PEANUT BUTTER SWIRL BROWNIES

IMG_1888.jpeg

This past week was pretty eventful due to the fact that Alex and I took care of my mom’s two dogs while she was away on vacation. Lily and Oliver are like my babies and are the cutest pups in the world, but they require a lot of attention. Not having any pets of our own at the moment, mostly because we live in an apartment, we realized just how much work and responsibility goes into taking care of dogs, and by the end of the week, we joked that the dogs were our children because they were all we talked and thought about every day. Even though I barely slept (the dogs are used to sleeping on beds and will give you hell if you don’t oblige), I’m honestly so sad that they’re gone and back at my mom’s. The apartment is so quiet and lonely and I’m counting down the days until we can get a cat (no dogs until we own a house with a yard!).

IMG_1844.jpeg

I don’t know how today’s recipe - peanut butter swirl brownies - is my first one featuring peanut butter, considering I eat the stuff every single day. I got my love for peanut butter from my mom at a young age when I’d see her walking around the house with a spoonful of it as a snack (ahem, dinner). Of course back then, it was all about commercial brand peanut butters like Jif or Skippy, but I’ve grown up since then by upgrading to the natural varieties from Trader Joe’s or Whole Foods. Although these kinds are much healthier for you, using the commercial brands that have the added sugars and whatnot are usually the norm to use when it comes to making peanut butter desserts, and therefore the type of PB I want you to buy for this recipe. This is so we don’t have to worry about the natural oils or lack of sodium/sugar that is found in the natural types of PB.

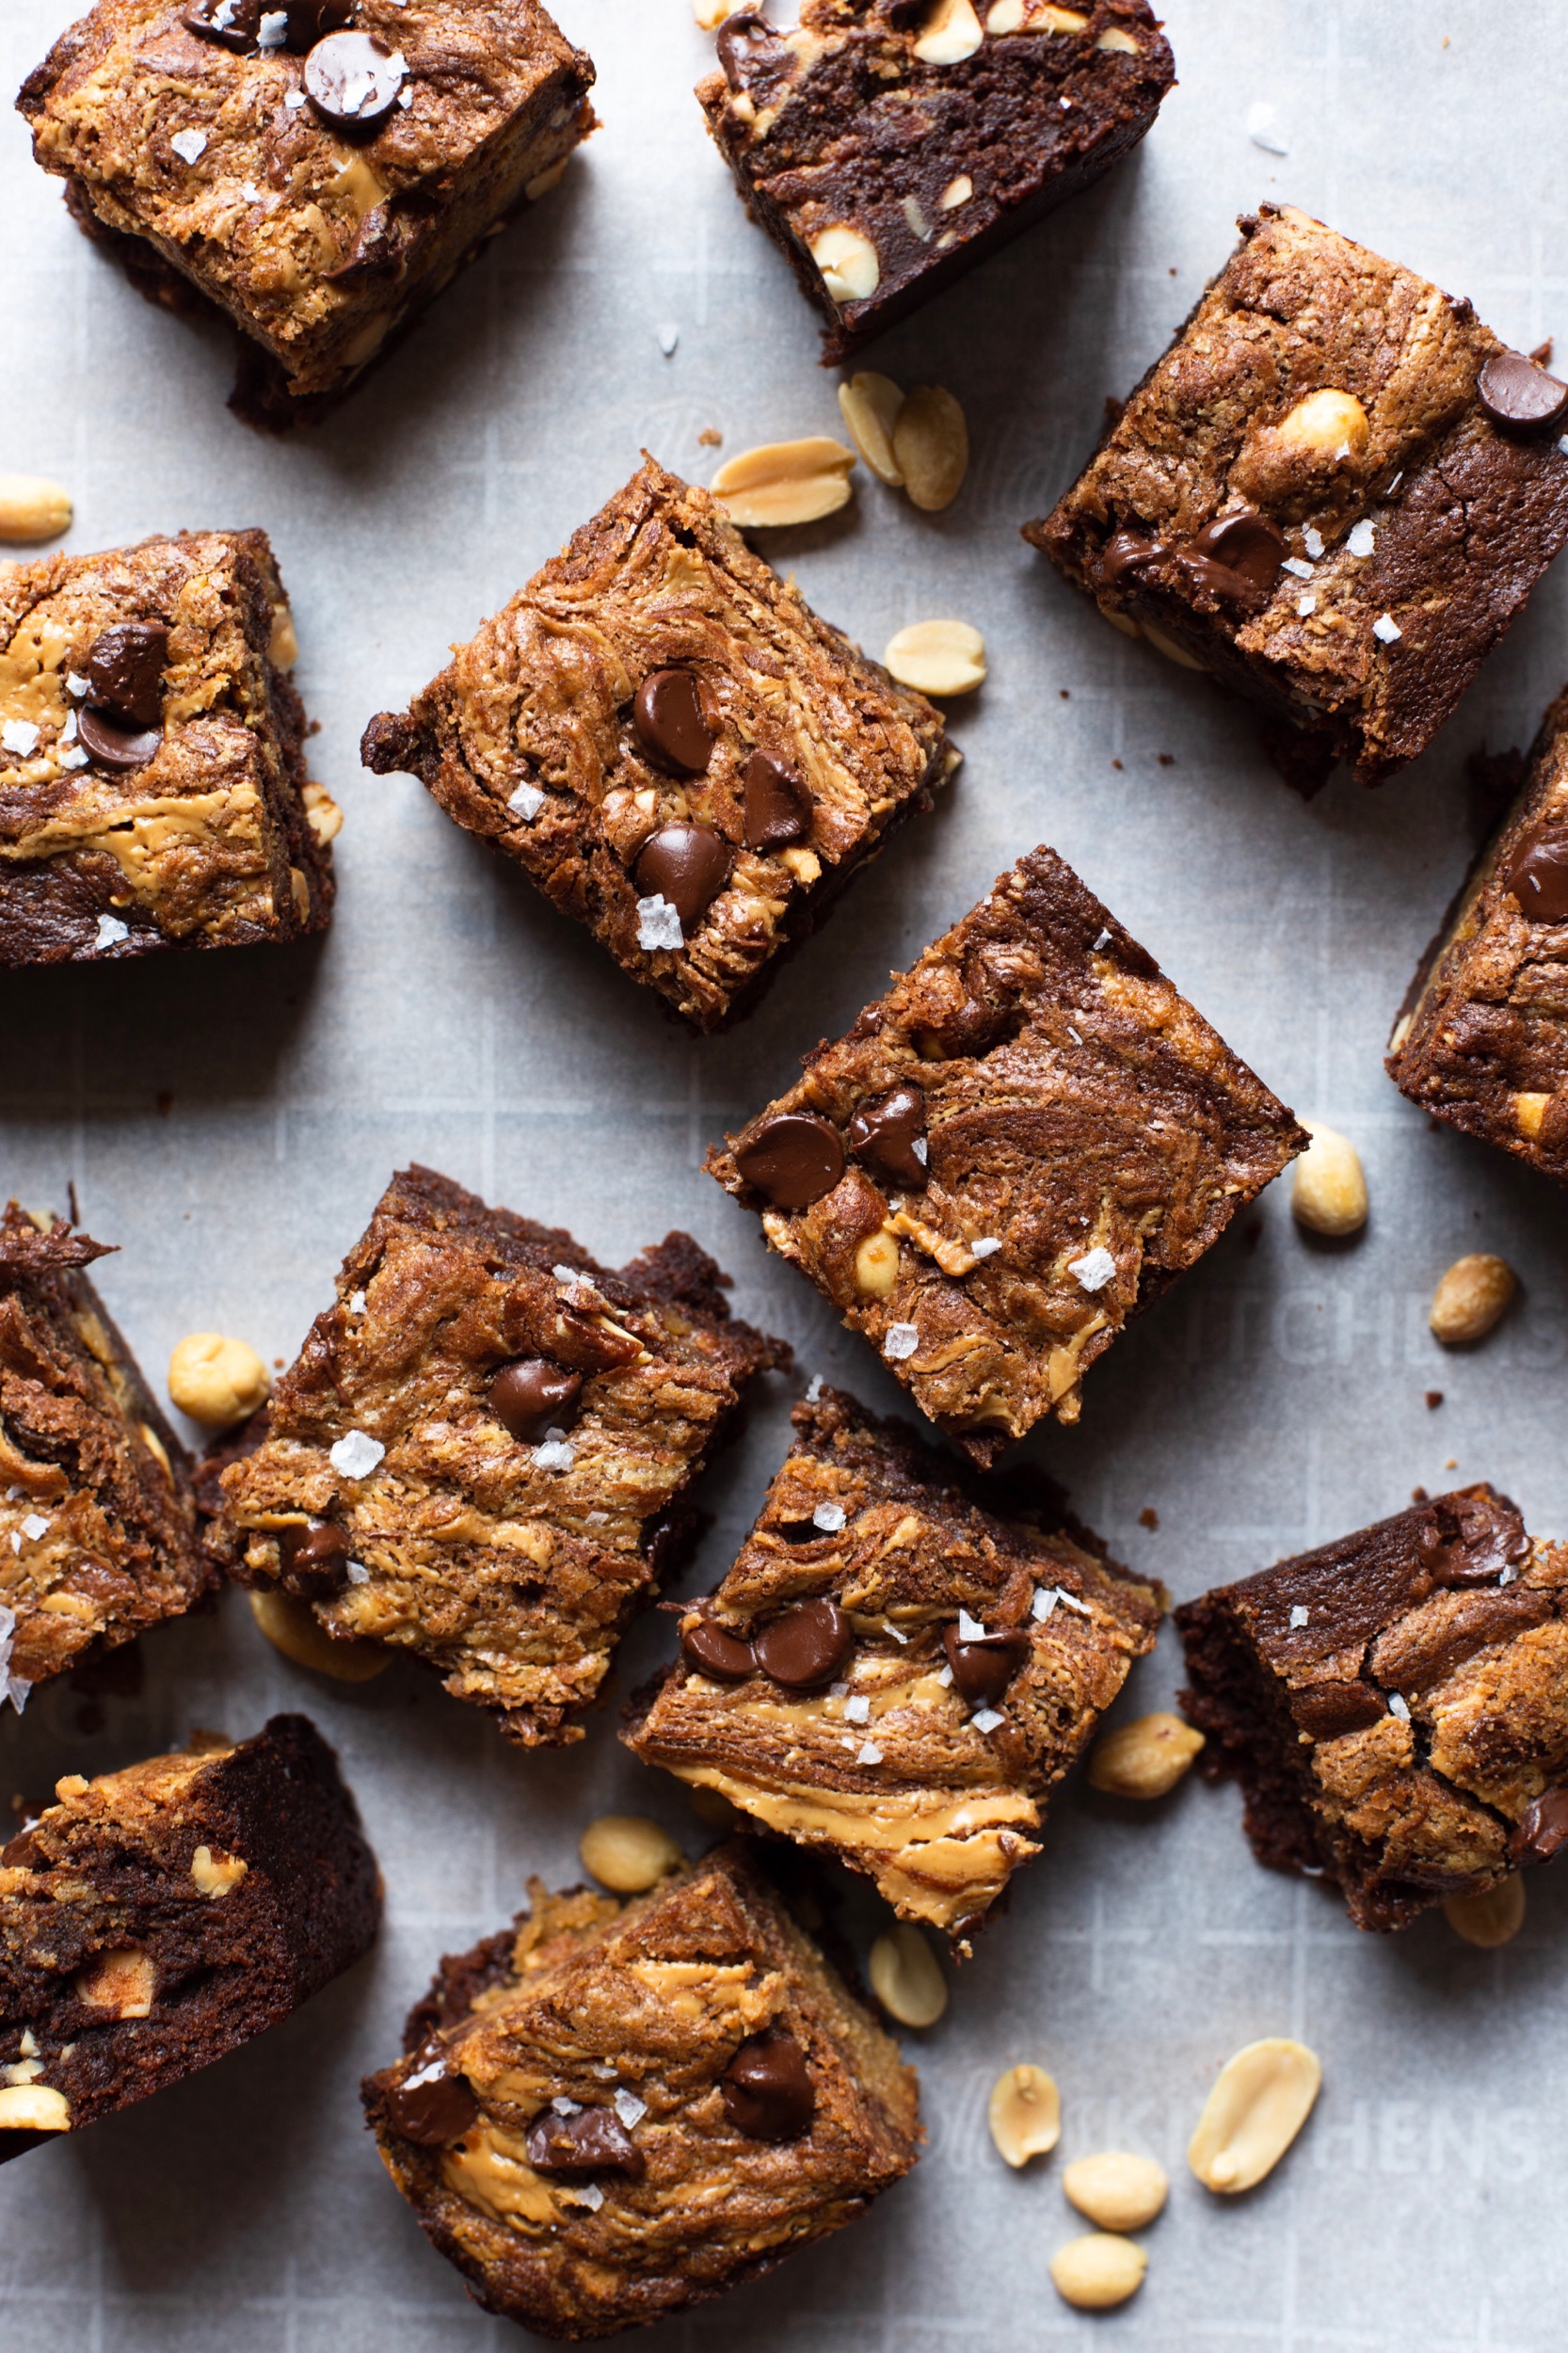
The only other brownie recipe on my site, my forever go-to chewy and fudgy brownies, is quite different from the jazzed up brownies in today’s post. These peanut butter swirl brownies are anything-but-basic, muuuch thicker, and filled with crunchy peanuts. I am normally not a fan of nuts in my brownies, but I really think the peanuts work well in these because you get double the peanut flavor and a nice added texture. To put it plainly: today’s PB brownies are very decadent, but that doesn’t mean it’ll stop you from having more than one piece at a time.

IMG_1832.jpeg

Looking at the recipe itself, I’m sure you’ll notice how I am also giving metric measurements (grams, milliliters) for the ingredients. When working with something messy like peanut butter, it’s so much easier weighing it out in a bowl set over a scale than with measuring cups which can be a pain to clean. Furthermore, I’ve made the recipe both ways, and although the consistency of the batters were a bit different, I could barely notice a difference after they came out of the oven. So if you can weigh your ingredients, certainly do it, and if not, don’t worry about it.

I hope everyone has a great Memorial Day Weekend! Alex and I are going to our first Cinespia screening of the year at the Hollywood Forever Cemetery (aka my favorite summer activity to do) and I cannot wait! The movie we’re seeing is Alfred Hitchcock’s Rear Window so it should be a pretty mixed crowd. I’m very excited to be sipping on a cocktail and snacking on these brownies, while surrounded by other cinephiles come Sunday.

E2A7C2EE-F2B0-4925-BA96-B6B3282E6B89.jpeg

Peanut Butter Swirl Brownies

Recipe slightly adapted from Smitten Kitchen

Ingredients

IMG_1893.jpeg

For the peanut butter batter:

  • 3/4 cup (190 grams) smooth peanut butter

  • 2/3 cup (135 grams) granulated sugar

  • 1 large egg

  • 1/4 tsp. vanilla extract

  • A good pinch of coarse sea salt

For the brownie batter:

  • 1/2 cup (115 grams) unsalted butter

  • 3 oz. (85 grams) unsweetened chocolate (like this one), roughly chopped

  • 1 1/4 cup (250 grams) granulated sugar

  • 2 large eggs

  • 1 tsp. (5 ml) vanilla extract

  • 1/4 tsp. espresso powder (optional but recommended - it helps intensify the chocolate flavor)

  • 1/4 tsp. coarse sea salt

  • 2/3 cup (85 grams) all-purpose flour

  • 1/2 cup (60 grams) chopped toasted peanuts

  • 1/4 cup (40 grams) chocolate chips, semisweet or bitter

  • Flaky sea salt or confectioners’ sugar, to finish

Directions

  1. Preheat the oven to 350°F. Line a 8in. square baking pan with parchment paper and then grease the pan (bottom and sides) with cooking spray or butter. Set aside.

  2. Make the peanut butter batter: In a medium bowl, whisk all ingredients together until well combined and smooth.

  3. Make the brownie batter: In a microwave-safe bowl, melt the butter and unsweetened chocolate together. Do this in 30 second intervals, stirring well after each time, being careful not to burn the mixture. Once melted, transfer the mixture into a large bowl. To this, add the eggs one at a time, whisking well after each addition. Then add the vanilla extract, espresso powder (if using) and salt. Whisk until combined. Using a spatula, fold in the all-purpose flour until no dry ingredients remain. Stir in the chopped peanuts.

  4. Pour a thin layer (about a 1/3 of the batter) of the brownie batter into the baking dish and spread evenly. Take the peanut butter batter and drop big spoonfuls of it in a random fashion over the thin layer of brownie batter. Use the rest of the brownie batter and fill in the spaces between the peanut butter batter so that it looks like image #2 above. Using a butterknife or wooden skewer, start to swirl the brownie and peanut butter batters together. Don’t worry if you don’t get perfect swirls, the flavor will still be there. Sprinkle the chocolate chips over the top.

  5. Pop the baking dish in the oven and bake for 30-35 minutes or until a toothpick inserted in the center comes out fairly clean (a few crumbs are okay). Sprinkle with flaky sea salt and/or confectioners’ sugar. Allow the brownies to cool completely before cutting - this makes it much easier and gives you cleaner pieces.

VICTORIA SPONGE CAKE

IMG_1563.jpeg

Another trip to Portland, Maine has come and gone, and once again I’m counting down the days until Alex and I can return. This being our third time visiting Portland, we went with the plan of hitting up our favorite spots that we miss while back at home (Bonobo for our favorite pizza, Belleville for the best croissants I’ve ever had, Ruski’s for drinks, etc.), but made it a point to try things that we never had time to try on prior trips. And thanks to finally having a rental car, we were able to leave the peninsula and see places that I always had wished to.

Among these must-see places were: Palace Diner in Biddeford for a perfect breakfast set in a 15-seat dining car; driving up to Yarmouth to check out More and Co. - a shop that sells amazing ceramics and glassware.; and hiking around Mackworth Island, where fairies apparently live (don’t ask). But most importantly, with a car, we were able to make the trek up north to see Mount Desert Island, home to Acadia National Park. Since we only spent one night in MDI, I don’t have that many tips** on what to do or see (besides the basic tourist-y locations in the park), and therefore, I won’t be giving a guide for MDI. BUT, I did update my Portland City Guide post and added some new spots that I deemed worthy of checking out, with a few of them being a short car ride away from the peninsula.

IMG_1465.jpeg

And now, it’s time for baking again. Leading up to our trip to Maine and the week after we came home, I tried my best to eat as “cleanly” as possible. This pretty much meant no sweets, dairy, or alcohol, which was a lot easier than I thought it would be especially since Alex joined me in on this “detox”. But it also meant taking a mini break away from the blog because what fun is it to post something for you guys when I can’t eat it? No fun at all.

Today’s recipe is for a cake that I didn’t even know existed until watching an episode of the Great British Bake Off - the only baking competition show that I enjoy and cherish. I won’t go into detail about the show because I’m sure most of you have at least heard about it, but if you haven’t given the show a watch yet, I strongly recommend you do so (all the episodes are available on Netflix). In one of the season finales, the remaining three contestants had to make a quintessential British cake called a Victoria Sandwich, also known as a Victoria sponge cake. This very traditional layer cake has been around since the Victorian era and is essentially two sponge cakes with raspberry jam and/or a whipped cream OR buttercream frosting sandwiched between, with a generous dusting of confectioners’ sugar on top.

IMG_1505.jpeg

There is much debate on what is most traditional - having a whipped cream or buttercream frosting filling - and after some research, it honestly seems like it’s split down the middle. On the GBBO, the contestants were asked to make one of the judge’s, Mary Berry, version of the simple cake, with raspberry jam and a buttercream frosting. But today, I am giving you a recipe with a whipped cream filling and instead of raspberry, a strawberry jam. I felt like adding a buttercream frosting would make the cake too decadent and I wanted my cake to be more reminiscent of a strawberry shortcake, which is light and fresh. As for using strawberry jam instead of raspberry, that’s due to my preference over the two as well as how amazing the strawberries have been recently at my local farmers market. Therefore, I also added fresh strawberries to the filling, which definitely isn’t the standard, but I think a welcomed addition.

IMG_1600.jpeg

This recipe is kind of perfect to me due to the fact that it is equal parts easy to bake, beautiful to look at, and insanely delicious. Those three vital components are what I look for in recipes and its those dishes that I continue to bake time and time again. The cake layers come together rather quickly (only bake in the oven for less than 30 minutes) and nothing is easier than making fresh whipped cream and cutting up strawberries. If you want to make your own jam, by all means go ahead, but if we really want to call this a simple and quick recipe, store bought will definitely come in handy.

The two layers of sponge cake should be as identical as possible due to the fact that there’s no hiding any flaws that would normally be covered up with frosting. Much like my carrot cake, a Victoria sponge cake is “naked” and therefore you want to make sure the layers are even so the cake looks uniform. But as for the filling, I like having it more rustic-looking with the whipped cream and jam spilling out, especially when you slice into the cake. In my opinion, I think it makes the cake look more appetizing since the ingredients are more on display. The contrast of the perfect cake layers with a “messy” filling makes it that much more beautiful.

If you’d like to go more traditional, then definitely stick with the raspberry jam, or you can fill it with any other jam/fruit that your heart desires. I plan on making a couple Victoria sponge cakes for my sister’s baby shower in July (yes, I’m going to be an aunt!) with one being filled with an assortment of berries and another filled with an in-season stone fruit like apricots or peaches.

IMG_1725.jpeg

(*My only tip is to go to Momo’s Cheesecakes in Ellsworth, Maine. It’s a shop located in a garage that is open 24/7 with an assortment of cheesecake slices to choose from. Alex and I got a slice of blueberry cheesecake (which we immediately ate outside the garage at 10 am) and were genuinely disappointed in ourselves for not having more cash on us… it’s cash only and an honor system, meaning you drop the cash in a little box since no one is working the shop at all hours of the day. 10/10 recommend and now I kind of want to open up my own 24/7 cheesecake shop).

Victoria Sponge Cake

Yields (2) 8-inch cakes

Recipe adapted from the New York Times

Ingredients

  • 1 1/3 cups all-purpose flour

  • 3 1/4 tsp. baking powder

  • 1/2 tsp. kosher salt

  • 12 tbsp. (1.5 sticks) unsalted butter, room temperature

  • 3/4 cup plus 2 tbsp. granulated sugar

  • 3 large eggs, room temperature

  • 2 tbsp. milk, whole or 2% preferably

  • 1/2 - 3/4 cup strawberry jam, homemade or store bought (no judgement!)

  • 1 cup heavy cream

  • 1 tbsp. granulated sugar

  • 1/2 tsp. vanilla extract

  • 8 oz. fresh strawberries, hulled and sliced in half or quarter, depending on size (save some for garnish)

  • Confectioners’ sugar, for topping

Directions

  1. Preheat the oven to 350°F. Grease two 8-inch cake pans and line the bottoms with parchment paper. Set aside.

  2. In a medium bowl, whisk together the flour, baking powder and kosher salt.

  3. Using a stand mixer fitted with the paddle attachment (or in a large bowl if using a hand mixer) cream the butter and sugar together on medium speed until light and fluffy, about 2-3 minutes. Add the eggs, one at a time, and mix fully until adding each one. Pour in the milk and mix again. Scrape down the sides of the bowl.

  4. With the mixer off, pour in the flour mixture and mix until just combined. Evenly distribute the batter between the two cake pans (a scale would be useful here) and smooth the tops using a spatula.

  5. Bake in the oven for 25-30 minutes or until a toothpick inserted in the middle of the cake comes out clean. Allow the cakes to cool in the pan for about 10 minutes before transferring to a cooling rack. Let the cakes cool completely before adding the filling.

  6. Meanwhile, make the whipped cream. In the bowl of a stand mixer fitted with the whisk attachment, whisk the heavy cream, granulated sugar and vanilla extract until stiff peaks are formed.

  7. Take one of the cake layers (preferably the least attractive of the two) and place it on your desired cake stand or plate. Spread an even layer of the jam over the cake using an offset spatula or butterknife. Next, add about 3/4 of the whipped cream and spread evenly over the jam - leftover whipped cream can be used for serving. Over the whipped cream, arrange a layer of the fresh strawberries as evenly as possible. Place the second sponge cake on top and dust with confectioners’ sugar. Enjoy!

MY FAVORITE BANANA BREAD

IMG_1122.jpg

April has been a pretty exciting and busy month so far, but the best has yet to come. This Friday, even though I’ve lived in southern California all my life (minus college time), I am finally visiting Joshua Tree for the first time ever! How I made it almost 30 years without venturing to one of the most popular and beautiful deserts in the state (and country!) is beyond me, but I tend to make up for all that lost time by exploring and hiking around as much as humanly possible. And then… Alex and I will be landing in Portland, Maine on the last day of this month, so I’m pretty much counting down every day with too much excitement.

Today I’m sharing another one of my favorite standby recipes which I’m surprised took me so long to post: banana bread. I have a funny (re: picky) relationship with bananas: I absolutely do not like to eat them by itself mostly due to its texture, but I add them to my daily smoothies and I could live off of banana bread if I had the choice. It’s strange, I know, but I think that my dislike of bananas should be a testament to how good my banana bread is! If I could hate plain bananas, but love banana bread… I must be doing something right with this recipe.

IMG_0965.jpg

I don’t think there’s anything better than the smell of banana bread baking in the oven. I know a lot of people talk up the smell of fresh chocolate chip cookies, but I gotta say that the scent of fresh banana bread is up there as one of my most cherished scent “memories”. Even though the scent makes you want to eat the bread as soon as it comes out of the oven, I strongly advise against this! I come from the mindset that banana bread is 100 times better the next day and the next day after that. The longer the bread sits, the banana flavor intensifies. And speaking of bananas, I want you to wait to use your bananas until they look like fruit flies are going to eat them. Sorry for the gross visual, but the riper the bananas are, the more flavor and sweetness we’ll get from the fruit. I feel like this wait period is what sets a good banana bread from an exceptional one.

It took me a while to find my favorite version of banana bread, but the one I’m giving today is by far the best one I’ve ever come across. We all have our personal preferences when it comes to the popular loaf cake: some believe that adding chocolate chips is a must; some believe that adding yogurt or sour cream will give it the best moist texture; and some think nuts aren’t necessary. I believe that the best banana bread doesn’t have chocolate (I feel like it overpowers the banana flavor too much), needs sour cream for flavor and texture, and pecans must be added for a much needed crunch in each bite. Besides that, I don’t have any other notes or suggestions for this recipe! It’s pretty straight-forward, but trust me, it’ll quickly become a staple in your household after inhaling an entire slice.

IMG_1230.jpg

This is where the link will jump to

My Personal Favorite Banana Bread

Yields (1) 9x5” Loaf Cake

Recipe adapted from Epicurious

Ingredients

IMG_1011.jpg
  • 1 2/3 cup all-purpose flour

  • 1 tsp. ground cinnamon

  • 1/2 tsp. freshly grated nutmeg (ground will work as well)

  • 1 tsp. baking powder

  • 1/2 tsp. baking soda

  • 1/2 tsp. kosher salt

  • 1/2 cup (1 stick) unsalted butter, room temperature

  • 1 cup dark brown sugar, packed

  • 2 large eggs, room temperature

  • 4 large ripe bananas (about 2 cups), peeled and mashed with a fork

  • 1/4 cup sour cream

  • 1 tsp. vanilla extract

  • 1 cup toasted pecans, roughly chopped

Directions

  1. Preheat the oven to 350° F. Grease a 9x5” loaf pan with nonstick cooking spray (alternatively, you can butter and flour the pan). Set aside.

  2. In a large bowl, sift together the flour, cinnamon, nutmeg, baking powder, baking soda, and salt. Whisk to fully combine it.

  3. Using a stand mixer fitted with the paddle attachment, cream the butter and brown sugar together on medium speed until light and fluffy, a couple minutes. Add the eggs one at a time, mixing until each one is fully incorporated until adding the next. Add the mashed bananas, sour cream, and vanilla extract. Mix on medium speed until combined. Scrape down the sides of the bowl.

  4. Slowly add the dry ingredients to the stand mixer bowl while on low speed. Mix until the ingredients are fully incorporated. Using a spatula, fold in the chopped pecans.

  5. Pour the batter into the prepared loaf pan and smooth the top using a spatula. Bake in the oven for 60-65 minutes, rotating the pan halfway through. When ready, the bread will be a deep golden brown and a toothpick inserted in the center should come out clean. Allow the bread to cool in the pan on a cooling rack for 15 minutes. Run a butter knife around the perimeter of the bread and carefully turn it out onto a plate or platter.