CLASSIC CHEESECAKE W/ SOUR CREAM TOPPING

IMG_2830.jpg

Last year, I featured a cocktail recipe that was inspired by my trip to Berlin, Germany back in 2016. I won’t go into detail again about the trip (you can quickly read about it here if you’d like), but I spoke about how I had received an issue for Bon Appétit the month before leaving for Berlin, and luckily enough, that particular issue had an article dedicated to Berlin’s coolest neighborhoods and the best places to eat, drink and hang out. Besides taking the amazing advice to hit up an all-day cafe called ORA in Kreuzberg, I made a mental note to partake in the German ritual called “kaffee and kuchen”, translating to coffee and cake, that Bon Appétit mentioned. It essentially means having a meal between meals and simply is an excuse to relax and enjoy a cup of coffee and snack in the afternoon. Bon Appétit said that the best place to partake in this was a spot called Five Elephant, and that you had to get a slice of their cheesecake. So, before Alex and I were heading to a late lunch (at Burgermeister - another spot I strongly suggest visiting) we decided to make the journey to Five Elephant for afternoon Americanos and a slice of cheesecake.

Americanos and cheesecake at Five Elephant in Kreuzberg, Berlin

Americanos and cheesecake at Five Elephant in Kreuzberg, Berlin

And let me tell you: it was without a doubt one of my favorite meals of the trip. It was a beautiful day with perfect weather and we took our coffees and slice of cheesecake and sat at a table outside surrounded by locals. The cheesecake lived up to its reputation and we tried our hardest not to eat the entire thing before heading to our next meal. I’m pretty sure we failed.

IMG_2585-3.jpg

When I came home from the trip, I filled my mom in on everything that we did, including the best cheesecake I had ever had. When I showed her the picture of our cheesecake and coffee (the picture above), she noticed that the cheesecake had a layer of sour cream on top, which she told me was exactly the same way her mother (who was Czech) made it. My Babi (grandmother in Czech) sadly passed away when I was 10, so I don’t always remember the amazing desserts that she made, so her cheesecake had completely slipped my mind. Actually, what I regret most is that my little lazy kid self wasn’t more interested in helping my Babi out in the kitchen - I would have loved to have learned to bake all her Czech desserts. But luckily, I have my aunts and mom to call on when I need a “Babi” recipe, since they saved all of her recipe books and clippings from newspapers and magazines, and it was my aunts who helped me with getting Babi’s cheesecake recipe.

Earlier this week, when I took the first bite of my interpretation of Babi’s cheesecake, I was immediately transported back to Kreuzberg. Babi’s recipe tastes exactly like what I had at Five Elephant, and now every time I’ll bake it in the future, not only will it remind me of my time in Berlin and the wonderful trip I had there, but it also will be a tribute to Babi and will allow me to bring her back to life (in my kitchen at least). When I gave a piece of the cheesecake to my mom, she was ecstatic and quite emotional that she was able to taste that flavor again since she hasn’t had it since Babi passed away. I truly cannot wait to pass these recipes and my own onto my kids and grandkids and I just hope that they develop a passion for baking as I did.

IMG_2753.jpg

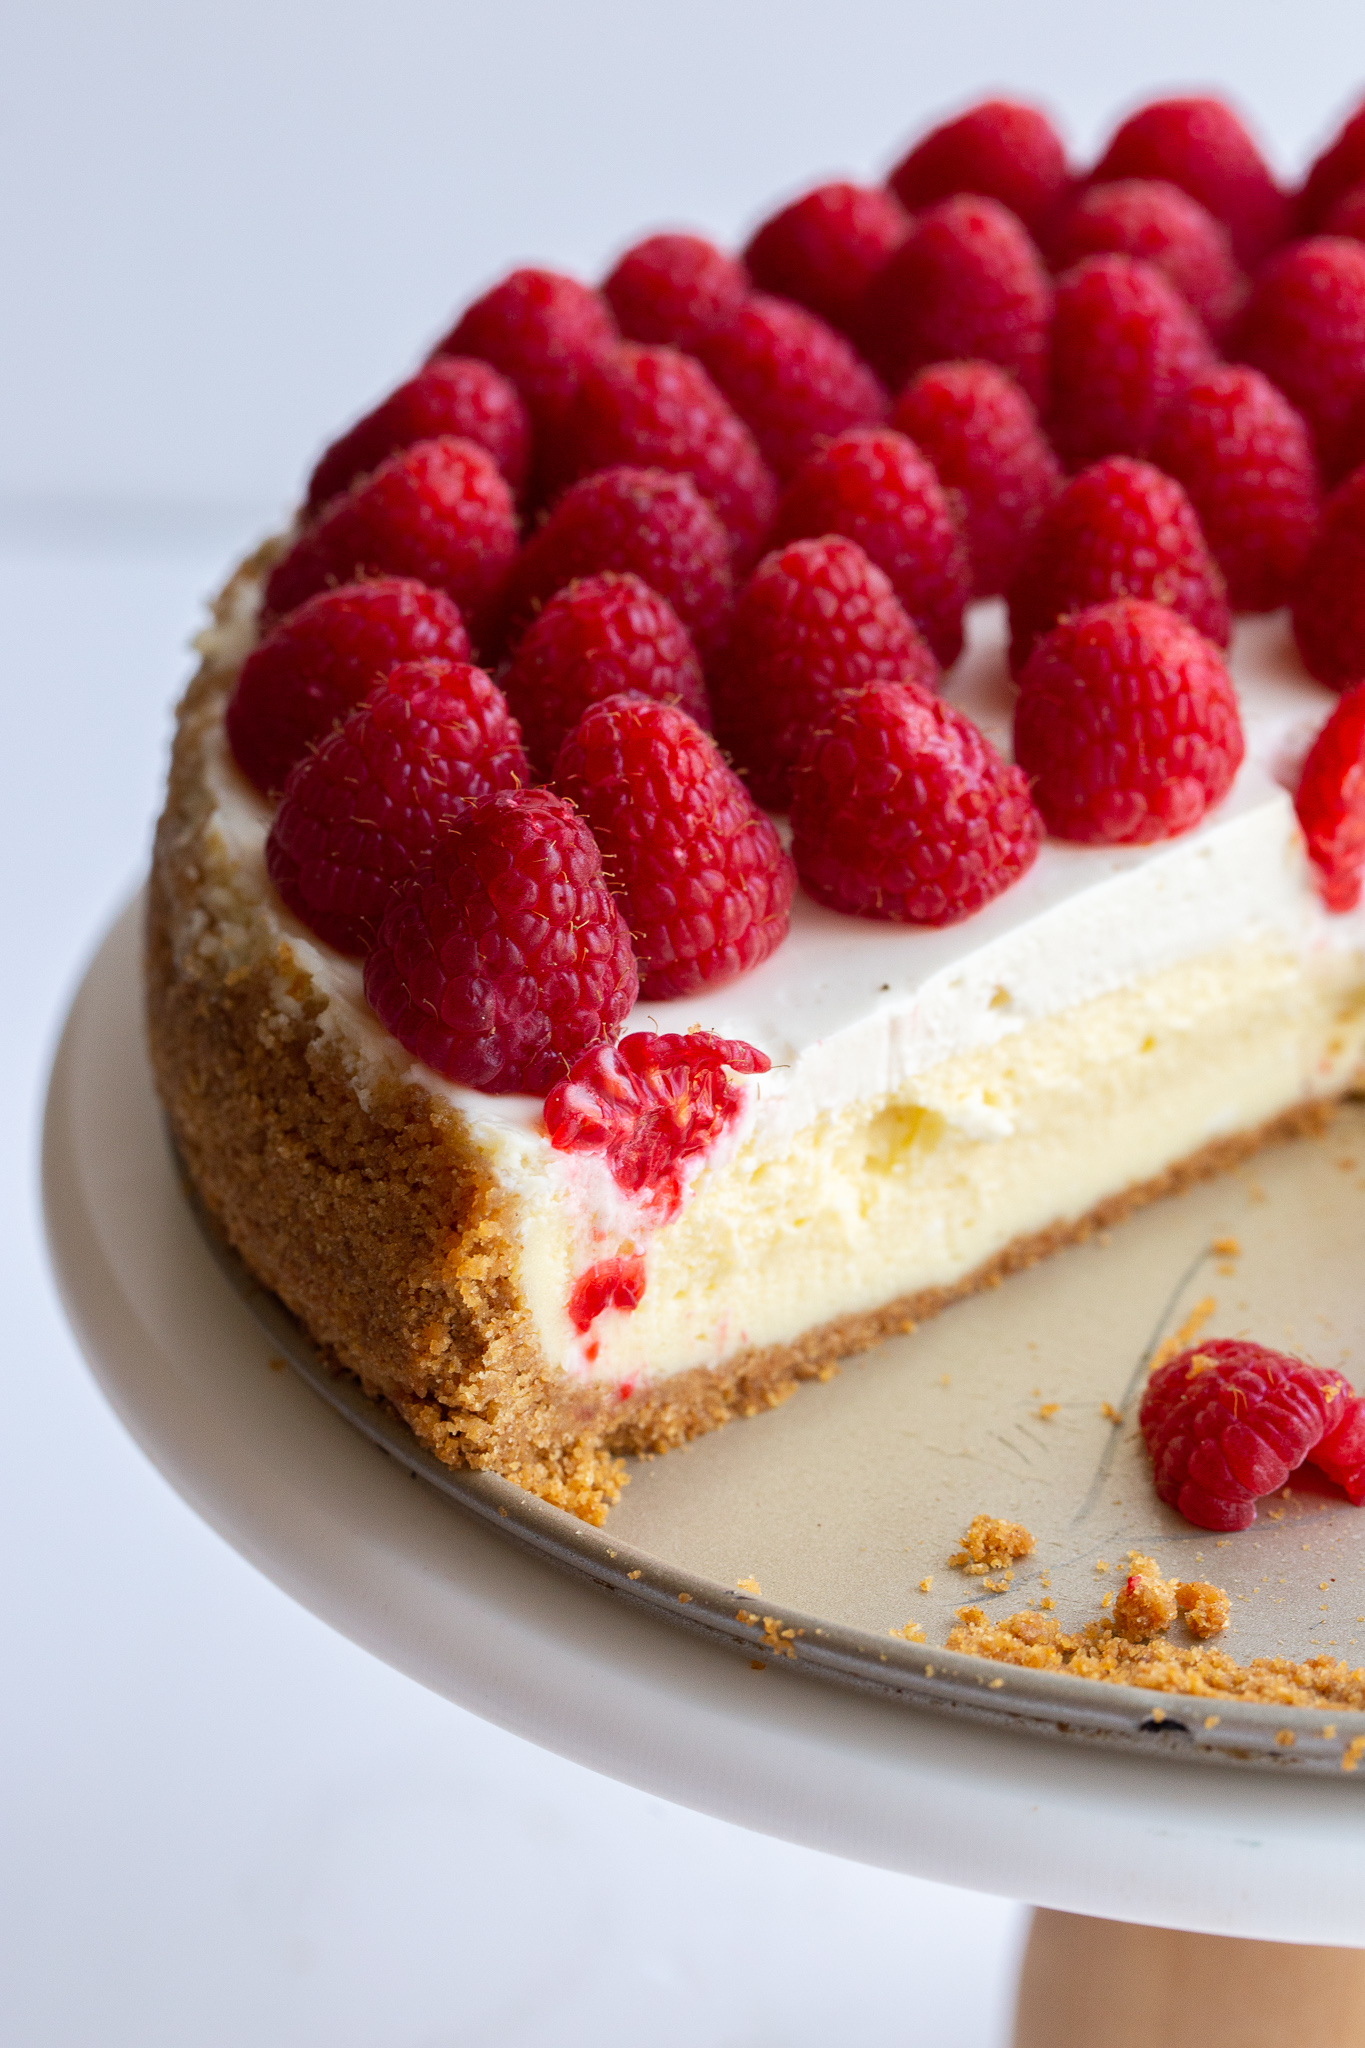
The cheesecake filling itself is extremely simple with only 4 ingredients - cream cheese, granulated sugar, eggs and vanilla extract. I usually recommend doing a water bath but since this is a smaller cheesecake, it only bakes for about 30 minutes, half the time compared to my other recipes. So therefore, I feel like going to the trouble of preparing the water bath isn’t worth the extra time or effort. I also made this cheesecake twice, once with a water bath and once without, and funny enough, I preferred the texture of the cheesecake without the water bath. AND although a water bath also aides in preventing cracks from occurring, there’s no need to worry about that due to the sour cream topping. The topping, consisting of sour cream, granulated sugar and vanilla extract, is poured over the baked and slightly cooled cheesecake, and then popped back into the oven for another 8-10 minutes. So any cracks or imperfections are hidden underneath the topping. And if for some reason your sour cream topping isn’t as smooth as you’d like, cover the top with fruit and you’re good to go.

If you’re not completely sold on the sour cream topping, trust me, it makes the cheesecake SO much better by adding more creaminess and tanginess. If you want, you can use less of the sour cream ( instead of a whole pint, you can use half) and just make a thinner layer.

P.S. interested in another Czech dessert? Here’s a recipe for palacinky aka Czech crêpes.

IMG_2773.jpg

Classic Cheesecake with Sour Cream Topping

Makes (1) 8 or 9 inch cheesecake

Recipe adapted from my Babi and aunt!

Ingredients

IMG_2738.jpg

For the crust:

  • 1 1/2 cups graham cracker crumbs

  • 3 tbsp. light brown sugar

  • 1 tsp. ground cinnamon

  • 5 tbsp. unsalted butter, melted

For the filling:

  • 2 (8 oz.) packages full-fat cream cheese, room temperature

  • 1/2 cup granulated sugar

  • 1 tsp. vanilla extract

  • 3 large eggs, room temperature

For the sour cream topping

  • 1 pint (16 oz.) sour cream

  • 1/4 cup granulated sugar

  • 1 tsp. vanilla extract

Directions

Make the crust:

  1. Move the oven rack to the lower-middle position and preheat the oven to 350°F.

  2. In a bowl, mix the graham cracker crumbs, brown sugar, ground cinnamon, and melted butter and transfer to an 8 or 9in. springform pan. Using the back of a measuring cup, firmly press the crust mixture into the bottom of the pan as well as the sides. Try to get the crust as evenly spread as possible. If the sides aren’t perfect, no worries.

  3. Bake in the oven for 10-12 minutes. Remove from oven and let cool while preparing the filling. Keep the oven on at 350°F.

Make the filling:

  1. In the bowl of a stand mixer fitted with the paddle attachment (or in a large bowl if using a hand mixer) beat the cream cheese on medium speed for 2 minutes, and then add in the sugar. Cream together for a few more minutes until no lumps remain and scrape down the sides of the bowl.

  2. Add the eggs one at a time on low speed, making sure each one is incorporated into the mixture before adding the next. Add the vanilla extract and mix until just combined. Turn off the mixer and finish mixing the filling using a spatula, making sure to get anything that may be down at the bottom of the bowl (this area usually gets left untouched when using a mixer). Pour the cheesecake filling into the pan and spread it evenly.

  3. Bake the cheesecake for 22-27 minutes. The center of the cheesecake will still have a wiggle to it, but the outer edges will be set. Take the cheesecake out of the oven and allow it to cool for about 15-20 minutes. Meanwhile, turn the oven temperature up to 450°F.

Make the sour cream topping:

  1. In a medium-sized bowl, whisk the sour cream, granulated sugar and vanilla extract together. Slowly pour the mixture over the top of the slightly cooled cheesecake and spread evenly using an offset spatula.

  2. Place the cheesecake back in the oven and bake for 10-12 more minutes.

  3. Allow the cheesecake to cool completely before transferring it to the refrigerator. Refrigerate the cake overnight/at least 8 hours before slicing into it.

FUNFETTI SPRINKLE SUGAR COOKIES

IMG_2509.jpg

Now that Memorial Day has come and gone, it is now - unofficially - summertime. My Memorial Day weekend ended up being pretty laidback and filled with dinners with family (both mine and Alex’s) and staying in to watch really random movies (Girl, Interrupted and Children of Men, if you’re curious) due to the rainy weather. As I had mentioned in my previous post, we were planning on attending our first Cinespia screening of the season but because of the crappy weather, the event was unfortunately cancelled. BUT we luckily were able to exchange our tickets and will be seeing The Goonies this weekend!

Today marks my 8th cookie recipe post on The Vivid Kitchen. Among those recipes, there have been a couple variations of the beloved chocolate chip cookie, a seasonal ginger molasses cookie that I wish I could eat year-round, and my personal favorite non-chocolate cookie: salted brown sugar toffee cookies. But for today, I’m giving you one of the most traditional cookie recipes around: a version of a sugar cookie. Unlike the ones you roll out and cut into shapes around Christmas time, these are baked just like normal cookies (the dough is scooped out with a cookie scoop).

IMG_2160.jpg

The texture on these sugar cookies is probably as close as it can get to my idea of cookie perfection. The cookie interior is very soft and chewy, while the exterior is more crisp. We get all of these ideal cookie textures from the addition of corn starch. I’ve made a handful of sugar cookies over the years, and without a doubt, I believe that it’s the corn starch that sets this recipe apart from the others.

If you can’t tell from the pictures, I made these cookies “bakery style” aka large-sized and, therefore, was only able to yield 9 cookies. I personally think these sugar cookies are better the larger they are because it makes them thicker and chewier overall, but I have made them regular-sized as well and they were a huge hit. So the choice is yours, but just make sure to adjust the baking time by a few minutes and keep on eye on them in the oven. These cookies are best when they are underbaked - you’ll only want a light golden browning on the edges - so definitely try not to overbake them.

IMG_2165.jpg

To jazz these plain sugar cookies up a bit, a good amount of colorful sprinkles are mixed into the dough. Normally, I’m not a sprinkles girl (I would rather add flaky sea salt to finish a baked good) but sprinkles honestly just work so well with these cookies. They add a subtle crunch in every bite, and of course, add color to an otherwise pale cookie. I suggest that you buy sprinkles that will not dye or stain the batter, so steer clear of nonpareils, the little sprinkle balls. The rainbow jimmies, the sprinkles that you see in my cookies, are a little bit more expensive than nonpareils but definitely will not bleed into the cookies. And if you don’t feel like spending extra money on sprinkles or just are not a fan of them, leave ‘em out and all will be fine.

IMG_2235.jpg

Making these cookies is super easy in that it’s a one-bowl recipe (less cleaning to do, which is always a plus), but there are a few things that need to be done to achieve sugar cookie perfection. The butter and egg need to be at room temperature when making the dough, and the finished dough needs to chill in the fridge for at least one hour. I feel like these are givens when it comes to most cookie recipes but I just wanted to clarify that these minor steps are actually vital to the finished product. As a reminder, using room temperature ingredients allows the dough to bind more easily, thus creating a more smooth and even texture, and chilling the dough yields a chewier texture and a more concentrated flavor. There’s a lot more to say about these two components of baking, but I’ll spare you and just say it’s important, so don’t skip it!

IMG_2490.jpg

Funfetti Sprinkle Sugar Cookies

Yields 9 LARGE cookies, or about 20 regular-sized cookies

Recipe slightly adapted from Posie Harwood of 600 Acres

Ingredients

  • 1/2 cup (1 stick) unsalted butter, room temperature

  • 3/4 cup granulated sugar

  • 1 egg, room temperature

  • 1 tbsp. vanilla extract

  • 1 1/2 cups all-purpose flour

  • 3/4 tsp. baking soda

  • 1 tbsp. cornstarch

  • 1/2 tsp. kosher salt

  • 2/3 cup sprinkles (preferably NOT nonpareils)

Directions

  1. In the bowl of a stand mixer fitted with the paddle attachment (or in a large bowl if using a hand mixer) cream the butter and sugar together until the mixture is light and fluffy, about 3 minutes. Add the egg and vanilla extract and mix again for a few more minutes.

  2. In a medium-sized bowl, add the flour, baking soda, cornstarch and salt and mix until just combined. Add this mixture all at once to the stand mixer and mix on low for about 10 seconds. Increase the speed to medium and mix until just combined - do not over mix. Using a spatula, fold in the sprinkles until evenly distributed. Refrigerate the dough for at least one hour. (Tip: you can scoop out the dough before or after chilling)

  3. Preheat the oven to 350°F and line a baking sheet with parchment paper. Using a cookie or ice cream scoop (depending on how big you want the cookies to be), scoop out the dough and place them on the sheet. If you’re making large cookies, do not put more than 6 cookies on a sheet.

  4. Bake in the oven for 10-12 minutes (8-10 if making smaller cookies). The cookies will be a light golden brown on the edges and just set when they are ready - they may look underbaked, but they won’t be since these are a softer texture of cookie. Allow the cookies to cool on the baking sheet for 5 minutes before transferring to a cooling rack.

PEANUT BUTTER SWIRL BROWNIES

IMG_1888.jpeg

This past week was pretty eventful due to the fact that Alex and I took care of my mom’s two dogs while she was away on vacation. Lily and Oliver are like my babies and are the cutest pups in the world, but they require a lot of attention. Not having any pets of our own at the moment, mostly because we live in an apartment, we realized just how much work and responsibility goes into taking care of dogs, and by the end of the week, we joked that the dogs were our children because they were all we talked and thought about every day. Even though I barely slept (the dogs are used to sleeping on beds and will give you hell if you don’t oblige), I’m honestly so sad that they’re gone and back at my mom’s. The apartment is so quiet and lonely and I’m counting down the days until we can get a cat (no dogs until we own a house with a yard!).

IMG_1844.jpeg

I don’t know how today’s recipe - peanut butter swirl brownies - is my first one featuring peanut butter, considering I eat the stuff every single day. I got my love for peanut butter from my mom at a young age when I’d see her walking around the house with a spoonful of it as a snack (ahem, dinner). Of course back then, it was all about commercial brand peanut butters like Jif or Skippy, but I’ve grown up since then by upgrading to the natural varieties from Trader Joe’s or Whole Foods. Although these kinds are much healthier for you, using the commercial brands that have the added sugars and whatnot are usually the norm to use when it comes to making peanut butter desserts, and therefore the type of PB I want you to buy for this recipe. This is so we don’t have to worry about the natural oils or lack of sodium/sugar that is found in the natural types of PB.

The only other brownie recipe on my site, my forever go-to chewy and fudgy brownies, is quite different from the jazzed up brownies in today’s post. These peanut butter swirl brownies are anything-but-basic, muuuch thicker, and filled with crunchy peanuts. I am normally not a fan of nuts in my brownies, but I really think the peanuts work well in these because you get double the peanut flavor and a nice added texture. To put it plainly: today’s PB brownies are very decadent, but that doesn’t mean it’ll stop you from having more than one piece at a time.

IMG_1832.jpeg

Looking at the recipe itself, I’m sure you’ll notice how I am also giving metric measurements (grams, milliliters) for the ingredients. When working with something messy like peanut butter, it’s so much easier weighing it out in a bowl set over a scale than with measuring cups which can be a pain to clean. Furthermore, I’ve made the recipe both ways, and although the consistency of the batters were a bit different, I could barely notice a difference after they came out of the oven. So if you can weigh your ingredients, certainly do it, and if not, don’t worry about it.

I hope everyone has a great Memorial Day Weekend! Alex and I are going to our first Cinespia screening of the year at the Hollywood Forever Cemetery (aka my favorite summer activity to do) and I cannot wait! The movie we’re seeing is Alfred Hitchcock’s Rear Window so it should be a pretty mixed crowd. I’m very excited to be sipping on a cocktail and snacking on these brownies, while surrounded by other cinephiles come Sunday.

E2A7C2EE-F2B0-4925-BA96-B6B3282E6B89.jpeg

Peanut Butter Swirl Brownies

Recipe slightly adapted from Smitten Kitchen

Ingredients

IMG_1893.jpeg

For the peanut butter batter:

  • 3/4 cup (190 grams) smooth peanut butter

  • 2/3 cup (135 grams) granulated sugar

  • 1 large egg

  • 1/4 tsp. vanilla extract

  • A good pinch of coarse sea salt

For the brownie batter:

  • 1/2 cup (115 grams) unsalted butter

  • 3 oz. (85 grams) unsweetened chocolate (like this one), roughly chopped

  • 1 1/4 cup (250 grams) granulated sugar

  • 2 large eggs

  • 1 tsp. (5 ml) vanilla extract

  • 1/4 tsp. espresso powder (optional but recommended - it helps intensify the chocolate flavor)

  • 1/4 tsp. coarse sea salt

  • 2/3 cup (85 grams) all-purpose flour

  • 1/2 cup (60 grams) chopped toasted peanuts

  • 1/4 cup (40 grams) chocolate chips, semisweet or bitter

  • Flaky sea salt or confectioners’ sugar, to finish

Directions

  1. Preheat the oven to 350°F. Line a 8in. square baking pan with parchment paper and then grease the pan (bottom and sides) with cooking spray or butter. Set aside.

  2. Make the peanut butter batter: In a medium bowl, whisk all ingredients together until well combined and smooth.

  3. Make the brownie batter: In a microwave-safe bowl, melt the butter and unsweetened chocolate together. Do this in 30 second intervals, stirring well after each time, being careful not to burn the mixture. Once melted, transfer the mixture into a large bowl. To this, add the eggs one at a time, whisking well after each addition. Then add the vanilla extract, espresso powder (if using) and salt. Whisk until combined. Using a spatula, fold in the all-purpose flour until no dry ingredients remain. Stir in the chopped peanuts.

  4. Pour a thin layer (about a 1/3 of the batter) of the brownie batter into the baking dish and spread evenly. Take the peanut butter batter and drop big spoonfuls of it in a random fashion over the thin layer of brownie batter. Use the rest of the brownie batter and fill in the spaces between the peanut butter batter so that it looks like image #2 above. Using a butterknife or wooden skewer, start to swirl the brownie and peanut butter batters together. Don’t worry if you don’t get perfect swirls, the flavor will still be there. Sprinkle the chocolate chips over the top.

  5. Pop the baking dish in the oven and bake for 30-35 minutes or until a toothpick inserted in the center comes out fairly clean (a few crumbs are okay). Sprinkle with flaky sea salt and/or confectioners’ sugar. Allow the brownies to cool completely before cutting - this makes it much easier and gives you cleaner pieces.