PÂTE BRISÉE + BLUEBERRY GALETTE

IMG_6917.jpg

With Mother's Day coming up this weekend, I figured I would share a few recipes this week that would be excellent for all the mamas out there. Typically, Mother's Day for my family entails some sort of mimosa-filled brunch followed by either shopping and/or going to the beach. Brunch seems to be a tradition that many other families partake in for the holiday, so today I'm providing a brunch "dessert", but let's face it, you can eat it at any time of the day you wish (hello breakfast). 

The dessert that I'm referring to is a galette. Galettes are my secret weapon in the baking world that I pull out when I want to impress people but most importantly, they are insanely easy to make. If you aren't aware of what a galette is, it is basically a freeform version of a pie: you do not bake it in a dish of any kind and form the shape of it yourself. With that said, a galette is rustic in nature and that's what makes it so cool; every one is unique in and of itself and there's no right way to do it necessarily. 

IMG_6478.jpg

But in order to have an amazing galette, we must back track a bit and learn how to make the foundation of it - the pie crust, or what we will refer to as the pâte brisée ("pie crust pastry" in French). To me, the pie crust is the single most important aspect of any pie or galette. The filling could be mediocre at best, but as long as the crust is flaky and buttery, I am happy as can be. 

For today's galette, I decided to keep it simple and provide you with a blueberry and lemon filling. But honestly, you can do whatever filling you want to! In the past I've taken the pâte brisée recipe and made a strawberry galette, a nectarine and blackberry galette, and even a lemon cheesecake (for this I used a pie dish). The recipe provided gives you two 8-10 inch pie crusts depending on how thin you roll it out, but you can make about a dozen hand pies with it or one gigantic galette. The sky is truly the limit with this recipe.

IMG_6653.jpg

With that said, the pie crust recipe that I am giving you today has been adapted to be on the sweeter side (1 tablespoon of sugar as opposed to 1 teaspoon) so feel free to scale back. I personally think the crust is perfect, but just know that there is room for adjustment. Also, if you want to use the pie crust for a savory pie, I would omit the sugar fully and leave everything else the same. 

IMG_6723.jpg

Lastly, I want to stress how easy it is to make both (pâte brisée and galette) of these recipes. I've made the pâte brisée countless times and just about every one of those times, I could have sworn that I did something wrong like adding too much ice water or over-mixing the dough, only to find that it still came out PERFECTLY. It really is a fool-proof recipe that I promise beginners can achieve. And once you get to forming the galette, that's honestly the fun part and shouldn't cause you any stress.

So for Mother's Day, make the pâte brisée and choose something to bake that your mother will love. Whether that be a berry galette, a rhubarb strawberry pie, or a dozen hand pies, make it for her and I promise you that you'll get more bonus points than your sister who only gave her a card. 

IMG_6892.jpg

Pâte Brisée

Makes 2 8-10 in. pie crusts

Recipe from Smitten Kitchen

Ingredients

  • 2 1/2 cups all-purpose flour

  • 1 tbsp. sugar

  • 1 tsp. course salt

  • 1 cup (2 sticks) unsalted butter, cold and cut into small pieces

  • 1/4 to 1/2 cup ice cold water

Directions

  1. In the bowl of a food processor fixed with the s-blade, mix together the flour, sugar and salt.

  2. Add in the butter, and pulse for about 10 seconds, or until the mixture resembles coarse crumbs with some larger chunks of butter.

  3. With the food processor on low, pour the water through the feed tube until the dough holds together, but is not sticky or too wet. You can test this by pinching the dough between your fingers - if it holds together, the dough is ready. If it's still too crumbly, add 1 tbsp. of water at a time until you've reached the right consistency. Do not over mix! This ensures a flaky crust.

  4. Turn out the dough onto a clean surface and divide in half. Shape each half into a disc and wrap individually in plastic wrap. Refrigerate the dough for at least one hour, if using soon. If not, the dough can be frozen for up to 1 month (allow the dough to defrost in the fridge overnight if frozen).

Blueberry Galette

Makes 1 galette

Ingredients

  • 1/2 recipe pâte brisée (one of the pie dough halves from the recipe above)

  • 2 1/2 cups fresh blueberries

  • 1 tbsp. cornstarch

  • 1 tbsp. lemon zest

  • 1 tbsp. fresh lemon juice

  • 1/4 cup granulated sugar

  • 1/4 tsp. salt

  • 1 large egg, beaten plus 1 tsp. water (for crust)

  • Raw/turbinado sugar, to sprinkle on crust

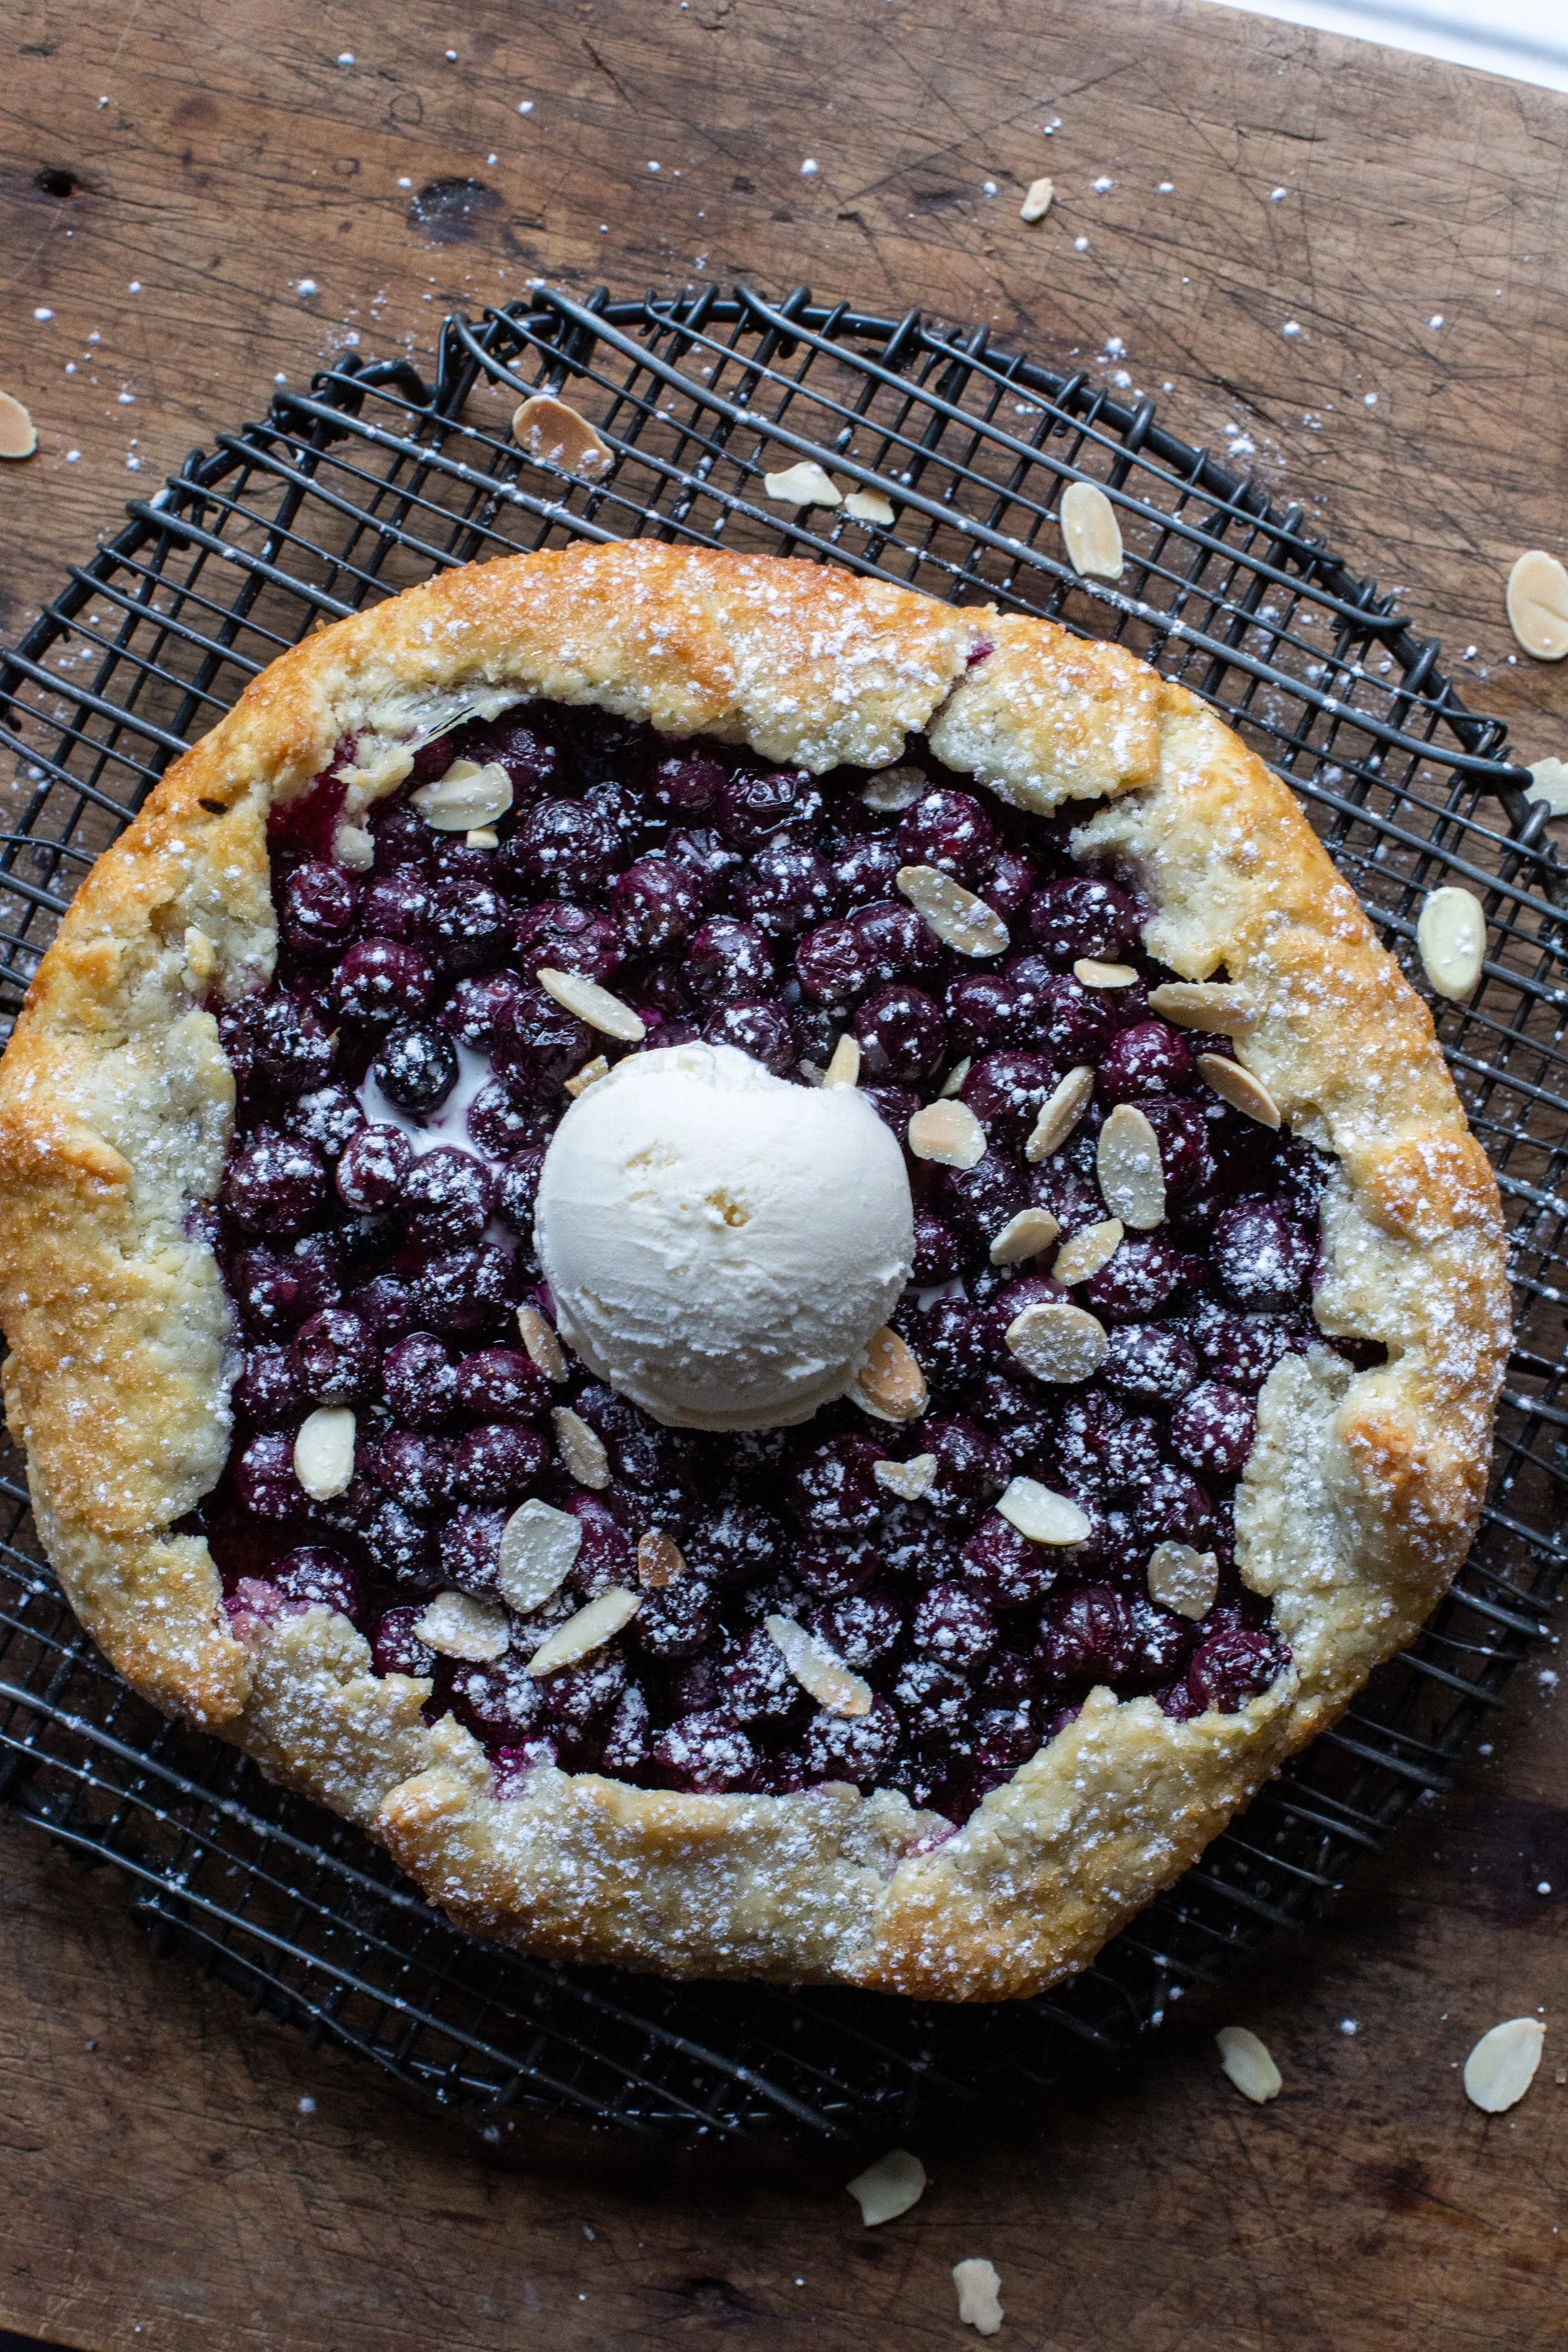
  • Confectioners' sugar, toasted sliced almonds, vanilla ice cream, to finish (optional)

Directions

  1. Line a baking sheet with parchment paper and set aside. Lightly flour a clean work surface and roll out the dough into about 12 inches round, flipping the dough over every once in a while as to prevent it from sticking. Transfer the dough onto parchment-lined baking sheet and refrigerate for about 15-20 minutes.

  2. While the dough is refrigerating, work on making the filling. In a bowl, gently mix the blueberries, cornstarch, lemon zest and juice, sugar, and salt.

  3. Preheat the oven to 400°F. Remove the dough from the fridge and let it sit for about 5 minutes or until it is workable. Spoon the filling into the center of the dough, being careful to leave about 2 inches of a border. If you're worried that not all of the filling will fit, take some out.

  4. Brush the 2 inch edges with the egg wash, and begin to push and tuck the dough inward over the filling, so that it provides a border. Once again, brush the border with the beaten egg and sprinkle with raw sugar.

  5. Bake in the oven for about 35-45 minutes, or until the blueberries are bubbling and the crust is golden brown.

  6. Transfer to a cooling rack, and if desired, sprinkle with confectioners' sugar, sliced almonds, and/or vanilla ice cream.

SPICY GRAPEFRUIT MARGARITAS

IMG_5330.jpeg

It appears that I have a theme going on this week - margaritas today and the Tres Leches cake from Tuesday - and yes, I did plan for this! Once I realized earlier this week that Cinco de Mayo was coming up, and I had already planned on making the Tres Leches cake, I knew it was a no-brainer to share a delicious margarita recipe.

Like I've mentioned before, going to a Mexican restaurant and ordering a couple rounds of margaritas with my carnitas plate is just about my favorite thing ever. Without a doubt, a traditional margarita is my drink of choice, mainly because tequila is my favorite liquor. 

DACFB6A8-EB06-4732-ADBE-5F3B56DBF3E7.jpeg
IMG_5129.jpg

Additionally, there's another tequila drink that I'm very fond of, and it actually is nowhere near as popular as margaritas are at Mexican restaurants here in America; that cocktail is the Paloma. A Paloma is tequila mixed with grapefruit soda (or juice) and lime juice, and poured over ice. So based on the ingredients, margaritas and Palomas are not too far off from one another, the only difference being that Palomas are always made with grapefruit, and margaritas are always sweetened using either orange liqueur/triple sec or agave nectar.

So today I'm sharing a margarita recipe that is quite similar to a Paloma: you'll get the subtle sweetness that a margarita promises from the agave nectar, as well as the delicious grapefruit flavor from the Paloma. I also decided to step it up a notch by making this a "spicy" margarita by including a few slices of serrano or jalapeño chile peppers. If you're not a fan of spiciness, I totally understand because I know it's not for everyone; you can just leave the peppers out entirely. It'll still be an amazing cocktail! 

IMG_5327.jpeg

Just in case you didn't know, cocktail recipes are given in measurements of ounces. To make this easier for yourself, I strongly suggest in purchasing a jigger, which is the proper way to measure out cocktails. Jiggers may come in a variety of sizes, but the standard one (and the one I own) gives you 1 and 2 oz. measurements. Also, I want to make it clear that this recipe yields only one cocktail! So double or triple your measurements accordingly. Enjoy and please drink responsibly!

IMG_5326.jpeg

Spicy Grapefruit Margaritas

Makes 1 large cocktail

Ingredients

IMG_5332.jpeg
  • kosher salt, for the rim

  • 3 oz. silver tequila

  • 3 1/2 oz. fresh or store-bought grapefruit juice

  • 1 1/2 tbsp. agave nectar (or triple sec)

  • 2 oz. fresh lime juice

  • 2-3 thin slices of serrano or jalapeño peppers (more or less, depending on how spicy you like it)

  • lime and serrano/jalapeño slices to finish

Directions

  1. Salt the rim of your margarita glass, add ice and set aside.

  2. In a cocktail shaker, combine tequila, grapefruit juice, agave nectar, lime juice, serrano/jalapeño pepper slices, and a handful of ice. Shake the mixture for about 10 seconds (the longer, the more spicier the drink will be).

  3. Strain the mixture into the prepared glass, and top with lime circles and/or more serrano/jalapeño slices, if desired. Sip and enjoy!

TRES LECHES CAKE

In case you haven't looked at a calendar, watched the news, or glanced at your phone... today marks the first day of May! Normally I would feel pretty indifferent about this, but this year I'm welcoming May with open arms: next month my sister, Tianna, is getting married! To say that I am ecstatic is a complete understatement, and even though a lot of planning and coordinating must be done from now until the big day, I know it will all come out perfectly!

For the wedding, not only am I in the wedding party, but I also have been asked to make ALL the desserts, including the wedding cake (the wedding will have over 100 people). When my sister had asked me months ago to do the desserts, I was pretty hesitant (read: HORRIFIED) and was worried that I would mess something up and ruin the day. But after much thought and talking to my friends and family, I decided I would be crazy not to. Doing the desserts for a wedding will be my biggest accomplishment thus far in my baking career, and I know that after the day is over, I will feel pretty triumphant. And if I screw something up, like burning the cookies or making an uneven cake (knock on wood), life will go on and I'm sure we'll all get a good laugh out of it.

I'm not going to reveal what I'm baking just yet, but one idea I had was to make this Tres Leches cake. For dinner at the wedding, we are eating tacos with rice and beans and plenty of chips and salsa, catered by an amazing taco spot in Los Angeles (Sky's Gourmet Tacos), so I figured a Mexican/Latin American cake would work out perfectly. But alas, my sister and her fiancé decided on something more simple and easier for me to bake, so I happily obliged. 

IMG_9541.jpg

With that said, a Tres Leches cake is still a wonderful option for any type of celebration, especially considering what this Saturday is (Cinco de Mayo!!!). I personally have made it for birthday parties (including my boyfriend's 30th) and backyard BBQs and it's always a hit. For those of you who don't know, "tres leches"  translates to "three milks". This has to do with soaking the cake in a combination of sweetened condensed milk, evaporated milk, and heavy cream.  Additionally, there is whole milk baked into the cake so it's safe to assume that anyone who is lactose-intolerant should stay far away from this cake and allow the milk fans to enjoy it!

The recipe for a Tres Leches cake can be broken down into three components: 1) the baking of the cake 2) the "poke and soak" aspect that entails filling the cake with a liquid and 3) the topping. All three components are quite straightforward and shouldn't give you any trouble unless you are not familiar with beating egg whites into soft, and eventually, stiff peaks. This step is important in making a perfect texture for the cake, and so I would suggest clicking here if you need some guidance.

Lastly, you may choose to decorate the cake in whichever way you wish.  Usually, the cake slices will have a maraschino cherry on top but I also like to add a good amount of sprinkles (I got this idea via the restaurant Trois Familia in Los Angeles). Whichever way you choose, it'll still be beautiful with the fresh whipped topping.


Tres Leches Cake

Recipe adapted from Smitten Kitchen

Ingredients

  • Butter and flour for cake pan, or nonstick cooking spray

  • 1 3/4 cup all-purpose flour

  • 1/4 cup cornstarch

  • 2 tsp. baking powder

  • 1/2 tsp. kosher salt

  • 6 large eggs, whites and yolks separated, room temperature

  • 2 tsp. vanilla extract

  • 1 1/4 cup sugar

  • 1/4 cup whole milk

  • 1 12 oz. can evaporated milk

  • 1 14oz. can sweetened condensed milk

  • 1 1/2 cup heavy cream

  • 1-2 tbsp. dark rum (optional)

  • 2 cups heavy cream (this is for the whipped cream topping)

  • 2 tbsp. confectioners' or granulated sugar (for whipped cream topping)

Directions

  1. Preheat oven to 350°F. Generously butter and flour (or spray with nonstick cooking spray) a 9" by 13" baking pan and set aside.

  2. In a small bowl, whisk together flour, cornstarch, baking powder and salt.

  3. In the bowl of a stand mixer fitted with the whisk attachment (or in a large bowl if using a hand mixer), beat the egg whites on medium speed until soft peaks form. With the mixer still going, slowly add the sugar and bring the speed up to medium-high until stiff peaks form. Add the vanilla extract and mix until incorporated.

  4. To the bowl, add one egg yolk at a time, mixing thoroughly before adding another. Add the whole milk and beat until combined, followed by adding the flour mixture in three additions.

  5. Pour the batter into the baking dish and bake in the oven for 18-24 minutes (or until a toothpick inserted in the center comes out clean). Allow cake to cool completely before moving on to the next step.

  6. In a large bowl, ideally one with a spout, whisk together the evaporated milk, sweetened condensed milk, heavy cream, and rum (if using). Using a toothpick or a fork, poke holes all over the cake including the edges, and pour the liquid milk mixture on top. Refrigerate the cake for at least a couple of hours, but if time allows, refrigerate overnight. The more time the cake sits, the more time for the cake to absorb the liquid.

  7. After refrigerating, make the whipped cream topping. In the bowl of a stand mixer using the whisk attachment, beat together the heavy cream (2 cups) and sugar (2 tbsp.) until soft peaks form. Spread evenly over the cake, top with maraschino cherries and/or sprinkles, and enjoy!