OLIVE OIL AND MAPLE GRANOLA

IMG_2290.jpg

When it comes to food, I am definitely a creature of habit. I rarely stray from ordering the same menu item from my favorite restaurants for fear of being disappointed with my decision. There are actually some restaurants where I've been ordering the same thing since I was a kid, which could either mean I had a refined palette as a child or that I now have the same palette as an 11 year old (I'd probably go with the latter).

My stubbornness, for lack of a better word, doesn't necessarily mean that I'm not adventurous when it comes to trying new foods. It just means that I know exactly what I like, and when I crave it, I get it! It's that simple. This mindset also is reflected in what I eat at home, especially for breakfast. 

IMG_2197.jpg

For the past three years, I've been eating the same exact thing for breakfast for about 90% of those days (the other days include breakfast eaten out, being on vacation, or making something else). My breakfast is a piece of Ezekiel Bread, toasted, and slathered with natural peanut butter that has flax and chia seeds in it, with a side of mixed berries and homemade cold brew. I LOVE this meal so much so that I go to bed excited knowing I'll be enjoying it within 8 hours. It's the perfect amount of food because I work out about 45-60 minutes afterwards, and it's full of all the good things (fiber, protein) that my body needs.

IMG_2221.jpg

Alex is pretty much like me when it comes to breakfast, with the only difference being that he rotates between a few different meals. A go-to breakfast of his is plain greek yogurt with store-bought granola (any variety from Trader Joe's works) with a drizzle of honey and fresh berries. Pretty healthy and delicious sounding, right? Well actually I think it's pretty common knowledge at this point that store-bought granola isn't always the best decision when trying to have a balanced breakfast. Last week, I took a look at the ingredients in the granola that Alex was eating that week and found four different kinds of sugar added and canola oil. Because I care about Alex and his well-being, I took it upon myself to make him a granola that not only is a healthier option, but one that he would prefer over the sugary, addicting varieties from the store. 

IMG_2547.jpg

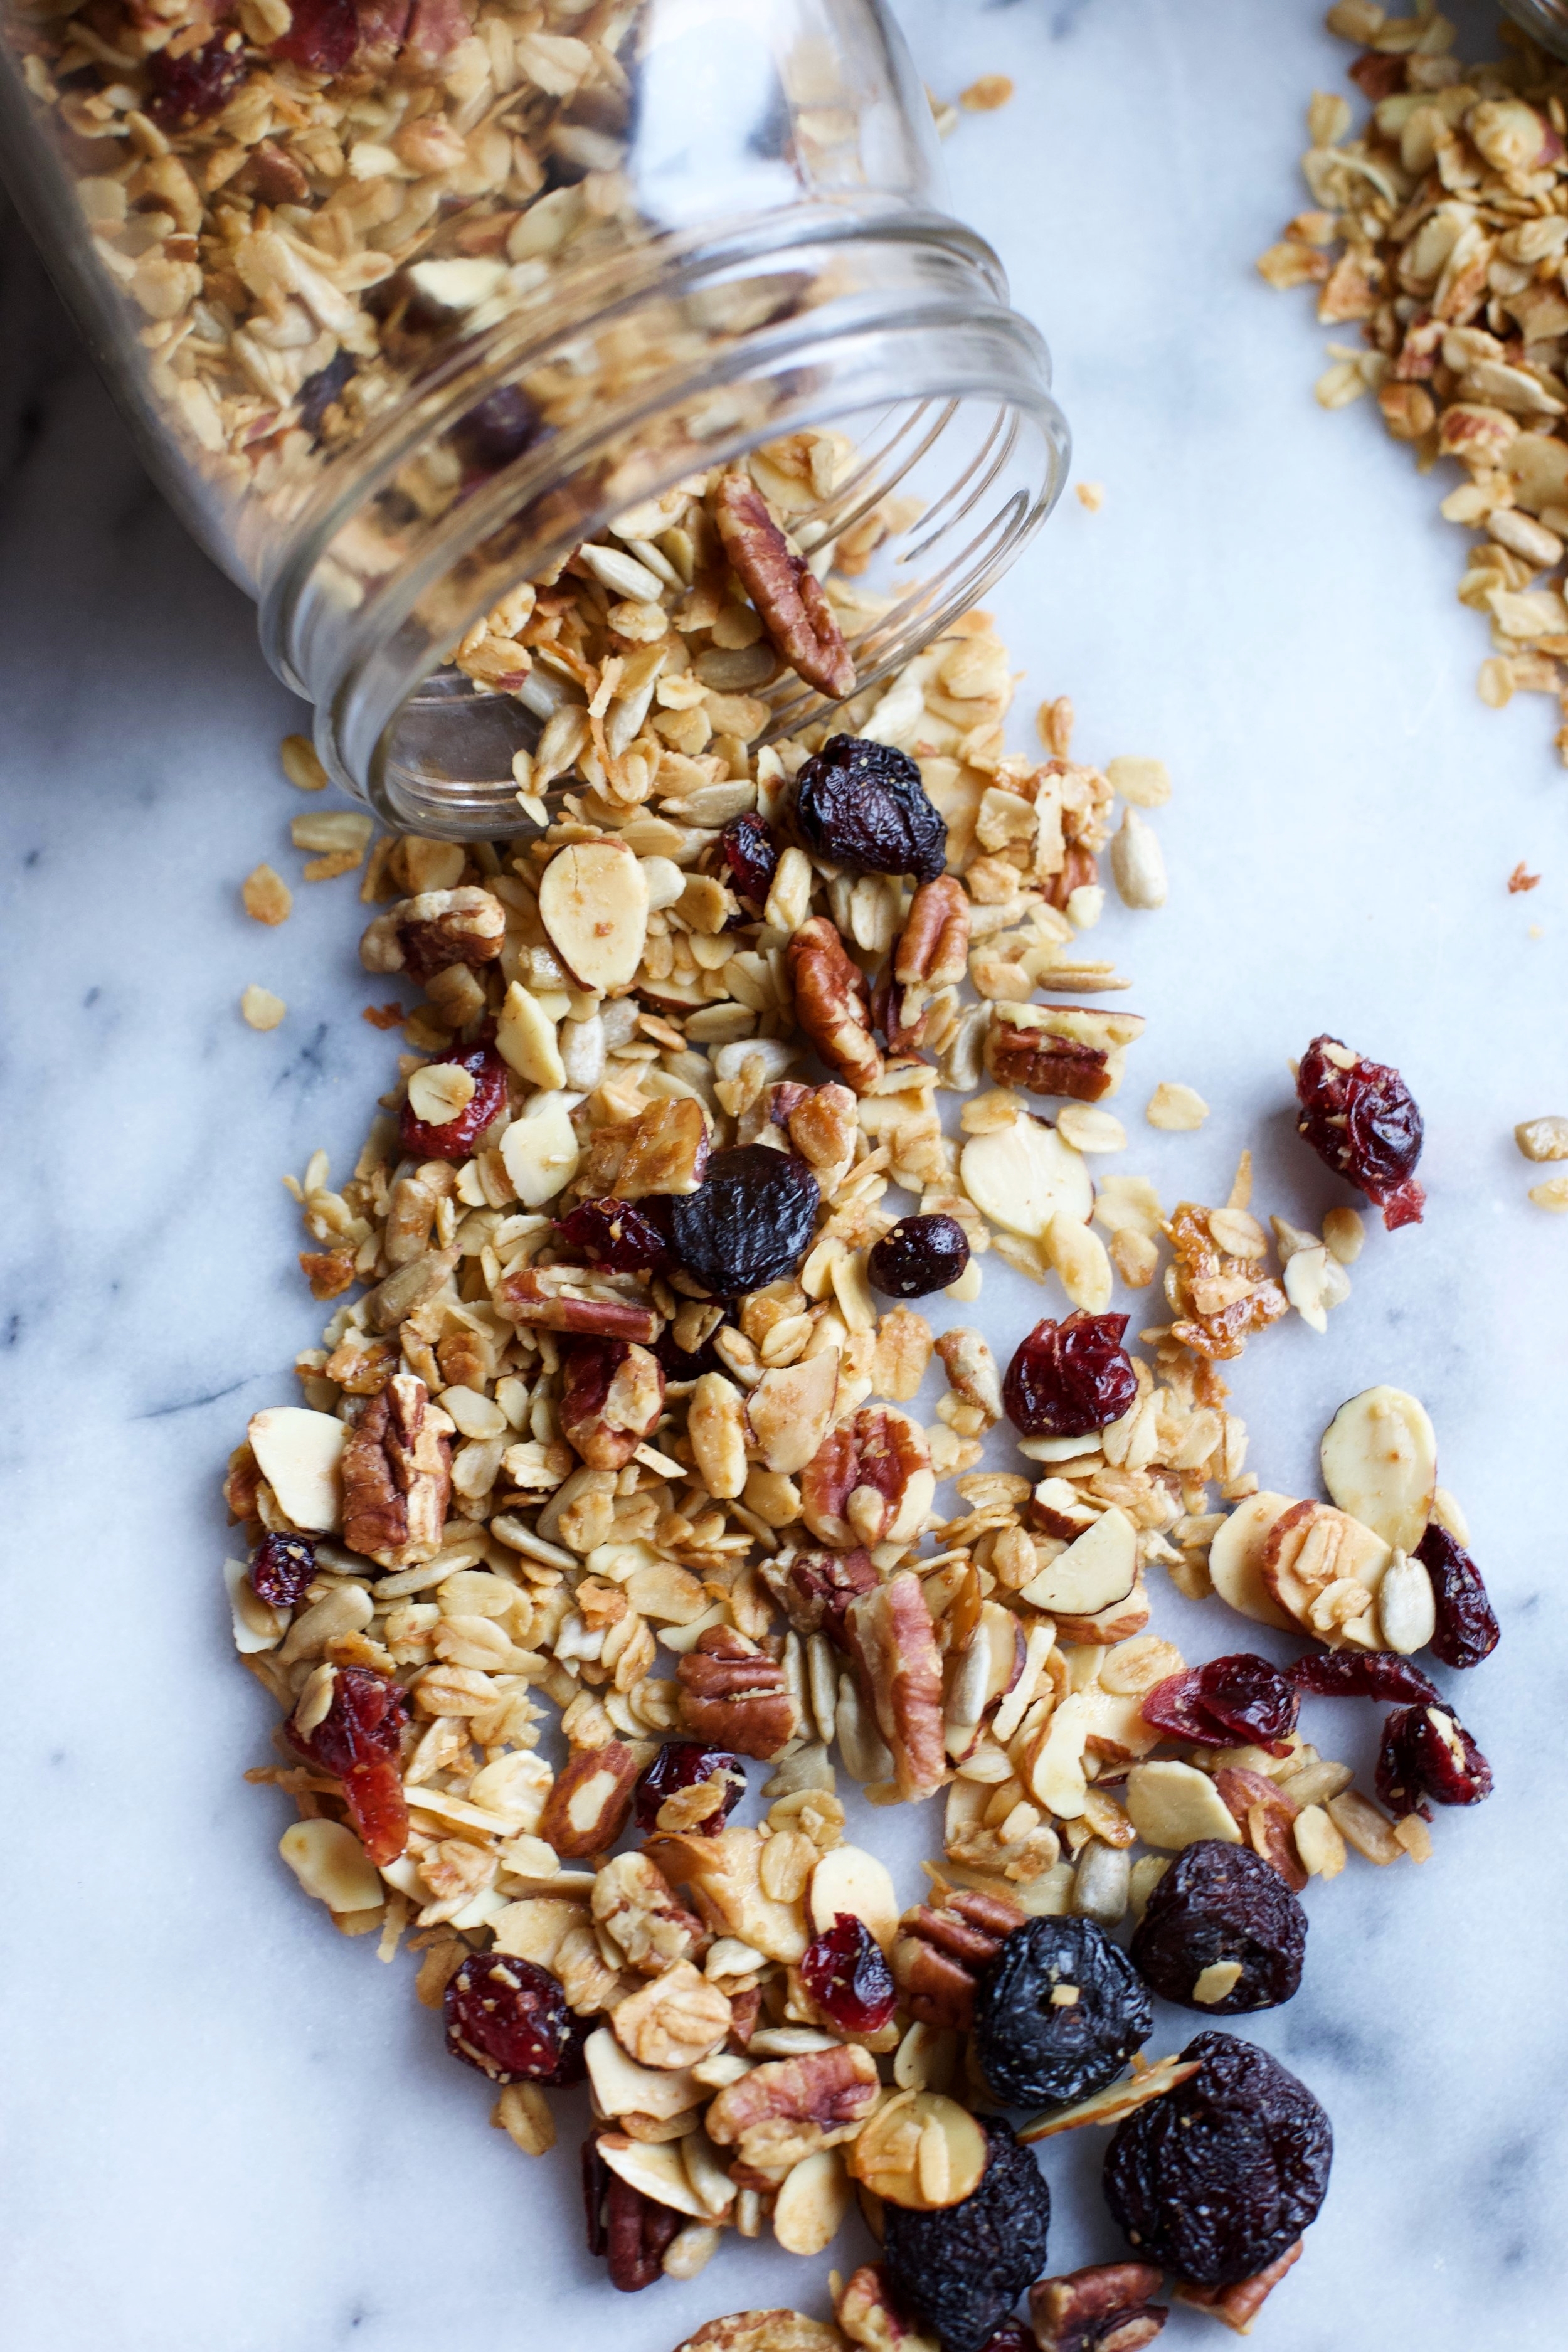
Enter Nekisia Davis' Olive Oil and Maple Granola - a recipe that I found within the cookbook Genius Recipes from Food52. I had actually made this granola years ago, following the recipe to a T, and I absolutely loved it. The olive oil made the granola have a more savory and interesting flavor, and the maple syrup and brown sugar added such a sweet and caramel-y flavor. But this time, I cut back on the maple syrup and instead of brown sugar, I used coconut sugar and only two tablespoons of it (as opposed to 1/2 cup of brown sugar). I added whichever nuts and seeds I knew Alex would like, added some dried fruit at the end, and the result was FANTASTIC. We've been snacking on the granola for the past two days, and I can happily say that it has replaced the store-bought granola for the foreseeable future. 

IMG_2536.jpg

What's so fun about this recipe is how it's so customizable: you can use any nuts of your choosing (almonds, cashews, pistachios, walnuts, etc.), change up the seeds (pumpkin, sunflower, etc). and if you're not too keen on olive oil, I'm sure coconut oil will work just fine as well. Same goes for the coconut sugar: if you are unfamiliar with this ingredient (you can find it at Trader Joe's in the baking section), feel free to stick to using brown sugar. Furthermore, I scaled back on the sugar in this recipe significantly, but I still think it has a nice sweet taste. If you want to add a couple more tablespoons of coconut or brown sugar, go right ahead. I set out to make a granola that was less sweet and breakfast-worthy, but if those aren't your goals, add all the sugar you want!

After the granola is finished baking, you then get to decide what to add to the mix. Dried fruit (cherries, cranberries, blueberries, apricots, etc.) and bittersweet chocolate chips are excellent additions, but make sure the granola is fully cooled before adding the chocolate (or the chocolate will melt). 

So just have fun with this! Make it your own based on your preferences, and you can even change it up every time until you land on a flavor combination that may lead you to eating it every day for breakfast for years. This also makes for a very thoughtful gift for a friend, family member, or coworker. Much more meaningful than giving them yet another candle!

IMG_2299.jpg

Olive Oil and Maple Granola

Makes about 7 cups

IMG_2296.jpg

Adapted from Nekisia Davis via Genius Recipes

Ingredients

  • 3 cups old-fashioned rolled oats

  • 1 cup hulled raw sunflower seeds

  • 1 cup unsweetened coconut flakes

  • 1 1/4 cup raw sliced almonds (or you can use whole almonds, roughly chopped)

  • 1 1/4 cup raw pecans, roughly chopped

  • 1/2 cup pure maple syrup

  • 2 tbsp. coconut sugar (or brown sugar)

  • 1/2 cup extra-virgin olive oil

  • 1 tsp. coarse salt

  • Optional add-ins: 1/2 cup dried cranberries, 1/4 cup dried cherries (just a suggestion!)

Directions

  1. Preheat the oven to 300°F. Line a rimmed baking sheet with parchment paper.

  2. In a large bowl, mix all the ingredients except for the add-ins, making sure every piece gets coated with the liquid components.

  3. Turn the mixture onto the baking sheet and spread it evenly. Transfer to the oven, and stir the mixture every 10-15 minutes (carefully take the tray out of the oven each time). In total, the granola will take about 45 minutes to finish toasting.

  4. Once out of the oven, transfer the granola to a bowl and toss in your additions of choice. Enjoy!

"BERLIN-STYLE" MOSCOW MULES

4306CEFC-1F66-44AB-8BFF-07DF72C830F0.jpeg

A few years ago, I was lucky enough to take a trip to Berlin, Germany with my boyfriend, Alex. Alex was actually born in Berlin, where he lived for the first seven years of his life, before his family picked up and moved to Southern California. I can truly say that visiting Berlin has been my favorite trip thus far, and if I was able to, I would move there in a heartbeat. The restaurants, bars, parks, people... EVERYTHING was amazing and so beautiful. I was pretty much crying the day we left and have been counting down the days until we can return (hopefully next May, fingers crossed). 

When preparing for a trip, I actually look forward most to researching and outlining an informal guideline to follow. I scour the internet reading through personal blogs and food websites, in addition to flipping through lifestyle/food magazines to look for the best recommendations and tips to make the most of our experience. When I say an "informal" guideline, I mean that I'm not writing out an itinerary for every day of our trip; I'm just getting an idea of what each neighborhood has to offer in that particular city. I always, always assume we will wonder around and stumble across an amazing spot that I didn't read about - and we always do.

The month before we left for Berlin, I received my Bon Appétit magazine subscription in the mail and coincidentally, there was a travel guide for Berlin featured. One of the places the magazine deemed a "must-visit" was ORA, a restored 18th century pharmacy that was repurposed into an all-day café. The description and pictures alone made me put ORA at the top of our list, and needless to say it was one of the best decisions trekking there.

EE0CDE9A-4FB0-40C6-A36B-5CDEF8085390.jpeg

Located in the neighborhood of Kreuzberg, a very cool and hip area filled with amazing bars and restaurants, ORA is where Alex and I discovered how Berlin does Moscow mules differently than they do here in America. Instead of the classic recipe composed of vodka, ginger beer, and lime juice, we were served a Moscow mule with vodka, ginger beer, bitters, and cucumber. I thought it was an odd combination but the moment I took a sip, I was hooked and vouched to always add cucumber/bitters to my Moscow mules. Below is a picture from our night at the bar. 

IMG_4642.jpg


After ORA, we decided to walk around the neighborhood and ended up going to a crowded cocktail bar that looked very cool. The bar, Würgeengel, ended up being one of our favorite bars from the trip to the point that we made a second trip on our last night in the city. At Würgeengel, I also ordered a Moscow mule to see if it would be prepared the same as it was at ORA and it was except for the addition of bitters. It was here where I noticed that the type of ginger beer that was being used was Fever Tree, a brand sold here in America and by far my top choice as far as ginger beers go. 

My assumption is that cucumbers are just more readily available than limes, and Germans have adapted the Moscow mule accordingly. So today I provide you a delicious recipe inspired by the Moscow mules that we enjoyed while in Berlin. To add more of the cucumber flavor, the recipe entails muddling a few cucumber slices and shaking it with the vodka to infuse the liquor. This step really makes a great difference in taste, so I would suggest not skipping it! 

B7BAD0E8-7BF1-4C47-960F-AEA555FE7FE9.jpeg


"Berlin-Style" Moscow Mules

Yields 2 cocktails

Ingredients

  • 4 peeled cucumber slices

  • 4 oz. vodka

  • Handful of ice

  • 4-5 oz. ginger beer, per drink

  • 2-4 dashes of Angostura bitters, per drink

  • Sliced cucumber, to garnish

Directions

  1. In a cocktail shaker, muddle the peeled cucumber slices. Add the vodka and ice and shake vigorously for about 10-15 seconds.

  2. Pour the liquid through a strainer into two prepared glasses filled with ice, making sure to divide the liquid between the two glasses equally.

  3. Top off each drink with ginger beer and your desired amount of bitters. Stir with a spoon. Garnish with a cucumber slice, if desired. Sip and enjoy!

SALTED TOFFEE + BROWN SUGAR COOKIES

public.jpeg

I remember a very dark period in my life when I didn't care for toffee. I know, I know it's crazy to think that there are people in this world who don't like toffee, but they exist, and I sadly used to be one of them! I don't remember when I switched over to the other side (re: the happier side) but I kind of have a feeling that these salted toffee and brown sugar cookies had something to do with it.

public.jpeg

I'm a pretty simple person when it comes to cookies: any kind that has chocolate in it I will most likely eat and love until the end of time. And any other kind of cookie that doesn't have chocolate in it like a peanut butter or sugar cookie are perfectly adequate in my opinion, but I don't usually go gaga over them. 

public.jpeg

But with these non-chocolate cookies, I can and will eat 5 in a sitting without even thinking twice about it. The toffee just melts in your mouth, the texture is so chewy and addicting, and the juxtaposition between the brown sugar/toffee combo and salty topping is perfect. Who needs chocolate when a cookie can deliver all of this?

So the next time you're at the grocery store and you find yourself in the baking aisle right near the chocolate chips (I find myself here more often than not), grab a bag or two of toffee bits, make sure you have a good supply of brown sugar, and for the love of God don't forget the precious flaky sea salt. I know I'm a bit zealous with my sprinkling of sea salt on baked goods (evidence #1 and evidence #2), but trust me on this one: you NEED the salt on top. 

public.jpeg

Salted Toffee and Brown Sugar Cookies

Yields about 25-30 cookies, depending on size

Recipe adapted from Everyday Annie

Ingredients

public.jpeg
  • 2 cups all-purpose flour

  • 2 tsp. baking soda

  • 1/2 tsp. salt

  • 1/4 tsp. ground cinnamon

  • 1/4 tsp. ground ginger

  • 3/4 cup (1 1/2 sticks, 6oz.) unsalted butter, room temperature

  • 1 1/4 cup brown sugar (any kind works)

  • 1 large egg, room temperature

  • 2 tsp. vanilla extract

  • 1 cup toffee bits

  • Flaky sea salt, to finish

Directions

  1. In a bowl, whisk together the flour, baking soda, salt, cinnamon, and ginger. Set aside.

  2. Using a hand mixer, or in the bowl of a stand mixer fitted with the paddle attachment, cream the butter and brown sugar together until light and fluffy, about 2-3 minutes. Scrape down the sides of the bowl and add the egg and vanilla extract. Mix until combined and scrape the bowl again.

  3. Add the dry ingredients to the stand mixer and mix on low until just combined. Fold in the toffee bits with a spatula. Cover the bowl with plastic wrap and refrigerate the dough for 30 minutes.

  4. Preheat the oven to 350°F. Line a baking tray with parchment paper, and using a spoon or a cookie scoop (I use the medium size), scoop out 1.5-2 tablespoons of dough for each cookie.

  5. Bake the cookies for 8-10 minutes, rotating the cookie sheet halfway through. The cookies are done when the edges are set and slightly browned, with the center still soft. Do not overbake! Once taken out of the oven, sprinkle with flaky sea salt and allow the cookies to sit on the pan for about 5 minutes before transferring to a cooling rack.