APPLE BUTTER PANCAKES w/ SAUTÉED APPLES

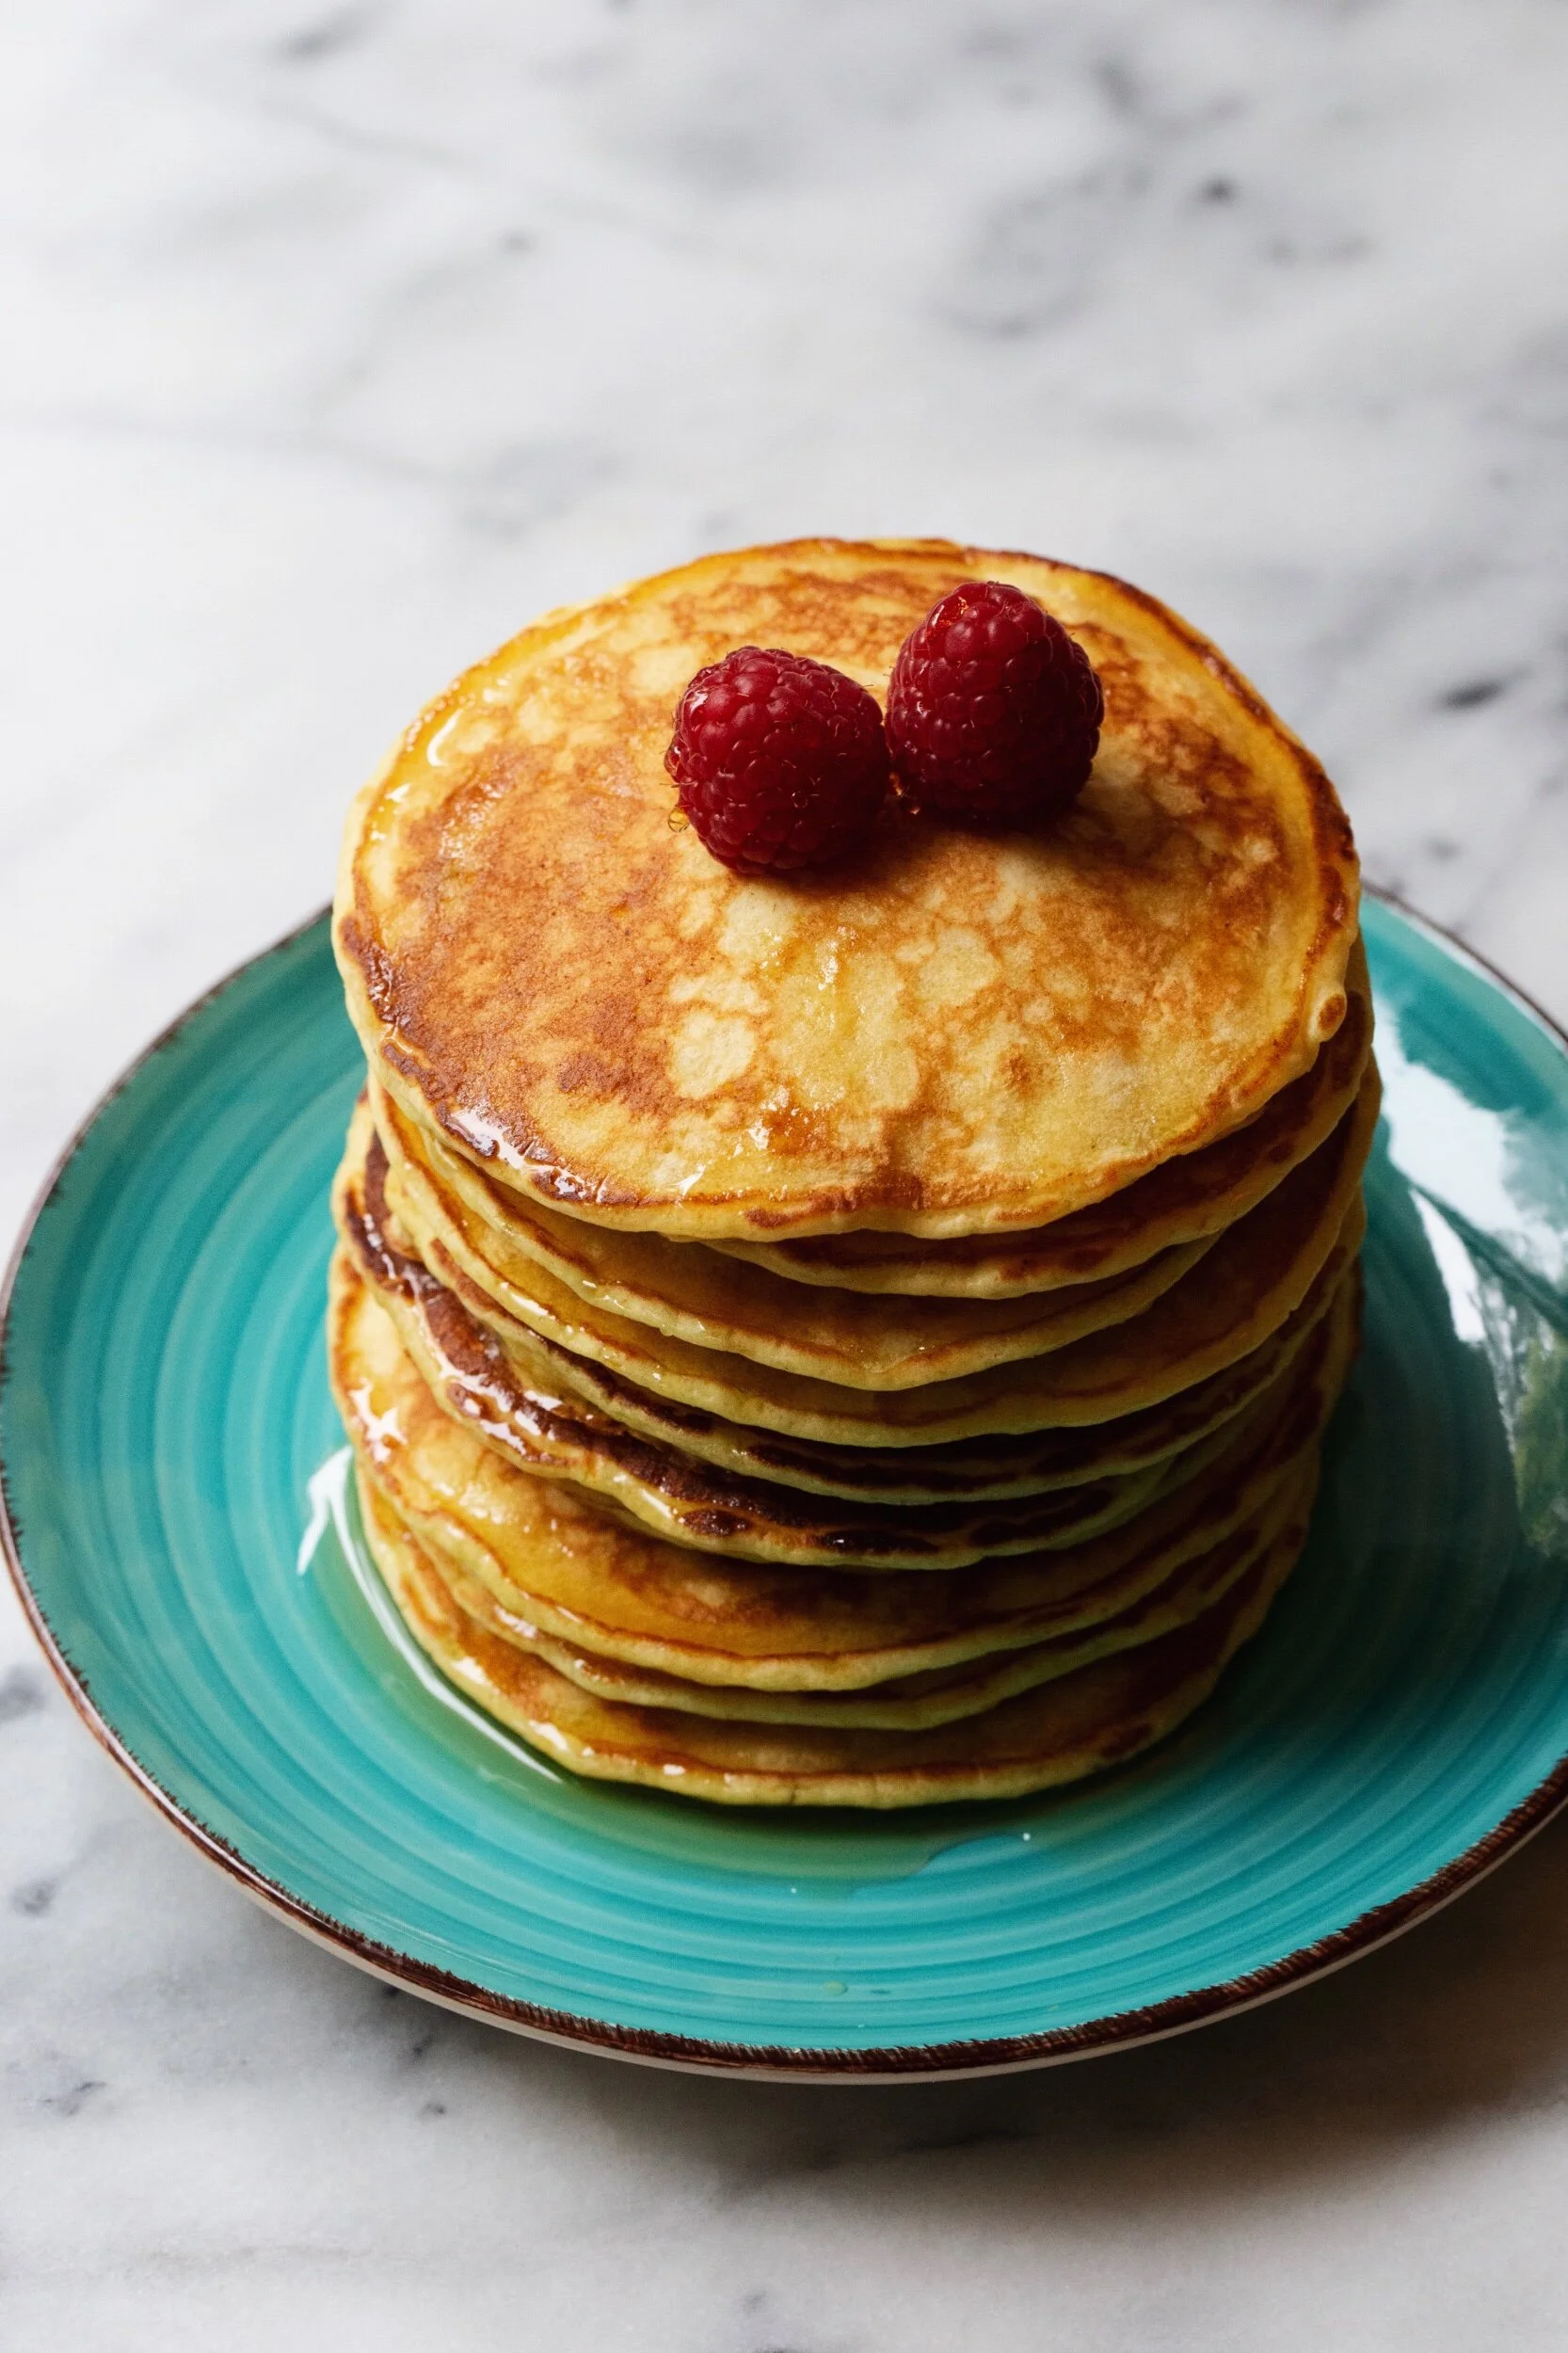
Why yes, it is yet another apple-focused recipe coming at you today! It might be the third one in just about a month, but I for one will never get sick of apple recipes so I hope you all feel the same way. I also wanted to use up the rest of my big batch of apple butter that had been sitting in my fridge since the rugelach post, so that’s really how I developed today’s recipe for apple butter pancakes with sautéed apples.

The last, and only, time I shared a pancake recipe was back in April 2020 when, as we all know, life was looking pretty grim for the entire world. I remember thinking that my orange ricotta pancakes were a little bright light at a very dark time, and how something as simple as writing and sharing a recipe could make me feel just a little bit better. Luckily, today’s recipe won’t be associated with any pandemics and we can all just focus on one thing: the deliciousness of these pancakes.

Although I’m usually more of a waffle person, there will always be room in my heart (and stomach) for pancakes, especially when they have autumnal flavors. The apple butter flavor may not be particularly in your face, but you’ll definitely get a hint of it in each bite. Because of this subtlety, I wanted to amp up the apple flavor by adding a topping of apples sautéed in butter, brown sugar and cinnamon. It’s of course an optional addition, but I have to say it really took these pancakes to a whole different level. But these pancakes will be perfect as well with a simple pat of butter and/or drizzle of maple syrup.

Apple Butter Pancakes

Makes about a dozen medium-sized pancakes

Ingredients

  • 1 1/4 cups all-purpose flour

  • 1 tbsp. granulated sugar

  • 2 tsp. baking powder

  • 1 tsp. cinnamon

  • 1/2 tsp. kosher salt

  • 1 cup milk, any kind works

  • 2 large eggs, separated

  • 1/2 cup apple butter, homemade or store bought

  • 2 tbsp. unsalted butter, melted

  • 2 tsp. vanilla extract

  • Sautéed apples, to finish (recipe below)

Directions

  1. In a large bowl, whisk the flour, sugar, cinnamon, baking soda and salt together until well combined.

  2. In a medium bowl, whisk the milk, egg yolks, apple butter, melted butter and vanilla extract until well combined. Pour the wet ingredients into the dry ingredients and using a spatula, fold all ingredients together until almost combined.

  3. Using a stand mixer fitted with the whisk attachment (or in a large bowl if using a hand mixer) whisk the egg whites until have stiff peaks. Gently fold the egg whites into the batter, being careful not to over mix. Let the batter rest for about 10 minutes. *This is a good time to start working on your sautéed apples.

  4. Preheat a lightly-greased griddle or nonstick pan over medium heat. Scoop about 1/4 cup of batter for each pancake and cook on the first side until the edges appear set and bubbles start to show on the top surface, about 2-3 minutes. Carefully flip and continue to cook for a few more minutes, or until golden brown. Repeat until all batter is used up.

    *If not serving immediately, place pancakes on a baking sheet in the oven preheated to 200°F. This will keep them warm until ready to serve.

  5. Top with butter, maple syrup and/or sautéed apples. Enjoy!

Sautéed Apples

Ingredients

  • 2 large apples, peeled and chopped (I prefer Granny Smith or Pink Lady), about 2 cups

  • 2 tbsp. unsalted butter

  • 1 tbsp. brown sugar

  • 1/2 tsp. ground cinnamon

Directions

  1. In a skillet over medium heat, sauté the chopped apples in the butter for about 5 minutes, stirring every so often.

  2. Once slightly softened, add in the brown sugar and ground cinnamon and continue to cook for another 5-10 minutes, or until fork tender.

ORANGE RICOTTA PANCAKES

3CD5282B-E340-4B2A-A6D1-6439C5357089.jpeg

I don’t even know where to begin. It’s been a month since I last posted a new recipe and I think it’s safe to say that we’ve (every single person on this planet) all been living an ongoing nightmare since then. I am, unfortunately, not writing this post sitting in my new apartment in Portland, Maine… our move, which was supposed to be on April 1st, got pushed back indefinitely and we’ve been staying at my mom’s house in Orange County for the time being. I don’t want to get into anything heavy or speak of my personal struggles because that’s not what I want to remember when I look back at this post years from now (nor do I want you guys to read yet another thing related to COVID-19), but I just want to say that I hope you all are well and that you’re in my thoughts every single day. If you want to privately message me, I’m here for you.

IMG_9602.jpeg

I’ve noticed online that a good amount of people have been taking this time of isolation as an excuse to pick up a new language, learn how to play an instrument, take an online course to get certified for something, or read as many books as humanly possible. And I’d like to let it be known that I am not one of these people. Besides exercising, baking, and watching as many random movies as I can, the only thing that I’ve “learned” is that my love for eating pasta has grown tenfold. And I feel no shame about it! I just want people to know that everyone deals with things differently and if you want to sit on your butt every day and do nothing meaningful or productive, then that’s perfectly fine. For example, I could have been hard on myself for not taking advantage of the extra time the past few weeks to post new recipes every other day, but I didn’t have the mental capacity or desire to! I honestly just wanted to bake for myself (and my family) and return to older recipes of mine that I didn’t have the time to remake. I baked my funfetti sugar cookies, chocolate sorbet, coffee toffee ice cream, etc, etc. - and it’s been making me SO happy. So why would I change that? I also didn’t feel comfortable with posting a recipe with ingredients that you may not have and I don’t want anyone going to the grocery store because of me!

DADA6DCB-D341-48FC-9B7C-BD861AB6085B.jpeg

But after about three weeks of being on an emotional rollercoaster, I finally found myself wanting to write and share something new with you and I landed on the breakfast/brunch staple that are pancakes. And not just plain old pancakes, but ones riddled with fresh orange zest/juice and creamy ricotta cheese. If you’ve been around, you know that my love for ricotta runs deep - I have a recipe on how to make homemade ricotta along with ricotta ice cream; I have the most beautiful citrus ricotta bundt cake with pistachios; and finally, I have the adorable individual apple ricotta tarts with homemade caramel drizzled on top.

The addition of ricotta to pancakes isn’t so much about changing the flavor but more so about getting a fluffier and creamier texture. On top of this, the number of eggs added - three- makes the pancakes even more decadent and custard-like since normal pancake recipes usually call for only one egg. You’re probably thinking that these additions to the recipe would mean that they’ll be too heavy or rich, but after eating a stack of four for lunch the past two days, I can attest that they’re just perfect. A big part of what helps cut through the creaminess from the ricotta and eggs is the addition of citrus (orange in this case) via the juice and zest. The citrus really brightens up the pancakes and prevents you from feeling like you’re being filled with too much dairy.

E378C760-C3D0-4D94-B910-F923B4FC09B4.jpeg

A couple of tips for when it comes to making these perfect pancakes: 1) if you have the time, have all the ingredients - namely the eggs, milk and ricotta - be room temperature. This ensures a smoother incorporation of the batter and therefore a better textured pancake. 2) Speaking of ingredients, make sure that your baking powder isn’t expired. I know a lot of people who don’t bake too often and when they finally do, the recipe fails and it’s usually since they’re baking powder (or soda) is months over the expiration date. 3) Do not over mix the batter! This is a given in almost every recipe for baked goods but is probably the most important when it comes to making pancakes. 4) After the pancake batter is finished, allow it to “rest” for about 15 minutes so that the flour can be properly hydrated and the leavening agents (baking powder and soda) can be evenly distributed.

So, if you have all of these ingredients in your fridge right now - don’t forget that you can make your own ricotta cheese with only 4 ingredients (milk, heavy cream, salt and lemon juice) - by all means, go ahead and make these this weekend for Easter brunch and try to have a fun and joyful holiday. And if you don’t have the ingredients, just remember to pick up some ricotta and oranges the next time you’re able to safely make it to the grocery store, and make a batch of the pancakes on a random weekday. Trust me, having these babies on a Tuesday morning will definitely brighten your day and I know we could all use that right now,

79B29689-D49E-400B-AB19-150208E31AC2.jpeg

Orange Ricotta Pancakes

Yields 12-13 pancakes

B5B41383-EBB6-4400-A777-38D2FFCA7DF3.jpeg

Recipe adapted from Cooking Classy

Ingredients

  • 3 tbsp. granulated sugar

  • 2 tbsp. orange zest

  • 1 1/2 cups all-purpose flour

  • 2 tsp. baking powder

  • 1/4 tsp. baking soda

  • 1/2 tsp. kosher salt

  • 3/4 cup ricotta (full-fat or part skim), homemade or store bought, room temperature

  • 1 cup milk (whole or 2%), room temperature

  • 3 large eggs, room temperature

  • 1 tsp. vanilla extract

  • 1/4 cup fresh orange juice

  • 1 tbsp. butter, melted and slightly cooled

Directions

  1. In a large bowl, using your hands or a whisk, massage/mix the sugar and orange zest together until fragrant (this helps release the oils in the zest). Add the flour, baking powder, baking soda and salt and whisk until combined.

  2. To a medium-sized bowl, whisk together the ricotta, milk, eggs, vanilla extract and orange juice. Slowly pour in the melted butter while whisking at the same time (just in case the butter is still too warm from being melted).

  3. Add the wet ingredients to the dry ingredients and mix until just barely incorporated. DO NOT OVER MIX. Allow the batter to rest at room temperature for 15 minutes,

  4. Preheat a lightly oiled griddle or frying pan over medium high heat. Scoop about 1/3 cup of batter for each pancake and cook on the first side until the edges appear set and bubbles appear on the top surface, about 3 minutes. Carefully flip and continue to cook for another 2-3 minutes, or until the pancakes are golden brown. Repeat until all batter is used up.

  5. Serve immediately with maple syrup, powdered sugar and/or lemon curd, Enjoy!

PUMPKIN + BROWN BUTTER BREAKFAST PUFFS

Well, summer is officially over. And I’m saying this because when I walked into Trader Joe’s the other day, I immediately noticed that the large containers that usually held big, beautiful watermelons were sadly replaced with pumpkins of all shapes and sizes. Although I welcome fall and everything it has to offer from cooler weather to Halloween and whatnot, I’m going to miss my precious watermelon! Ask Alex if you don’t believe me, but I ate watermelon every single day this summer. I guess I don’t care about saying goodbye to long beach days or sunsets at 8pm or wearing dresses… I only care about watermelon. See you next year, buddy!

Now that pumpkin and pumpkin spice-flavored everything has quite literally taken over Trader Joe’s (there’s pumpkin bagels, pumpkin cream cheese spread, pumpkin crackers, etc.), I figured I’d follow suit and offer a recipe utilizing the most popular of the gourd family. While I’m not a fan of pumpkin spice lattes, pumpkin-based dishes are something that I’ve come to really love. My pumpkin cheesecake, that I make every Thanksgiving, is something I look forward to baking (and eating) every year, and I am also a huge fan of pumpkin pancakes and pumpkin bread… and pumpkin ice cream. I don’t discriminate; I (mostly) love it all.

So when I was thinking about doing another pumpkin recipe for the blog, I remembered a recipe that I’d made a couple of times before - breakfast puffs, also known as French breakfast puffs. They’re essentially sugared doughnuts in muffin form and, although they’re a bit too sweet for breakfast/brunch purposes, I won’t judge you if you have one (or two) of them with your morning coffee. Typical breakfast puffs do not have canned pumpkin in them, but I was able to figure out what ingredient to remove from the original recipe to replace with the pumpkin: the milk. I actually read online that you can replace the eggs or the oil/butter with pumpkin in certain recipes, but since this recipe only calls for one egg, and the fact that the butter is vital to this recipe (more on that later), getting rid of the milk was my best bet. And it worked out!

Like the title of this post suggests, these pumpkin breakfast puffs also have brown butter in them, an ingredient that I save mostly for fall and winter desserts due to its decadent qualities. Adding brown butter to any recipe gives it a much more nutty and richer flavor, which I think works perfectly with the pumpkin and blend of spices. The last time I shared a recipe featuring brown butter was with my brown butter apple buckle, another perfect example of how well brown butter works with popular fall produce. Speaking of spices, I decided to make it simple and have you use “pumpkin pie” spice for this recipe - something that you can actually buy at the grocery store (I buy mine from Trader Joe’s). The pumpkin pie spice blend that I buy consists of cinnamon, nutmeg, ginger, cloves and cardamom, which are ingredients that most people already have in their pantry. So, if you don’t have pumpkin pie spice, simply make the blend yourself! Here’s a recipe I found, but I would suggest adding a 1/4 teaspoon of cardamom as well.

Pumpkin and Brown Butter Breakfast Puffs

Yields 12 puffs

Recipe adapted from FIVEANDSPICE via Food52

Ingredients

For the puffs:

  • 1/3 cup (76g) unsalted butter

  • 1/4 cup light brown sugar, lightly packed

  • 1/4 cup granulated sugar

  • 1 large egg

  • 1 1/2 cups all-purpose flour

  • 1 1/2 tsp. pumpkin pie spice

  • 1 1/2 tsp. baking powder

  • 1/2 tsp. kosher salt

  • 1/2 cup canned pumpkin, I prefer Libby’s brand

For the sugar coating:

  • 6 tbsp. unsalted butter, melted

  • 1/2 cup granulated sugar

  • 1 tsp. pumpkin pie spice

Directions

  1. Make the brown butter: In a medium saucepan, melt 1/3 cup butter over medium-low heat. Once melted, the butter will begin to foam and turn to a golden color. Stir frequently and soon there will be a nutty smell and the butter will brown. Immediately take off the heat once browned and transfer to the bowl of a stand mixer fitted with the paddle attachment (or a large bowl if using a hand mixer). Allow it to cool for about 10-15 minutes.

  2. Preheat the oven to 350°F. Grease a 12-cavity muffin/cupcake tin with butter or cooking spray and lightly coat with flour.

  3. To the slightly cooled brown butter, add both sugars and the egg and mix on medium speed for about 5 minutes.

  4. In a separate medium-sized bowl, add the flour, pumpkin pie spice, baking powder and salt, and whisk together.

  5. Add the pumpkin puree to the brown butter/sugar mixture and mix until incorporated. With the mixer on low, slowly add in the dry ingredients and mix until just incorporated - don’t over mix!

  6. Using a spoon or a ice cream scoop, evenly distribute the batter between the 12 cavities in the pan - it may seem like not a lot of batter, but they will rise in the oven - and bake for 18-20 minutes or until golden brown and a toothpick inserted comes out clean.

  7. Allow the puffs to cool for a few minutes before using a knife to take them out of the pan and place them on a cooling rack.

  8. Coat the breakfast puffs: put the melted butter in one shallow bowl and combine the sugar and pumpkin pie spice together in a separate shallow bowl. One at a time, gently roll each puff through the melted butter, getting every section, and then roll it through the spice-y sugar. The puffs are best eaten straight from the oven but can be enjoyed for a couple more days when stored in an airtight container.