PALACINKY (CZECH CRÊPES)

IMG_3341 2.jpg

I'm a bit sad today. Just a couple of hours ago, my mom and I dropped off my family member, Tereza, at the airport. After staying with my mom for two and a half weeks, Tereza's first trip to the West Coast/California is over, and she's heading back to Prague. Growing up, I always wanted to have girl (first) cousins - I only have four cousins (4 on my mom's side, 0 on my dad's), and they are all boys. Don't get me wrong, I love them all, but I just always wished to have the relationship that my friends had with their girl cousins: not so much a sister, but more like a best friend. 

IMG_3072.jpg

Hanging out with Tereza, who is technically my fourth cousin, for the past couple of weeks has been honestly so much fun. She is so sweet, so smart (her English is probably better than mine), and has the greatest sense of humor. I introduced her to margaritas, the film It Follows, s'mores, reality television (all of which she LOVED), as well as other random American things. She and I could talk for hours on end about anything and nothing, and still just genuinely enjoy each other's company. I am going to seriously miss this relationship that I've built with her, and I cannot wait until I visit her again in Prague, hopefully soon. 

So the recipe that I am bringing you today is one that has been in my and Tereza's family for over 75 years: palacinky. A very well-known dish throughout Central and Eastern Europe with different names depending on which country you are in, palacinky is something that not only I grew up eating, but my mother and her parents did as well. Like I've mentioned before, my mom's side of the family is fully Czech (both of my grandparents emigrated to the States in the 1950s) and with them, they brought a handful of dishes that I still crave and eat today (Řízek and goulash being my two favorites).

IMG_3079.jpg

Palacinky, a crêpe-like dish that can be eaten at any time of day, is one of the recipes that my grandma and grandpa would make for me when I was little. But after they passed away when I was fairly young, I didn't even think about making them for myself until this past weekend when my aunt decided to make them for a dinner party we were attending. Tasting them again after all these years brought back a flood of memories, and so I immediately asked for the recipe and had my aunt show me how to make them (spoiler alert: it's super easy).

IMG_3275.jpg

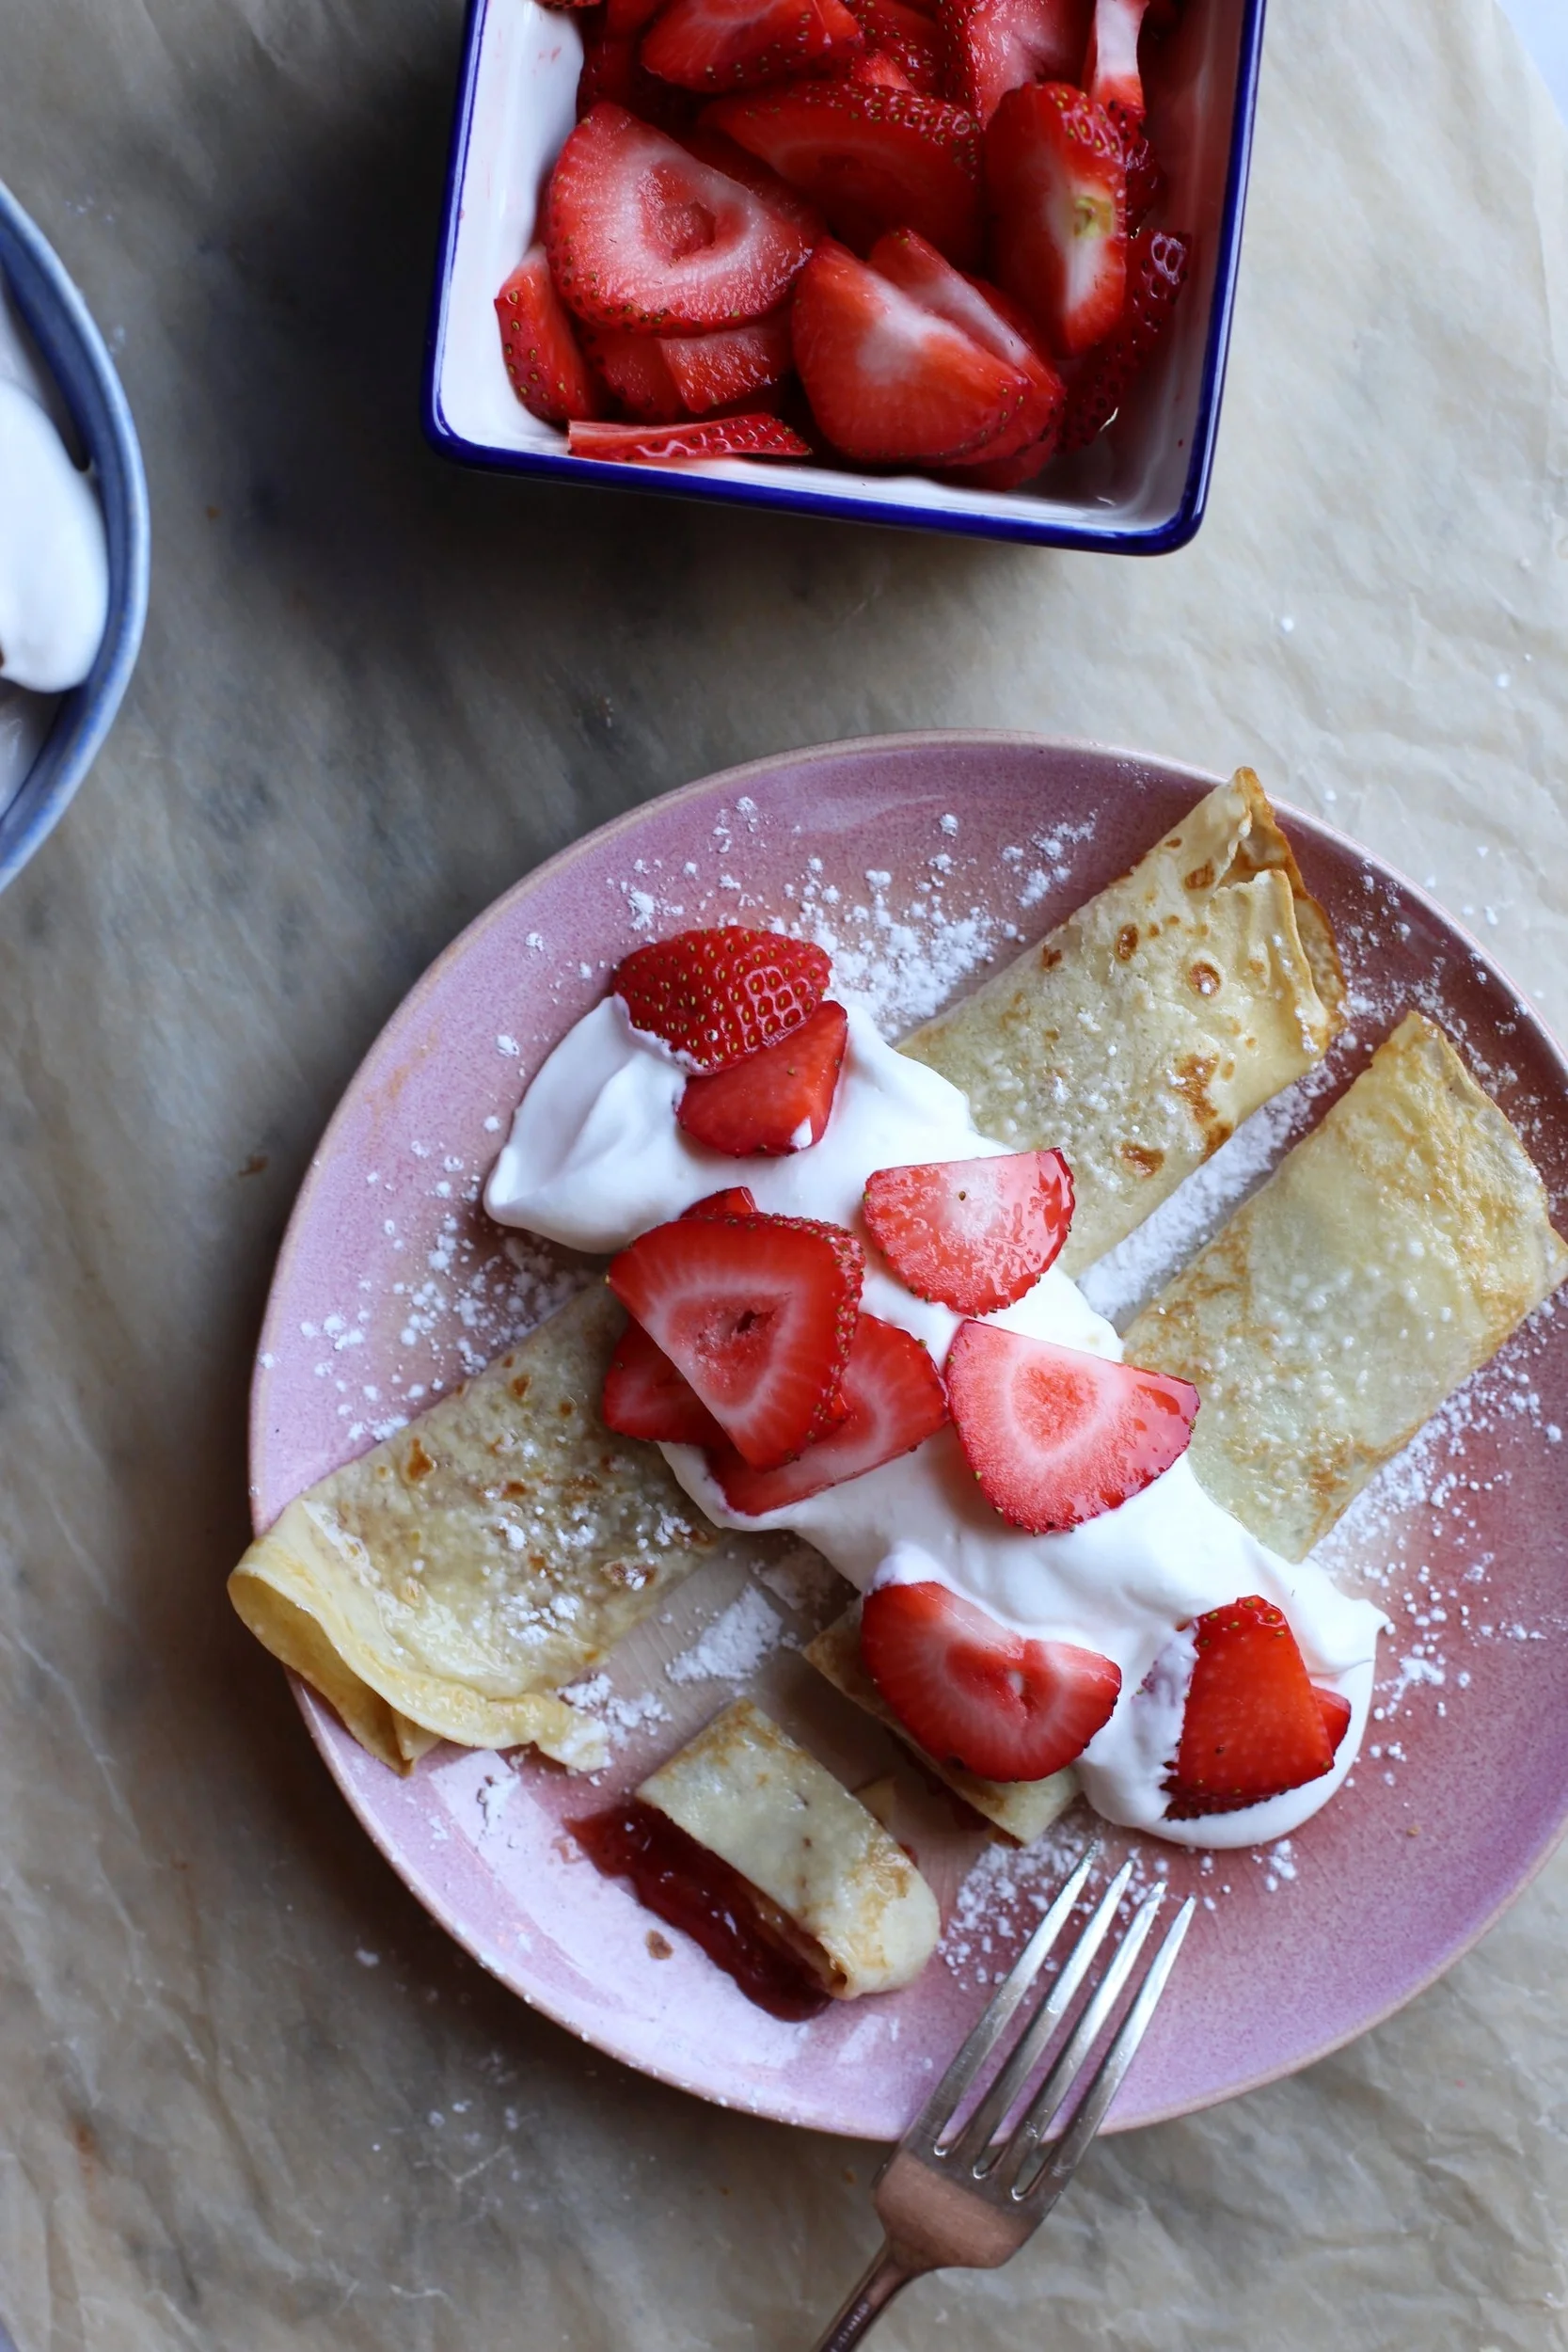
A big part of palacinky is the filling that you choose, which is traditionally some type of preserve or jam. I personally chose strawberry and apricot preserves that I found at my local Trader Joe's, and I also made some with Nutella which were insanely delicious. For the topping, it is common for palacinky to be sprinkled with powdered sugar, but I also made fresh whipped cream which I thought was a great addition. My aunt actually made her own preserves (nectarine and mixed berry) when she made the dish, so feel free to do this yourself with any fruit that is in season. If you wish to go the savory route which isn't as popular but still an option, just eliminate the sugar, vanilla extract, and lemon zest from the recipe. Then, you can fill it with whatever ingredients you'd like: ham, mushrooms, spinach, etc. Treat it as if you were choosing your favorite ingredients for an omelette. I want to add that my mom mentioned how growing up they would eat palacinky (the sweet way with jams and powdered sugar) for dinner, and this just makes me more proud to be Czech than ever before (who doesn't like eating sweets for dinner). 

IMG_3186.jpg

Unlike crêpes, I feel like palacinky are much more forgiving: they aren't as thin as crêpes so flipping them in the pan is much easier, and if you tear a piece of the palacinky or brown a side too much, it can easily be covered up with toppings (whipped cream, powdered sugar, etc.).

A trick that my aunt taught me in making palacinky is to preheat your nonstick pan on medium heat for about 3-5 minutes. This ensures that even your first crêpe will come out perfectly (this is also a useful tip for making pancakes, another scenario where the first batch is usually a 'throwaway'). 

IMG_3318.jpg

Palacinky

Yields about 15 "crêpes", depending on size of pan

Recipe from my grandparents!

Ingredients

IMG_3163.jpg
  • 2 large eggs
  • 3 tbsp. sugar
  • 3 tbsp. unsalted butter, melted and slightly cooled, plus 2-3 tbsp. more of melted butter for cooking
  • 2 cups milk, preferably whole milk
  • 1/2 tsp. vanilla extract
  • 1 tsp. lemon zest (optional, but recommended)
  • Pinch of salt
  • 1 1/2 cup all-purpose flour
  • Filling suggestions: fruit preserves/jam (strawberry, apricot, etc.), Nutella
  • Topping suggestions: powdered sugar, whipped cream, fresh fruit 

Directions

  1. In a blender, mix all ingredients (eggs, sugar, melted butter, milk, vanilla, lemon zest) except for the flour. Add in the flour, in 1/2 cup increments, and blend until smooth. 
  2. Let the batter sit for about 15 minutes. After this time, check the consistency of the batter: you are looking for a consistency similar to heavy cream - not thick like pancake batter, and not too runny. If it's too thick, add a splash of milk and mix. If it's too runny, add more flour, a tablespoon or two at a time, and mix. (Note: I followed the recipe as written, and the consistency was good enough for me to not add anything, in case you're worried).
  3. Preheat a nonstick pan or skillet for about 5 minutes on medium heat. 
  4. Using a basting brush, spread a layer of the additional melted butter over the pan. Ladle some batter into the bottom of the pan, while twirling the pan, making sure that the batter spreads evenly. How much batter you add at a time is up to the size of your pan, but it will be between 1/4 cup to 1/3 cup per crêpe.
  5. Let it cook for about 2-3 minutes, or until the edges begin to turn golden brown. Using a thin spatula, flip the crêpe and cook the other side for about 2 minutes more. 
  6. Continue steps 4 and 5 until all batter is used up (brush the pan with butter before each new addition of batter - trust me, it makes it taste much better!).
  7. Spread your desired filling on one side of the crêpe, leaving about 1 inch of a border, then simply roll it up. Sprinkle with powdered sugar, and top with whipped cream and/or fresh fruit, if desired.
  8. Palacinky can be stored in the refrigerator and/or freezer, just allow them to defrost and heat them up in the microwave before adding the filling. Enjoy!


ROCKY ROAD ICE CREAM (WITH THE BEST CHOCOLATE ICE CREAM EVER)

Photo Jun 20, 11 11 16 AM.jpg

Hello boys, I'm backkkkkkk!!! After three weeks away from the blog, I am happy to report that my little "break" is over, and I can't wait to get back into the swing of things in my (vivid) kitchen.

In case you don't follow me on instagram (@shawnasellmeyer), I explained in a post that I wanted to focus all my time and energy into my sister's wedding, which happened this past Saturday! With family flying in from around the country for the big day and the fact that I was in charge of the desserts, I knew that in order to keep my sanity, I had to put The Vivid Kitchen on the back burner. Even though I was honestly pretty sad about not being able to blog, I think it was the best decision I could have made. The week leading up to the wedding was complete chaos with me, my mom and aunt prepping and baking for about 6 hours each day. 

In the end, we baked: 75 carrot cake cupcakes with a cream cheese frosting, 130 salted dark chocolate chip cookies, 50 tartlets with a sweetened cream cheese filling topped with a mixed berry sauce, and a four-layer homemade funfetti vanilla cake with a vanilla buttercream frosting. My sister and her husband (it's going to take a while to get used to calling him that) aren't the biggest fans of cake, so they luckily only wanted a small, one-tier cake for them to cut into. Additionally, my grandma baked Mexican wedding cookies as well as shortbread cookies. It was definitely all hands on deck when it came to the desserts.

Although there were a number of mishaps and accidents along the way, I think all of the hard work was well worth it. To say that I made the desserts for a 110-person wedding is an incredible feat, and something I will always be proud of. And to make matters BETTER, I was getting compliments all night long at the wedding at how delicious the desserts turned out. Now, would I ever do this again? Be in charge of the desserts for a wedding? Short answer: no. Long answer: no, definitely not. Just being honest! 

Photo Jun 20, 11 13 54 AM.jpg

After the wedding was all said and done, my intention was to come back to the blog offering you one of the recipes I used for the wedding. But in all honesty, I am so bored with making those desserts that I needed to switch it up and I figured ice cream was the perfect route to take. But don't fret; I will share the recipes for everything served at the wedding eventually, if you all want them that is! Comment below and let me know which recipe you would want first.

Another big reason I wanted to make ice cream is because my (fourth) cousin, Tereza, from the Czech Republic is visiting! Little side fact about me: my mom's parents were both born and raised in the Czech Republic and emigrated to the United States back in 1956. They eventually made their way to Los Angeles, California where my mom was born, and the rest is history!

Growing up with Czech grandparents, it was always a dream of mine to someday visit their home country and meet all the family members that were still living there. This dream eventually became a priority when sadly both of my grandparents passed away by the time I was 12 years old. I finally made it out there in 2016 with Alex (it was part of the same trip when we went to Berlin, Germany) with the only goal of traveling to Nespeky, a small village just outside of Prague, where most of my family resides to this day. It was there that I met Tereza, who is just a few years younger than me and speaks perfect English. So when I heard she was visiting my family here in California, I was very excited to show her around my neck of the woods.

Photo Jun 20, 11 14 04 AM.jpg

One thing that I quickly learned about Tereza is that she LOVES sweets, especially chocolate.  When my mom took Tereza to the grocery store to stock up on her favorite foods to have while visiting, Tereza made a beeline for the ice cream section and picked up a carton of rocky road ice cream. It was then that I knew I had to recreate this flavor of ice cream for Tereza at home, and show her how homemade ice cream is better than store-bought.  

Rocky road ice cream is simply chocolate ice cream mixed with fluffy, soft marshmallows and crunchy, toasted almonds - it is perfect. The ice cream I am giving you today begins with, quite frankly, the ONLY chocolate ice cream recipe you will ever need in your life. And to that, we will add the mini marshmallows and almonds, as well as chunks of dark chocolate thrown in for good measure. If you just want plain ole chocolate ice cream, which you might, due to nut allergies or because you like it plain, just leave out the additions. But I will say, those additions compliment the ice cream very well and will only make you happier. I promise. 

P.S. I want it to be known that Tereza LOVED the ice cream, and I know she wouldn't lie to me because when we took her to In-n-Out for her first time, she straight up said she didn't like it. The girl does not hold back!


Rocky Road Ice Cream / Chocolate Ice Cream

Yields about 1 quart of ice cream

Recipe adapted from David Lebovitz (forever my go-to ice cream guy)

Ingredients

Photo Jun 20, 11 11 36 AM (1).jpg
  • 2 cups heavy cream

  • 3 tbsp. unsweetened cocoa powder

  • 5 oz. semisweet or bittersweet chocolate, chopped (I used a blend of both)

  • 1 cup whole milk

  • 3/4 cup sugar

  • Pinch of salt

  • 5 large egg yolks

  • 1/2 tsp. vanilla extract

If making rocky road ice cream, add:

  • 1 cup toasted almonds, roughly chopped

  • 1 1/4 cup mini marshmallows

  • 1/2 cup bittersweet chocolate chunks or chips

Directions

  1. In a medium saucepan, warm one cup of the heavy cream with the cocoa powder, making sure to whisk thoroughly. Bring the mixture to a boil, then lower the heat and allow it to simmer for 30 seconds. Remove the pan from the heat and add the 5 oz. of chopped chocolate. Stir until smooth, and then add the remaining 1 cup of heavy cream. Transfer the mixture, trying to not leave any remnants behind in the pan, into a large bowl set with a mesh strainer. Set this whole bowl in a prepared ice bath.

  2. Warm the milk, sugar, and salt in a clean saucepan over medium-low heat. In a medium bowl, whisk the egg yolks together. Just as the milk mixture is beginning to simmer, gradually add some of it to the bowl of egg yolks, whisking constantly as to not scramble the eggs (this is called tempering). Once the egg yolk mixture temperature has raised, pour the mixture back into the saucepan. Stir constantly over medium-low heat until the mixture thickens and coats the back of your spatula or spoon.

  3. Pour the custard over the strainer into the prepared bowl that has the chocolate mixture from earlier and stir the two together. Add the vanilla extract and allow the ice cream base to cool before covering with plastic wrap and refrigerating until thoroughly chilled.

  4. Churn the ice cream in your maker according to the manufacturer's instructions (mine took about 20 minutes to finish). The mixture will be a bit thick after chilling, so I suggest whisking it before pouring into the maker.

  5. Transfer the finished ice cream into a bowl and stir in the marshmallows, almonds, and chocolate (if you are making rocky road ice cream). Freeze in an airtight container and enjoy!

OLIVE OIL AND MAPLE GRANOLA

IMG_2290.jpg

When it comes to food, I am definitely a creature of habit. I rarely stray from ordering the same menu item from my favorite restaurants for fear of being disappointed with my decision. There are actually some restaurants where I've been ordering the same thing since I was a kid, which could either mean I had a refined palette as a child or that I now have the same palette as an 11 year old (I'd probably go with the latter).

My stubbornness, for lack of a better word, doesn't necessarily mean that I'm not adventurous when it comes to trying new foods. It just means that I know exactly what I like, and when I crave it, I get it! It's that simple. This mindset also is reflected in what I eat at home, especially for breakfast. 

IMG_2197.jpg

For the past three years, I've been eating the same exact thing for breakfast for about 90% of those days (the other days include breakfast eaten out, being on vacation, or making something else). My breakfast is a piece of Ezekiel Bread, toasted, and slathered with natural peanut butter that has flax and chia seeds in it, with a side of mixed berries and homemade cold brew. I LOVE this meal so much so that I go to bed excited knowing I'll be enjoying it within 8 hours. It's the perfect amount of food because I work out about 45-60 minutes afterwards, and it's full of all the good things (fiber, protein) that my body needs.

IMG_2221.jpg

Alex is pretty much like me when it comes to breakfast, with the only difference being that he rotates between a few different meals. A go-to breakfast of his is plain greek yogurt with store-bought granola (any variety from Trader Joe's works) with a drizzle of honey and fresh berries. Pretty healthy and delicious sounding, right? Well actually I think it's pretty common knowledge at this point that store-bought granola isn't always the best decision when trying to have a balanced breakfast. Last week, I took a look at the ingredients in the granola that Alex was eating that week and found four different kinds of sugar added and canola oil. Because I care about Alex and his well-being, I took it upon myself to make him a granola that not only is a healthier option, but one that he would prefer over the sugary, addicting varieties from the store. 

IMG_2547.jpg

Enter Nekisia Davis' Olive Oil and Maple Granola - a recipe that I found within the cookbook Genius Recipes from Food52. I had actually made this granola years ago, following the recipe to a T, and I absolutely loved it. The olive oil made the granola have a more savory and interesting flavor, and the maple syrup and brown sugar added such a sweet and caramel-y flavor. But this time, I cut back on the maple syrup and instead of brown sugar, I used coconut sugar and only two tablespoons of it (as opposed to 1/2 cup of brown sugar). I added whichever nuts and seeds I knew Alex would like, added some dried fruit at the end, and the result was FANTASTIC. We've been snacking on the granola for the past two days, and I can happily say that it has replaced the store-bought granola for the foreseeable future. 

IMG_2536.jpg

What's so fun about this recipe is how it's so customizable: you can use any nuts of your choosing (almonds, cashews, pistachios, walnuts, etc.), change up the seeds (pumpkin, sunflower, etc). and if you're not too keen on olive oil, I'm sure coconut oil will work just fine as well. Same goes for the coconut sugar: if you are unfamiliar with this ingredient (you can find it at Trader Joe's in the baking section), feel free to stick to using brown sugar. Furthermore, I scaled back on the sugar in this recipe significantly, but I still think it has a nice sweet taste. If you want to add a couple more tablespoons of coconut or brown sugar, go right ahead. I set out to make a granola that was less sweet and breakfast-worthy, but if those aren't your goals, add all the sugar you want!

After the granola is finished baking, you then get to decide what to add to the mix. Dried fruit (cherries, cranberries, blueberries, apricots, etc.) and bittersweet chocolate chips are excellent additions, but make sure the granola is fully cooled before adding the chocolate (or the chocolate will melt). 

So just have fun with this! Make it your own based on your preferences, and you can even change it up every time until you land on a flavor combination that may lead you to eating it every day for breakfast for years. This also makes for a very thoughtful gift for a friend, family member, or coworker. Much more meaningful than giving them yet another candle!

IMG_2299.jpg

Olive Oil and Maple Granola

Makes about 7 cups

IMG_2296.jpg

Adapted from Nekisia Davis via Genius Recipes

Ingredients

  • 3 cups old-fashioned rolled oats

  • 1 cup hulled raw sunflower seeds

  • 1 cup unsweetened coconut flakes

  • 1 1/4 cup raw sliced almonds (or you can use whole almonds, roughly chopped)

  • 1 1/4 cup raw pecans, roughly chopped

  • 1/2 cup pure maple syrup

  • 2 tbsp. coconut sugar (or brown sugar)

  • 1/2 cup extra-virgin olive oil

  • 1 tsp. coarse salt

  • Optional add-ins: 1/2 cup dried cranberries, 1/4 cup dried cherries (just a suggestion!)

Directions

  1. Preheat the oven to 300°F. Line a rimmed baking sheet with parchment paper.

  2. In a large bowl, mix all the ingredients except for the add-ins, making sure every piece gets coated with the liquid components.

  3. Turn the mixture onto the baking sheet and spread it evenly. Transfer to the oven, and stir the mixture every 10-15 minutes (carefully take the tray out of the oven each time). In total, the granola will take about 45 minutes to finish toasting.

  4. Once out of the oven, transfer the granola to a bowl and toss in your additions of choice. Enjoy!