ROASTED STRAWBERRY + VANILLA ICE CREAM

IMG_6279.jpg

With about a month left before summer is officially over, I am scrambling to make as many dishes utilizing what the season has to offer. Even though I'm much more of an autumn and winter fan, summer produce yields my favorite fruits to eat: watermelon, stone fruit, and berries. Although living in California allows me to eat some of these fruits year round, nothing compares to when these fruits are at their peak of ripeness.

The recipe I am giving you today was not what I had planned exactly. I was testing a roasted bourbon-peach sherbet and after a few trials, I ended up axing the recipe altogether. Alex gave his seal of approval, but from the process to the finished product, I came across a bunch of problems and in the end, I couldn't stand behind the recipe nor could I share it with you. Maybe I'll try it again next summer when I haven't reached my limit of purchasing peaches yet.

With that said, I want to be clear that today's ice cream recipe is no consolation prize, and in fact, I'm looking at the peach sherbet failure as a blessing in disguise. I realized that I hadn't shared my go-to vanilla ice cream recipe yet and instead of just giving you the recipe for that straight-up, I wanted to add something to it highlighting a summer ingredient. Enter: roasted strawberries.

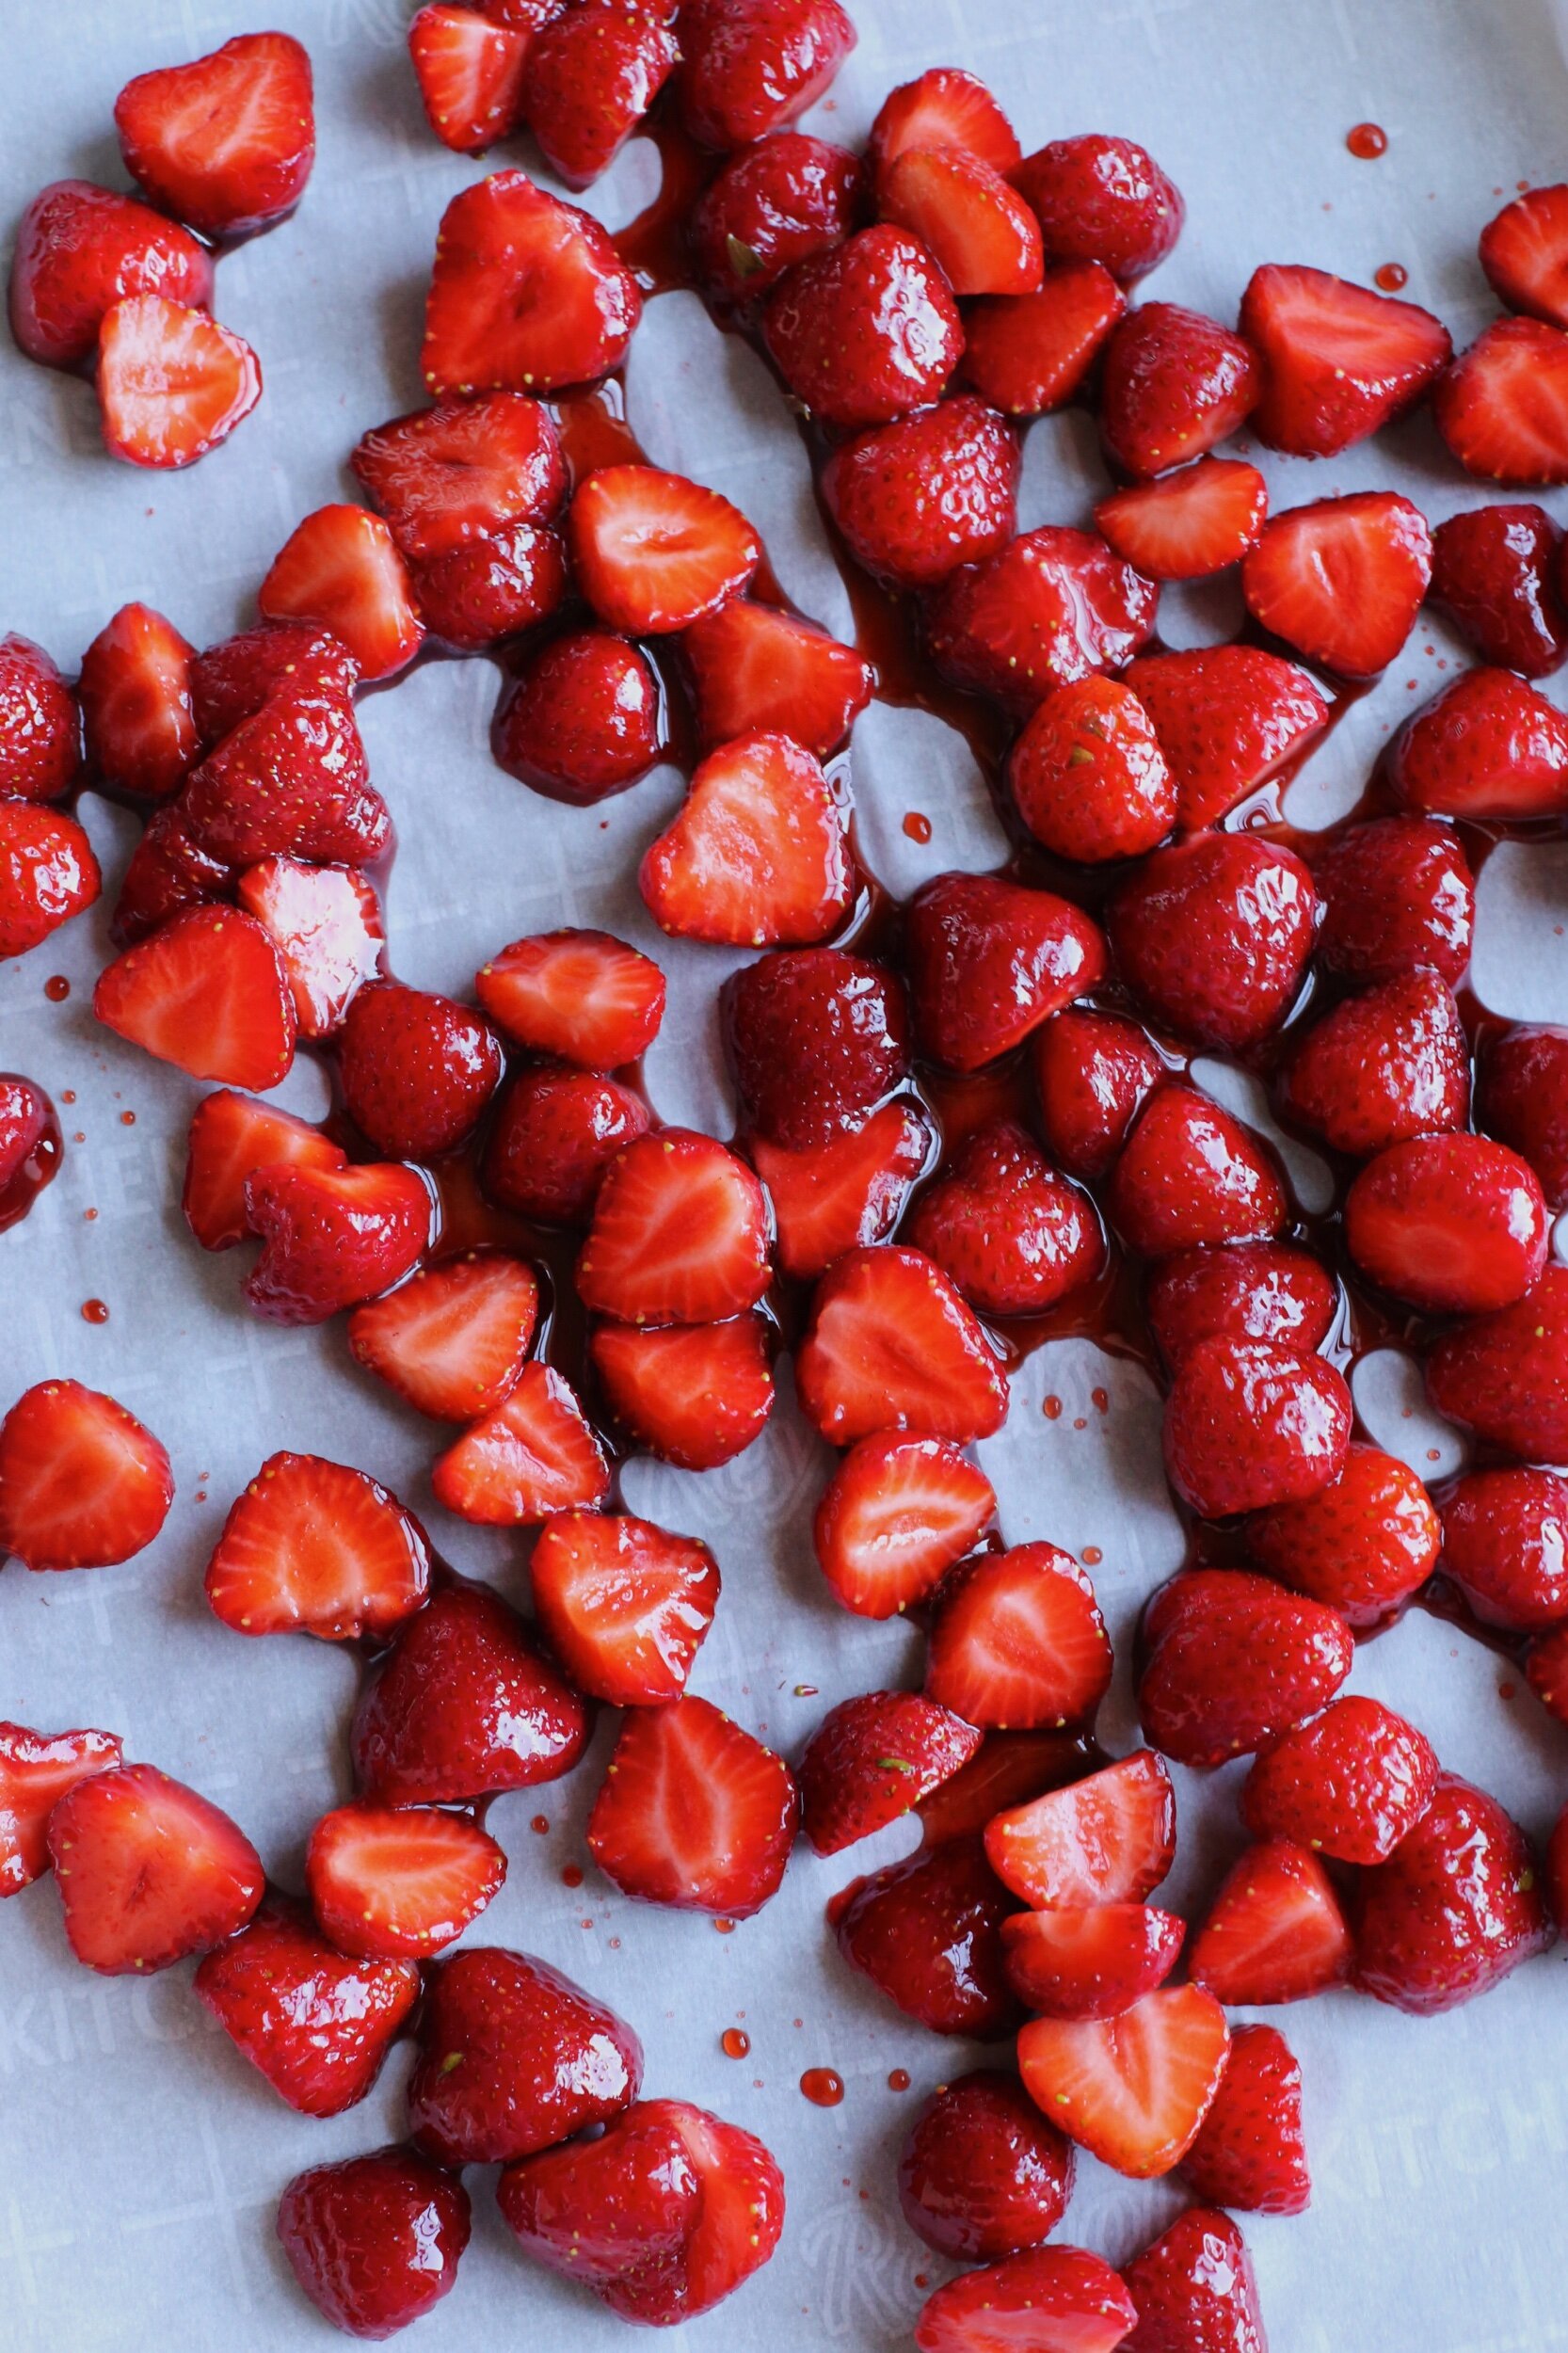
Let me preface this by saying that growing up I never EVER cared for ice creams that didn't have some kind of chocolate element to them. Chocolate chip cookie dough, mint chocolate chip, cookies 'n cream... these were all my favorites. Flavors like pistachio, strawberry, cherry, or butter pecan, were all a no-go for me. Fortunately, I've outgrown my narrow-mindedness in the ice cream department, and can earnestly say that this roasted strawberry and vanilla ice cream is in my top 5 favorite flavors. Roasting the strawberries in honey and a bit of balsamic vinegar gives it such a unique flavor that isn't overpowering to the vanilla, and leaves you with a complete fresh taste. It's truly incredible.

I divided up the recipe so that if you 0nly want to make the vanilla ice cream, and trust me, you'll want to, the directions and ingredients are there for you. I've made this vanilla ice cream countless times and it's so creamy and refreshing that I will probably never bother trying to find another recipe. As for the roasted strawberries, there's one tip that I want to give: the larger you leave the roasted strawberries when cutting them before adding to the ice cream base, the bigger chance of them becoming icy when in placed in the freezer. As you can see in the pictures, I chose to leave the strawberries larger because I think it looks beautiful, and I personally wasn't phased by the texture of the berries. If you think that will bother you, simply puree the berries in a blender. 

Roasted Strawberry and Vanilla Ice Cream

Makes about 1 quart

Ingredients for Roasted Strawberries

  • 1 pound fresh strawberries, hulled and cut in half or quarters depending on size

  • 3 tbsp. honey

  • 1 tsp. balsamic vinegar

Ingredients for Vanilla Ice Cream (adapted from David Lebovitz)

  • 1 cup whole milk

  • 2 cups heavy cream, divided

  • 3/4 cup sugar

  • Pinch of salt

  • 6 large egg yolks

  • 2 tsp. vanilla extract

Additional Ingredient

  • 1 tsp. fresh lemon juice


Directions

Make the strawberries: 

  1. Preheat the oven to 350°F and line a baking sheet with parchment paper.

  2. In a medium size bowl, mix the strawberries, honey, and balsamic vinegar and transfer to the baking sheet, making sure to scrape out everything from the bowl.

  3. Bake in the oven for about 35-40 minutes, stirring the strawberries once halfway through. The berries will appear well-cooked, a bit browned, and the juices will be bubbling.

  4. Allow the berries to cool for about 15 minutes on the baking sheet. Using a knife or kitchen scissors, roughly cut up the berries so there will be bigger chunks in the ice cream. You can also use a muddler if you want a more less chunky mixture. Transfer to a bowl, making sure to get all the juices from the parchment paper and chill completely until ready for the ice cream.

Make the vanilla ice cream / strawberry vanilla ice cream

  1. In a large bowl, add 1 cup of the heavy cream and set a strainer over the top (use a bowl that will be able to fit over an ice bath for later).

  2. Warm the milk, 1 cup of heavy cream, sugar, and salt in a saucepan over medium-low heat. In a medium bowl, whisk the egg yolks together. Just as the milk mixture is beginning to simmer, gradually add some of it to the bowl of egg yolks, whisking constantly as to not scramble the eggs (this is called tempering). Once the egg yolk mixture temperature has raised, pour the mixture back into the saucepan. Stir constantly over medium-low heat until the mixture thickens and coats the back of your spatula or spoon.

  3. Pour the custard mixture over the strainer-lined bowl. Stir the custard in with the heavy cream that is already in the bowl and add in the vanilla extract. Let the ice cream base sit over an ice bath for about an hour before moving to the refrigerator. Chill for at least 4 hours, or overnight.

  4. When ready to churn, mix the roasted strawberry mixture with the custard ice cream base. Add the lemon juice. Churn the ice cream in your maker according to the manufacturer's instructions.

  5. Transfer the finished ice cream to an airtight container and freeze until solid. Enjoy!

RESTAURANT STYLE SALSA + HOMEMADE TORTILLA CHIPS

IMG_5588.jpg

It's been a long and hard week... our family dog, Luka, sadly passed away last Saturday night. I know everyone has their own daily struggles and hardships, and they probably don't want to come to a food blog to read about someone else's problems BUT, I couldn't not say anything about our sweet boy.

We rescued Luka about 12 years ago, and he was actually the first dog that my family ever owned. Before Luka, all my family ever cared about was cats... at any given time from the day I was born, we consistently owned at least two kitties. But around the time I was a sophomore in high school, my mom decided that it was time to get our first dog, and we ended up finding Luka at an animal shelter in Mission Viejo. He was about 6 years old when we brought him home, so he lived a VERY long and nice life. My mom spoiled him like crazy, but we all gave him so much love, happiness, and whipped cream (his favorite treat). And in return, he gave us love, happiness, and a lot of shedded hair. We will miss that handsome pup so much, but I know that every day he spent with us was his happiest day. PLEASE consider adopting your next pet... there are so many animals in shelters that need a loving home.  

IMG_5483.jpg

Ok, enough sad talk! Let's move on to today's recipes. 

I don't know about you guys, but I could probably eat tortilla chips and salsa every single day of my life. There actually have been many nights where I was too lazy to cook myself a proper meal, and happily plopped down on the couch with a fresh bag of chips and a big bowl of salsa and/or guacamole. When I'm at home and using store-bought salsa, I'm not too picky about what kinds of salsas I like; I enjoy salsa verde, pico de gallo, etc. etc. But when I go out to eat at Mexican restaurants, I judge each place based on how good their house salsa is; salsa is a very important aspect of Mexican dining.

IMG_5509.jpg

Luckily, living in Southern California, I haven't run into the problem of having "bad" salsa, and I can probably name 10 places off the top of my head that crush the salsa game. My all-time favorite house salsas come from two Mexican restaurants here in Orange County: 1) Coyote Grill in Laguna Beach and 2) El Ranchito, which has multiple locations, but my favorite one is located in Orange. The salsas from these two restaurants are amazing to me in their own ways, with Coyote Grill's having an extra kick of black pepper and El Ranchito's having chunks of green onion in almost every bite.

IMG_5526.jpg

So, when my sister shared with me a simple, yet perfect salsa recipe that she created by using her new Vitamix, I decided to take that recipe and add my favorite salsa elements to it. The end result came out being insanely delicious! This salsa is definitely restaurant-worthy, if not on the same level: very fresh, a bit of heat, and undoubtedly addicting. I'm seriously surprised that I had leftover salsa to take pictures of for the blog because I couldn't stop eating it. I used my food processor for this recipe because I personally think it yields the best consistency, and makes it much easier than chopping up each ingredient. Don't have a food processor? Just stick to a blender, and I think the results will be similar.

And of course, what goes perfectly with fresh salsa? Warm, straight from the fryer, corn tortilla chips. Everyone should at least give homemade tortilla chips a try because I honestly think making that extra effort really pays off in the end. My only suggestion for making the chips is that having a kitchen thermometer is pretty vital to the process... the oil needs to be at 350°F in order to fry the chips.

IMG_5583.jpg


Homemade Tortilla Chips

Ingredients

  • 15-20 corn tortillas, cut into quarters (60-80 chips)

  • Vegetable or peanut oil, for frying

  • Salt, to taste

Directions

  1. In a large pot or Dutch oven, heat up 2-3 inches of oil - enough to cover the chips - over medium heat.

  2. When the temperature of the oil reaches 35o degrees F (a kitchen thermometer will come in handy here), begin adding about 10 tortilla quarters at a time to the pot. Using a slotted spoon or an Asian strainer, move the tortilla pieces around to prevent sticking and to let them evenly cook. After about two minutes, the tortillas will begin to change to a golden brown color and the oil will settle down - this is when the chips are done.

  3. Transfer the chips to a paper towel-lined plate or baking sheet, and immediately sprinkle generously with salt. Continue working in batches until all tortilla pieces are cooked. Enjoy the chips with my salsa recipe below!

Restaurant Style Salsa

Makes about 3-4 cups

Ingredients

  • 1/2 cup fresh cilantro leaves, lightly packed

  • 3 large garlic cloves

  • 1 serrano or jalapeño pepper, seeds and membrane removed

  • 8 Roma tomatoes, seeds removed

  • Juice from 1/2 a lime

  • 1 1/2 tsp. kosher salt

  • 1 tsp. freshly cracked black pepper

  • 1 bunch of green onions, white and light green parts, thinly sliced

Directions

  1. Add the cilantro, garlic, and pepper to the food processor fitted with the "S" blade and pulse until finely chopped.

  2. Next, add the tomatoes, lime juice, salt, and pepper and blend until no chunks of tomato remains - about 20 seconds.

  3. Transfer the salsa to a bowl and stir in the green onions. Add more salt and black pepper if needed.


RIP sweet Luka

RIP sweet Luka

SIMPLE SUMMER PLUM CAKE

IMG_3213.jpeg

Today's recipe has quite a bit of significance to me. Back in 2011, when I was in college in Chicago and only occasionally baking cupcakes and cakes from a box mix, and absolutely nothing from scratch, I discovered food blogs. I believe this was the time when food blogs, and any type of blog for that matter, were beginning to gain traction and it felt as if there was a new blog popping up on the internet daily. One of those blogs was Smitten Kitchen - a blog that is run by Deb Perelman that I still love and utilize to this day.

IMG_3081.jpeg

I randomly came across a recipe of Deb's, Strawberry Summer Cake, in the summer of 2011 when I was visiting Cleveland, Ohio and wanted to make something for the Fourth of July. The recipe looked innocent enough and I thought I'd give it a try, this being my first recipe baking from scratch without help from my mom, grandma, etc. Also, the house I was staying at had a beautiful, hunter green Kitchenaid stand mixer, and I was fortunately able to use it (this was also my first time using the machine). Needless to say, I made a bunch of mistakes while making the cake - I'm fairly certain I didn't use room temperature butter and got some eggshell in the batter that I had to fish out - BUT by some miracle, the cake ended up working out and tasted pretty good. 

Even though I didn't really get into baking until I moved back home to California a year later, I'll never forget that day in Cleveland and how it sparked something within me; I will always fondly think of that as my "first" baking experience.

IMG_3103.jpeg

7 years later, I like to think that a lot has changed when it comes to making a simple fruit cake, and more over, my skills in the kitchen. But for whatever reason, I never attempted to remake that strawberry cake until this past weekend when it somehow popped up on my radar again. But even though the cake calls for strawberries, I thought I'd take this recipe and use it as a base for something that I wanted to create. So, I went grocery shopping and looked for a fruit substitute that is in season right now - lo and behold, I landed on plums. 

Honestly, I can't tell you the last time I had eaten a red plum and I'm kind of kicking myself for not doing it sooner. I've always been more inclined to buying nectarines or peaches, but I gotta say that plums might be beating both of those right now. They are that good. And look at how beautiful they are! 

IMG_3119.jpeg

Luckily for me, the plums worked out perfectly with the cake. To put my own spin on it, I added some spices that I knew would work well with the fruit (AKA I googled what pairs well with plums). I added cinnamon, ginger, and a little bit of cardamom because it's what I had in my pantry and it turned out AMAZING. If ginger isn't your thing, you definitely can leave it out and just add more nutmeg or even add another spice in its place, like cardamom. 

I feel like this cake can easily pass as a breakfast dish; I would just maybe stay away from adding confectioners' sugar and whipped cream, and maybe topping it with greek yogurt instead with fresh plums. That sounds perfect to me!

IMG_3175.jpeg


Simple Summer Plum Cake

Makes (1) 9" or 10" Cake

Recipe adapted from Smitten Kitchen

Ingredients

IMG_3193.jpeg
  • 6 tbsp. unsalted butter, room temperature, plus more for pan

  • 1 1/2 cups (188g) all-purpose flour

  • 1 1/2 tsp. baking powder

  • 1/2 tsp. salt

  • 1 tsp. ground cinnamon

  • 3/4 tsp. ground ginger

  • 1/4 tsp. ground cardamom

  • 1 cup granulated sugar

  • 1 large egg, room temperature

  • 1 tsp. vanilla extract

  • 1/2 cup milk (any kind will work, including non-dairy - I used unsweetened almond milk)

  • 1 pound plums (about 4) halved, pitted, and cut into about 8 wedges per plum

  • 2 tbsp. turbinado sugar

  • Confectioners' sugar, whipped cream, and/or thinly sliced fresh plums, to finish

Directions

  1. Preheat oven to 350°F. Generously butter a 9-inch or 10-inch springform pan (or pie pan).

  2. Whisk together the flour, baking powder, salt, cinnamon, ginger, and cardamom in a medium bowl and set aside.

  3. In the bowl of a stand mixer fitted with the paddle attachment (or in a large bowl if using a hand mixer) cream the butter and sugar together, on medium speed, until light and fluffy, about 3 minutes. Add the egg, vanilla extract, and milk and mix until incorporated. Scrape down the side of the bowl.

  4. With the stand mixer on low speed, gradually add the flour mixture until smooth. The batter will be quite thick.

  5. Evenly spread the batter into prepared pan. Arrange the plums in a single layer over the batter with the skin side up. Sprinkle the two tablespoons of turbinado sugar over the top.

  6. Bake in the oven for 10 minutes, then lower the temperature to 325 degrees F and bake for another 50-60 minutes until the cake is golden brown and a toothpick inserted in the middle of the cake comes out clean.

  7. If using a springform pan, allow the cake to cool 10-20 minutes before running a knife around the edge of the pan and carefully remove the top. Allow the cake to cool completely on a rack before adding your topping of choice (confectioners' sugar, whipped cream, and/or thinly sliced fresh plums).