ROASTED GRAPE AND BRIE CROSTINI

Do any of you have a mom that goes over the top when it comes to hosting? And by that I mean, do they put out trays and trays of food with four different dips, six various chips and crackers, at least three kinds of cheese, and roughly half of the local grocery store’s veggie selection? Well mine does and you can bet that on Thanksgiving that everything I just mentioned (and more) is causally placed in front of guests as the “appetizer” portion of the day. As much as I love eating all of it, especially the Ruffles and onion dip, it’s not ideal when you want people to save room for dessert, aka what I love making for Thanksgiving. Today’s recipe is my answer to this dilemma when it comes to hosting: make 1 dish that incorporates all the typical appetizer favorites without overdoing it.

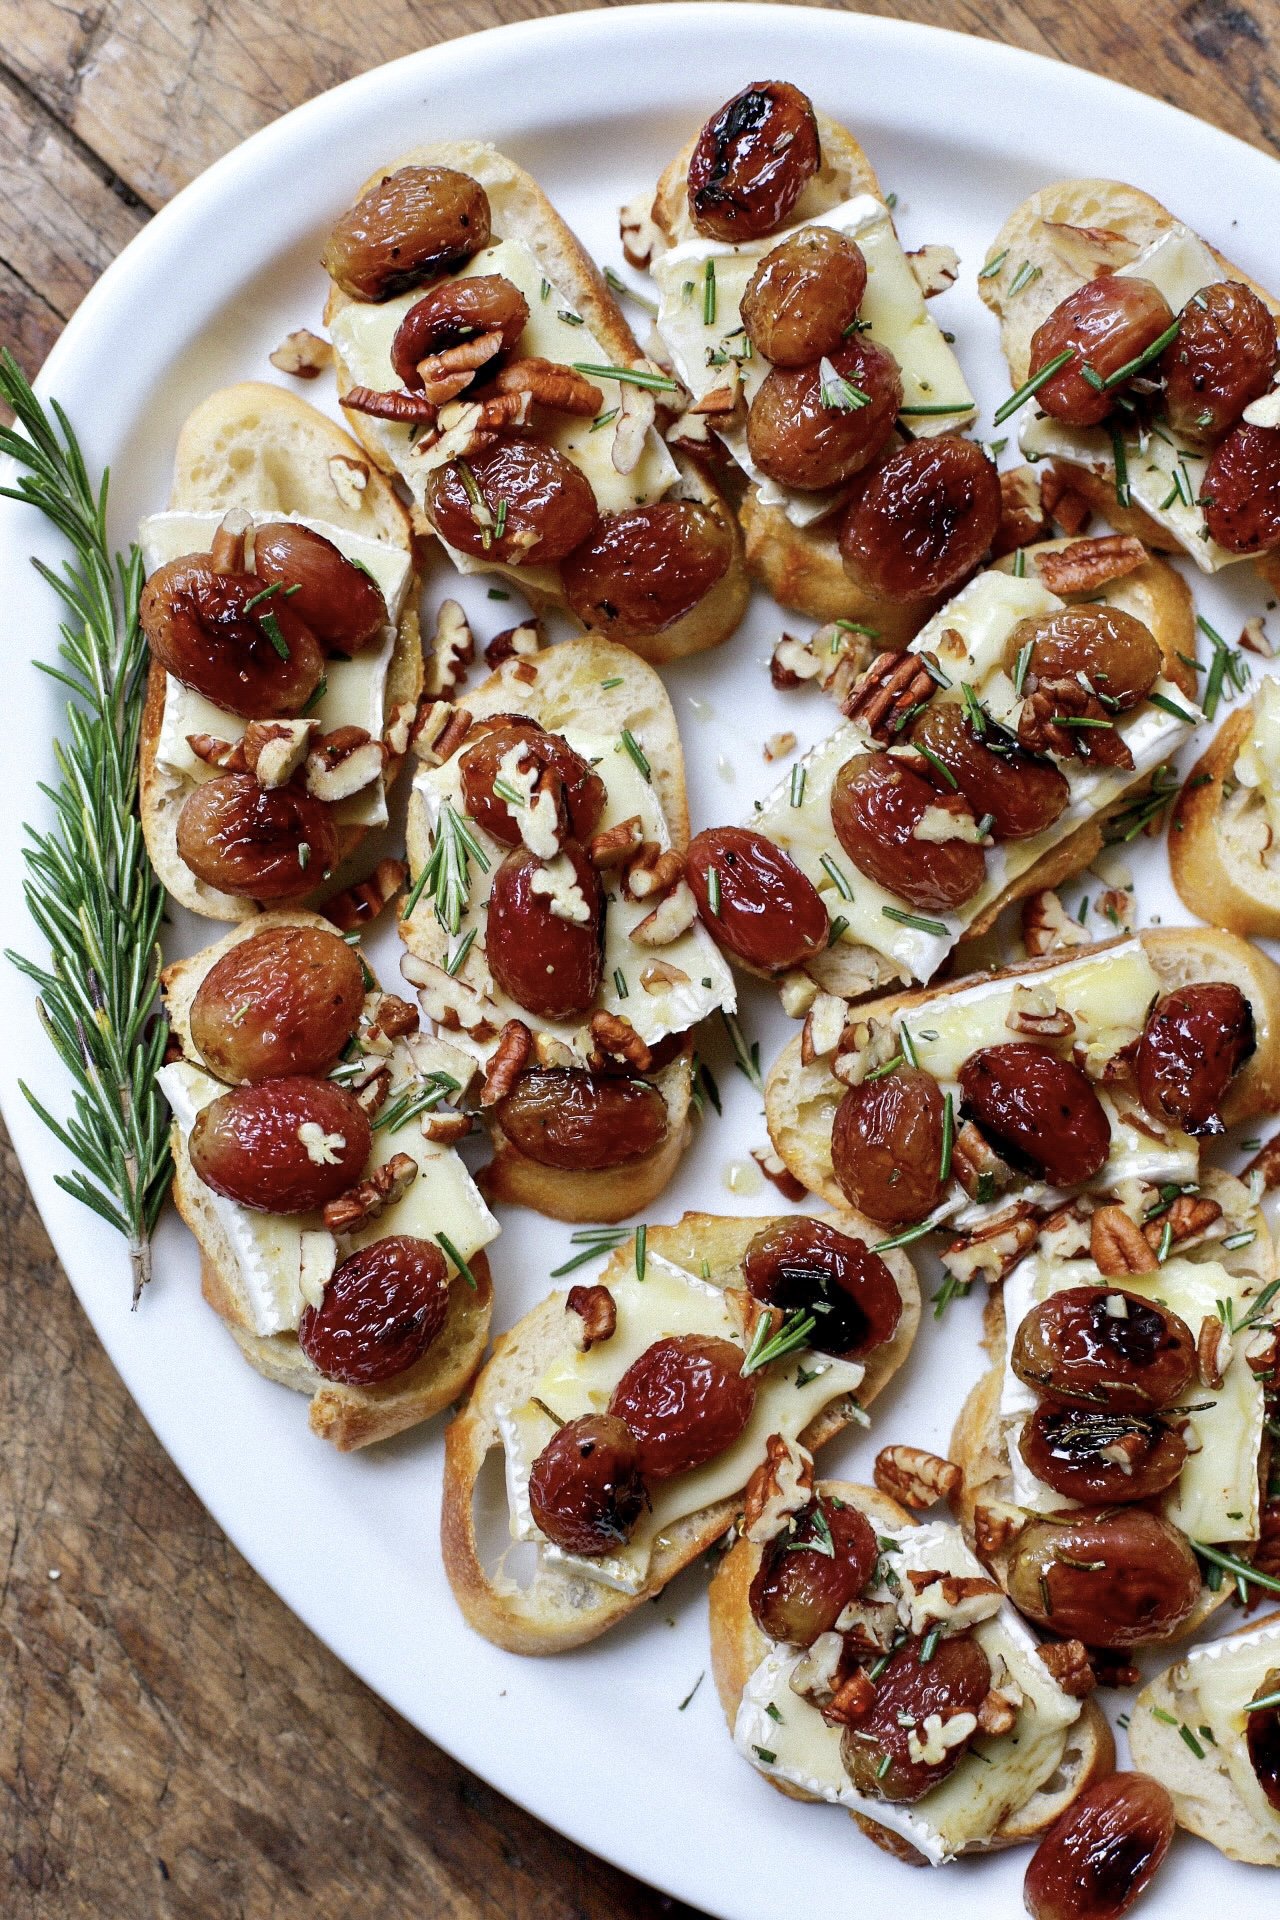
These Roasted Grape and Brie Crostini are so good that I promise you they’ll be one of the most remembered dishes of the day if served on Thanksgiving. You start off by roasting red grapes in olive oil, fresh rosemary, salt and pepper until they are nice and caramelized, then add them to toasted baguette slices along with creamy brie cheese, chopped toasted pecans, a drizzle of honey and some more rosemary for color and flavor. It couldn’t be simpler, but the finished product is mind-blowingly delicious. Everyone I’ve made them for so far has agreed that they’re the perfect couple of bites of food.

The thing that I like best about this recipe is that you can make it your own based on your personal food preferences. If you don’t like brie cheese, you can use ricotta, goat cheese or even a funkier bleu; if rosemary isn’t your favorite herb, then try it with thyme, oregano or sage; if you don’t have chopped pecans lying around, walnuts, pistachios, or hazelnuts all make for great substitutions; and lastly, instead of the plain honey, you can drizzle on a hot honey or a balsamic glaze to make it a bit more interesting. The combinations are truly endless so if you feel overwhelmed with where to start, just use my flavor pairings as a jumping off point.

Roasted Grape and Brie Crostini

Makes about 30 crostini, depending on bread size/slice thickness

Ingredients

For the roasted grapes:

  • 4 cups red grapes

  • 2 tbsp. olive oil

  • 2 sprigs of fresh rosemary, roughly chopped

  • Salt and pepper to taste

For the crostini:

  • 1 baguette, cut into 1/2in. pieces

  • Olive oil, to drizzle over the bread

  • 2-3 garlic cloves

  • 10-12 oz. Brie cheese, thinly sliced

  • 1/2 cup toasted pecans, roughly chopped

  • Honey, to finish

  • Chopped fresh rosemary, to garnish

Directions

  1. Preheat the oven to 400 degrees F. Place the grapes on a baking sheet and toss with the olive oil, rosemary, salt and pepper (to taste). Bake in the oven for 30-35 minutes, or until softened and browned, mixing halfway through. When the grapes are done, lower the oven temperature to 350 degrees F.

  2. Place the baguette slices on a separate baking sheet(s), drizzle with olive oil, and bake until lightly toasted, about 10 minutes. Once out of the oven, immediately rub each baguette slice with the garlic clove.

  3. Top each piece of baguette with a slice of brie, 3-4 roasted grapes and a sprinkling of chopped pecans. Finish with a drizzle of honey and some chopped rosemary. Serve immediately and enjoy!

MANGO + ROASTED TOMATILLO SALSA

IMG_3044-2.jpg

Earlier this week, Southern California got its first heat wave of the season and it was a doozy. Alex and I live on the top (3rd) floor of our apartment building and so by the late afternoon, its typical for our apartment to reach about 90 degrees (!!!). We do have central A/C, which we’re totally grateful for, but I come from the notion that you should save the A/C for the worst conditions… aka I’m cheap. Because of this, I try to never complain about the heat, but it’s pretty much a given that sleeping on these hot nights will be hell, especially because I’m sharing a bed with Alex. You know how back in the old days (I’m talking like, the 16th century) when people would place bed warmers in their bed? Alex is essentially one of those bed warmers, which is something I cherish in the winter times, because then I don’t even have to wear socks or sweats in bed, but not so much in the summer. I love him, but the dude runs hot.

Because of the heat, the last thing I wanted to do this week was turn the oven on and bake a cake or cookies. Furthermore, I noticed how I hadn’t posted a non-sweets recipe since January (my bar nuts) so I knew it was about time to do another appetizer or snack of some sort. And even though Alex turns our bed into a mini sauna, today’s recipe is dedicated to him because he was the inspiration for it.

Any time Alex and I go to a casual Mexican restaurant, without fail, Alex gets the mango salsa from the self-serving salsa bar. Although I love fresh mango and pretty much eat a bag of Trader Joe’s dried mangoes every day, mango salsa has never really been my thing. In my opinion, it's usually too sweet and has none of the spice or other flavors that I crave in my favorite salsas. And I’m convinced that most of them have added sugar to achieve that flavor. So, I decided to turn a mango salsa into something that both Alex and I would enjoy, which was achieved by adding a little heat with serrano peppers and a good amount of roasted tomatillos.

IMG_2921.jpg

If you’re unfamiliar with the Mexican fruit, let me tell you a little bit about tomatillos. Although they are part of the nightshade family and look like unripened green tomatoes, tomatillos are actually not tomatoes! They’re smaller, come in a papery husk which is easily removable and have a sticky residue on the exterior. Their bright green color is what gives Mexican salsa verde its signature look and as for taste, it is more acidic than normal tomatoes. Because of this added acidity, I felt like sweet, ripe mangoes would be a perfect match when balanced correctly. After a few trials, I believe that I found the perfect blend of sweetness, spiciness and acid.

In order to get that right balance, it is very important that you only use ripe mangoes. Otherwise, if you add a mango that isn’t ready, the sweetness won’t be there and you won’t even be able to tell that there’s mangoes in the salsa. Tomatillos can be a pretty overpowering flavor, so in order to combat this, ripe mangoes are vital. Don’t even bother making this salsa if your mangoes are unripe!

Although I pledged to not turn the oven on this week, I made the exception to turn the broiler on to roast not only the tomatillos, but the peppers and garlic cloves as well. Roasting these three ingredients allowed the flavors to be more accentuated and added more depth to the salsa. You want to achieve a light char on them, so don’t worry if you think you’ve “burned” the tomatillos or anything. Char equals flavor. Oh! And speaking of the serrano peppers, if you’re afraid of spicy food, I would suggest removing the seeds after you’ve roasted them, and using anywhere from one whole pepper to half of one. My ideal salsa is one whole pepper with some of the seeds squeezed out after roasting.

IMG_3026.jpg

And just so everyone is aware, Alex told me that this salsa is “the best salsa he’s ever had” and I literally had to take the bowl away from him because he would have eaten all of it. That’s a big deal! And I know he’s not lying because we’ve been together for 5 and 1/2 years and so we’re well past the phase of not being brutally honest with one another (he loves telling me when my hair is too fluffy).

If mango isn’t your thing, check out my other salsa recipe here, which includes a recipe for homemade tortilla chips.

Mango and Roasted Tomatillo Salsa

Yields about 3 cups

Ingredients

  • 6 small to medium-sized tomatillos

  • 1 serrano pepper

  • 3 unpeeled garlic cloves

  • 1/2 cup cilantro leaves, lightly packed

  • 1/2 cup red onion (about 1/2 an onion), chopped

  • 1 tsp. kosher salt

  • 2 ripe mangoes, chopped

Directions

  1. Move the oven rack to the top position and preheat the broiler.

  2. Remove the husks from the tomatillos and quickly rinse them with water to get rid of the sticky residue. Place the tomatillos, pepper and garlic cloves on a baking sheet and broil them for about 10-12 minutes, turning halfway. You want everything to be slightly charred, so if the garlic or pepper roasts faster, remove them first. Once roasted, peel the garlic cloves and remove the stem from the pepper. If concerned about heat, cut the pepper in half and squeeze out some of the seeds.

  3. In a food processor fitted with the S-blade or in a high-powered blender, add all ingredients except for the mango, and mix on high until everything is puréed. A few chunks are okay. Add the mango and pulse 5-10 times. Add more salt if needed. Transfer to your desired bowl and eat immediately with tortilla chips.

UNION SQUARE CAFE'S BAR NUTS

IMG_4980.jpg

Today I am giving you quite possibly the easiest recipe that you can find on The Vivid Kitchen thus far. We’re taking a break from desserts and baked goods this week in lieu of making something that will work perfectly for your Super Bowl viewing party. I’m talking about bar nuts, and not just any bar nuts but Union Square Cafe’s version of the seriously addicting snack. For those who don’t know, Union Square Cafe is a famous restaurant in NYC and comes from the mastermind restaurateur, Danny Meyer. He later went on to open other highly accoladed spots like Gramercy Tavern and Eleven Madison Park, the latter being a Michelin-starred restaurant. Although Union Square Cafe is a high-end restaurant with a sophisticated menu, their bar nuts are almost as famous as the restaurant itself. A quick google search will show that I am far from the first person to share this recipe, but I’ve found that still, a good amount of people in my circle had never heard of or tried these I introduced them. So, I want to spread the bar nuts love a little further today!

I’ve made these bar nuts at least 15-20 times since I discovered the recipe in my coveted Genius Recipes cookbook from Food52, about 4 years ago. Every time I go to a Cinespia screening at the Hollywood Forever Cemetery where we picnic before viewing a film, it’s a no-brainer among my friends that I will be bringing a batch of the nuts. At my sister’s wedding, I made a HUGE batch of these, enough for 115 people, but with only almonds because we just so happened to find pounds of them in my mom’s freezer. Each table at the wedding had a cheese platter filled with crackers, fruit, and the seasoned almonds (my mom, aunt, and I made each platter mere hours before the ceremony) and it was the perfect appetizer.

IMG_4610.jpg

The only problem with these bar nuts is that once you start eating them, you honestly can’t stop. I have no problem stopping myself from eating an entire can of Pringles, and I know I can only eat one single Lay’s potato chip, but with Union Square Cafe’s nuts, there’s no stopping. In fact, I never make them just for Alex and I to have at home because we both will eat nothing else until they’re all gone. And on Thanksgiving, I’m not allowed to make them because putting them out before dinner would ruin everyone’s appetite. Have I given enough proof that these nuts are amazing and that you need to make them?

As for what nuts to use, the choice is yours. You may include pecans, walnuts, Brazil nuts, peanuts, almonds, cashews or hazelnuts. These are all the nuts that are found in Union Square Cafe’s blend. But could you add pistachios or macadamia nuts? Of course you can! You also get to decide how much of each nut you want in your batch: you can have more almonds and less cashews, you can use only pecans, or you can use every single nut I listed above. Just as long as you use 800 grams (1 3/4 lbs. or 28 oz.) worth of nuts, you’re good to go. I find that the easiest way to measure out the nuts is by using a kitchen scale, especially if you’re using an array of nuts.

IMG_4619.jpg

It’s important that I note that you need to buy raw and unsalted nuts! We need to toast them ourselves so that the seasoning “paste” we make - consisting of melted butter, brown sugar, chopped fresh rosemary, cayenne pepper, and salt - will adhere to the warm nuts. I made two tiny changes to the seasoning paste which is that I use a bit more butter than what is called for (about 2 tbsp. instead of 1) and I finely chop the fresh rosemary. Over the years, I’ve found that these two modifications make for not only a tastier batch, but allows for the nuts to receive a generous coating of seasoning deliciousness. So that’s why in the recipe below, I have written 1-2 tbsp. of melted butter. I suggest starting with 1 tbsp. and see if it works for you, and if not, remember to add an extra half tablespoon or so the next time you make them! Because there will definitely be a next time.

Make these for your Super Bowl party please! Or any party or get together for that matter. I promise that these nuts will get more compliments than your main dish that took hours to prepare.

P.S. Have leftover fresh rosemary and not sure what to do with it? Make my lemon and rosemary madeleines!

IMG_4869.jpg

Union Square Cafe’s Bar Nuts

Makes about 5 cups

Recipe from Union Square Cafe via Genius Recipes

Ingredients

  • 1 3/4 lb. (800g, 28oz.) raw and unsalted assorted nuts (peanuts, cashews, Brazil nuts, pecans, walnuts, almonds, hazelnuts)

  • 1-2 tbsp. unsalted butter, melted (see note above)

  • 2 tbsp. finely chopped fresh rosemary

  • 2 tsp. dark brown sugar, packed

  • 1/2 tsp. cayenne pepper

  • 2 tsp. kosher salt

Directions

  1. Preheat the oven to 350°F. Evenly spread the nuts on a large baking sheet (if all nuts do not fit on one sheet, divide between two and toast at the same time). Toast the nuts for 10 minutes, or until lightly golden brown and fragrant.

  2. Meanwhile, prepare the seasoning. In a large bowl (large enough to fit the nuts), combine the melted butter, fresh rosemary, brown sugar, cayenne pepper and salt. When the nuts are finished, immediately transfer to the bowl with the seasoning and thoroughly mix to coat. Add more salt or cayenne if needed. Enjoy warm, but I think they’re best at room temperature when the coating has settled.