CITRUS RICOTTA BUNDT CAKE W/ PISTACHIOS

IMG_4156.jpg

And we’re back! After taking some time off from The Vivid Kitchen, I am more than excited to be here with my (tiny) community and start 2019 with fresh content. I kind of abruptly stopped posting new recipes about halfway through December because I had to focus on baking for real life events (I baked 4 different kinds of cookies to pass out as Christmas gifts - including these and these) and then after Christmas, Alex and I went out of town to Scottsdale, Arizona for 5 days to celebrate NYE. When we returned home on the 1st, I got sick for the first time in years and now that I’m finally feeling better, here we are!

P.S. I might do a photo diary/city guide of some sort for Scottsdale soon, even though all we do when we visit is hike and cook at the house we stay at.

IMG_4016.jpg

For Christmas, I was very lucky to be gifted a handful of kitchen/baking-related items that I’ve been obsessing over since opening them. Some things I received were: a Shun chef’s knife (Shun is my favorite knife brand), a Hamilton Beach waffle maker that I’ve already used a couple of times and yes, there will be waffle recipes in the future, a marble phone holder for my kitchen when I’m baking and my hands are full, and a few other things. I also got a new macro lens for my Canon camera (thank you, dad!) that is incredible and is the lens that I used to shoot this recipe.

Another gift I received was a new bundt pan from Nordic Ware, and I didn’t know it was possible to be in love with a baking pan, but I guess it is! The mold is so beautiful and makes every cake look like a piece of art, but it is also just as functional as it is pretty - I had no problems with the cake sticking to the pan. This is my first pan from Nordic Ware and it’s safe to say that I will continue to buy from them in the future.

IMG_4734.jpeg

Since we’re getting into citrus season, my favorite time of year, I wanted to make a bundt cake highlighting the season’s bright flavors. After about a month straight of eating cookies and chocolate, I didn’t want to make a very heavy or overly sweet cake, and this citrus ricotta cake is anything but those things. Olive oil and ricotta make the dish light yet super moist; the cake is sweetened with a blend of granulated sugar and honey; and the lemon/orange zests and juices brighten the cake and give it such a fresh flavor. This is actually one of the few cakes that you could eat for breakfast and not feel any guilt about it. Side note: I used my favorite orange variety, Cara Cara, for this recipe, which I highly recommend, but any orange variety will be perfect as well. You could even try using grapefruit, which I’ll probably do next time I make this cake.

If you remember, I did a post last year about making your own ricotta cheese for ricotta ice cream (still one of the best ice creams I’ve ever made) and today's recipe is pretty much the cake version of that. The flavors of citrus and pistachios work so well with the creamy ricotta cheese, so I knew that they both needed to be front and center in this cake. And of course, if you want to make your own ricotta cheese for this recipe, please do so, since it’s SO easy! But, if you don’t have the time or cheesecloth, then by all means, store-bought is A-OK with me. I recommend reaching for the whole-milk variety though.

IMG_4199.jpg

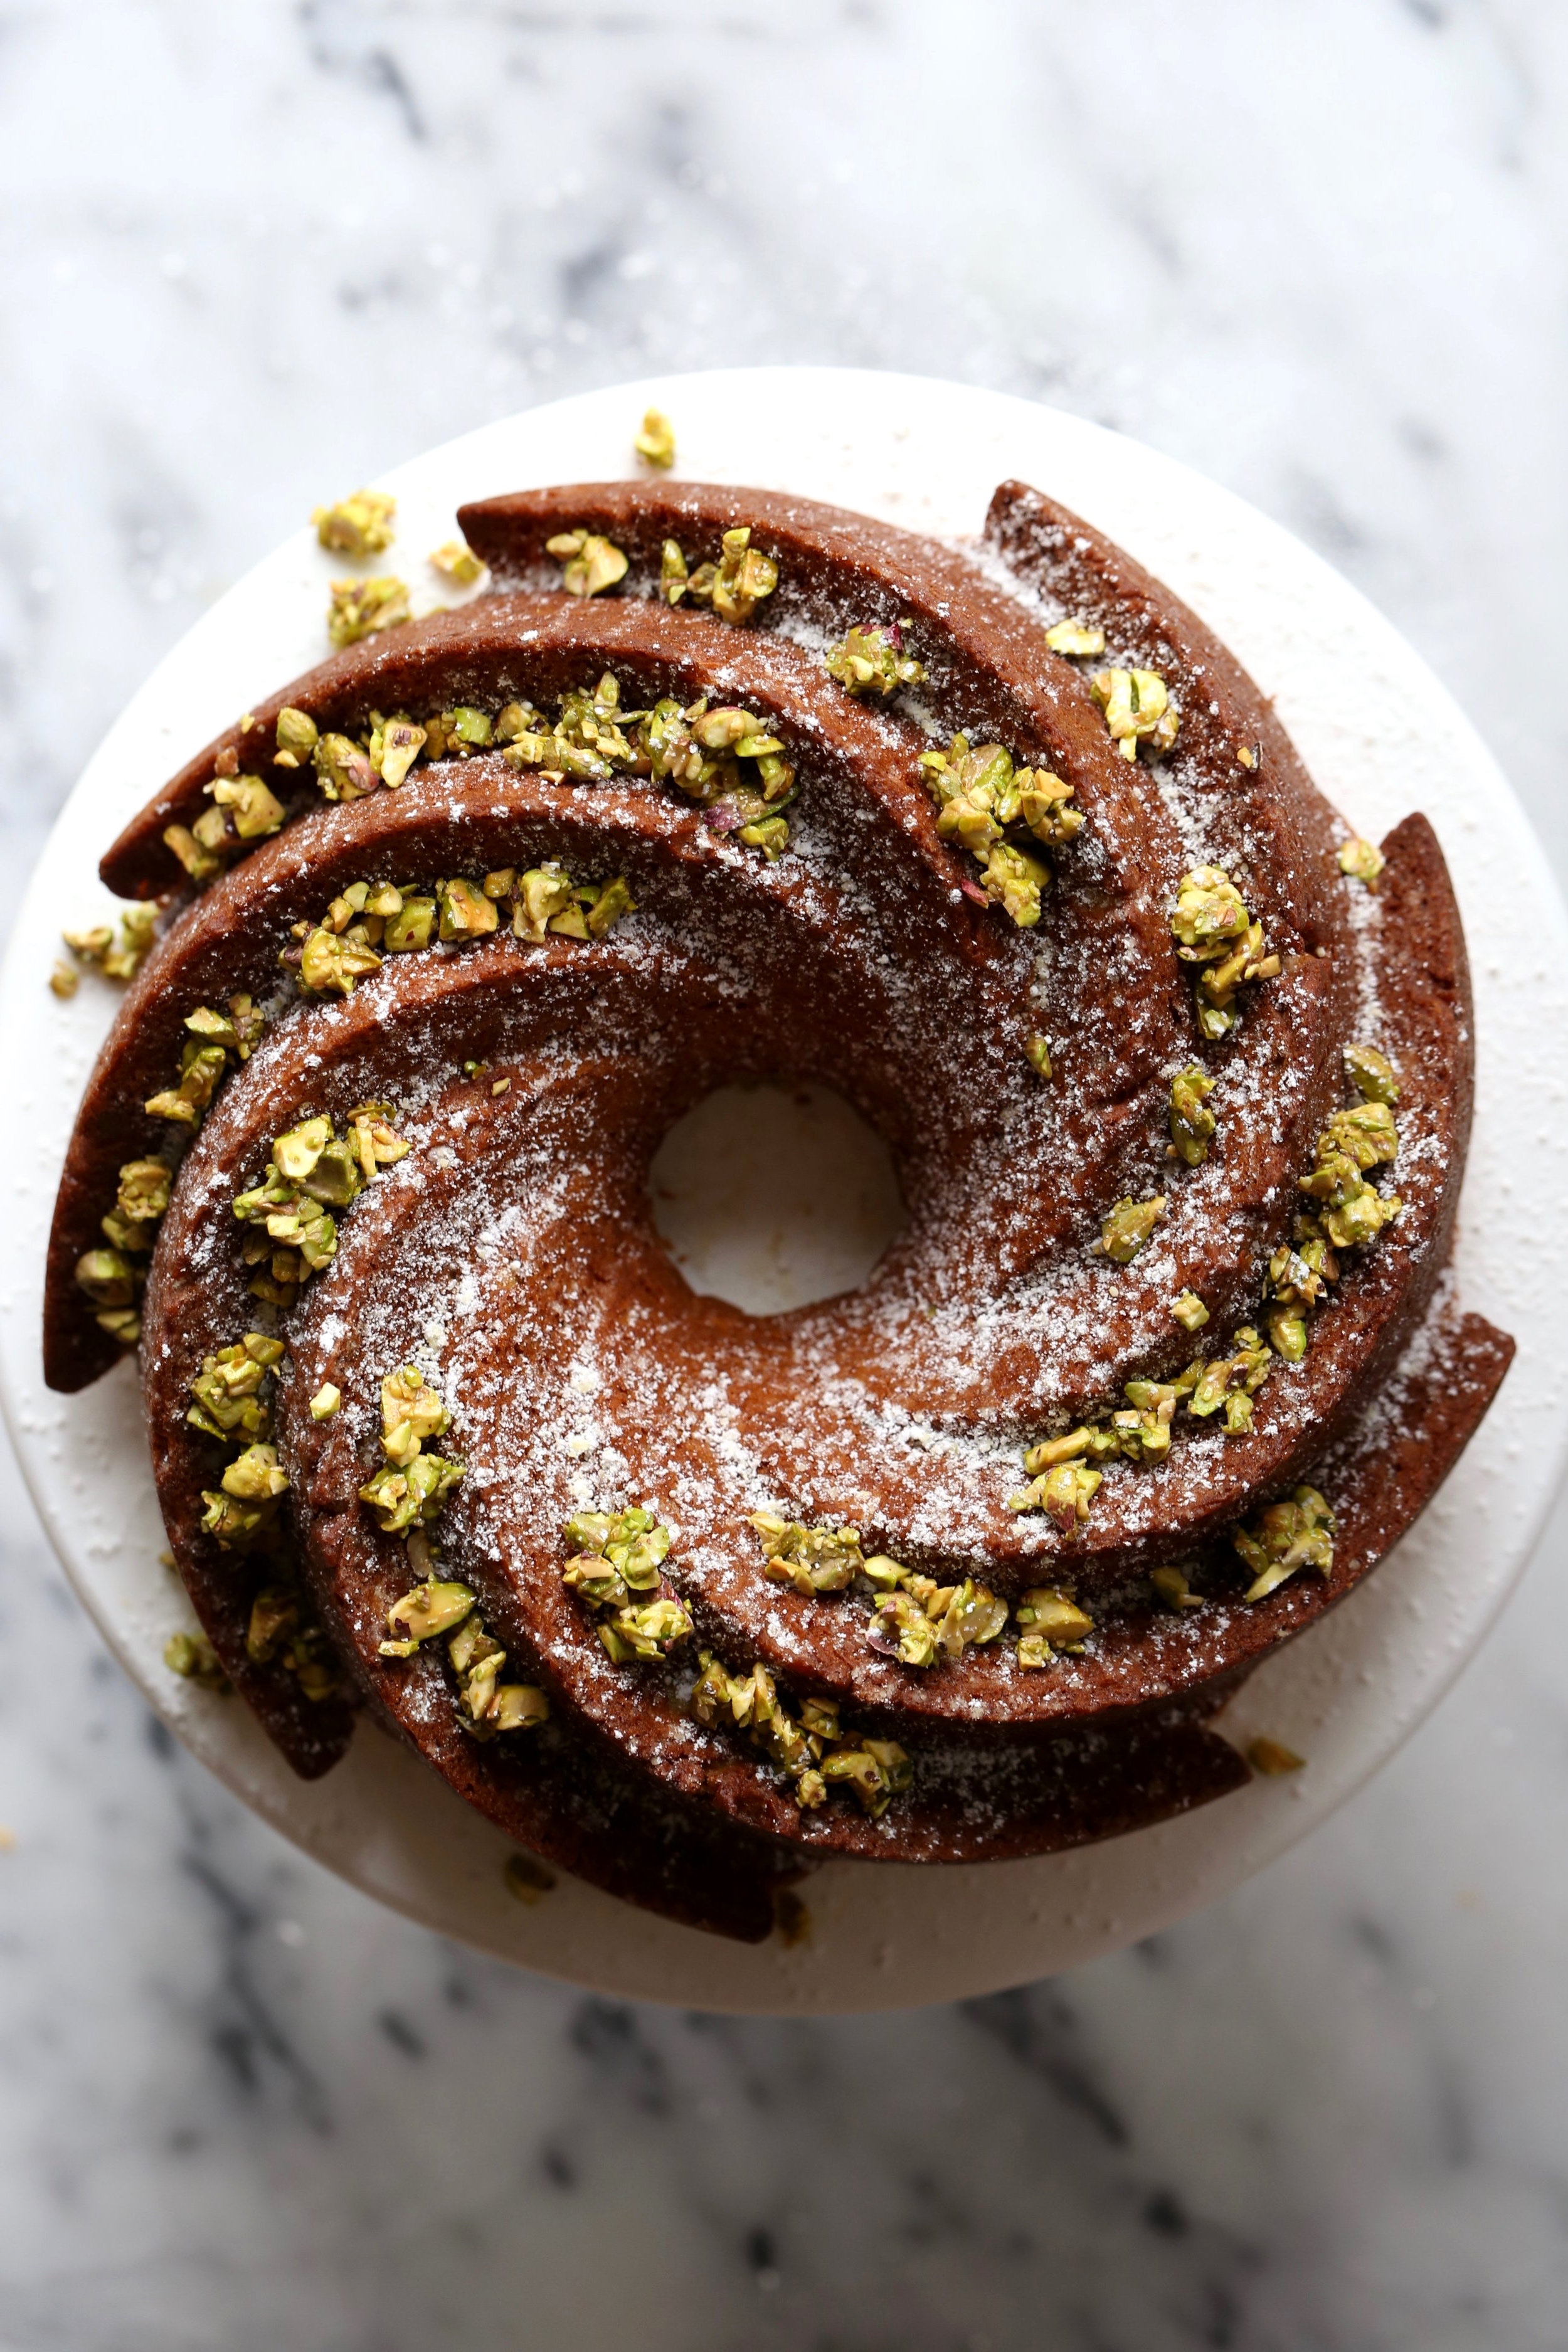
As for how to finish the cake, the choice is yours to make! (I did not plan that rhyme, I promise). There are a number of options: 1)a standard dusting of confectioners’ sugar, 2) a simple citrus glaze (2 cups of confectioners’ sugar whisked with 3-4 tbsp. of fresh lemon or orange juice), and/or 3) a mix of chopped pistachios with honey sprinkled all over the top. As you can see from the pictures, I chose a dusting of confectioners’ sugar as well as the pistachio/honey mixture and I thought it was perfect.

IMG_4735.jpeg

Citrus Ricotta Bundt Cake w/ Pistachios

Yields (1) standard bundt cake

Recipe adapted from Fraiche Nutrition

Ingredients

IMG_4736.jpeg
  • 2 cups all-purpose flour

  • 1/2 cup granulated sugar

  • 1 tsp. baking powder

  • 1 tsp. baking soda

  • 1/4 tsp. salt

  • 1 cup whole milk ricotta cheese, homemade or store-bought

  • 1/2 cup olive oil

  • 2 large eggs

  • 1 tsp. vanilla extract

  • 1/4 cup honey

  • 3 tbsp. lemon zest

  • 2 tbsp. orange zest (I love Cara Cara oranges)

  • 1/4 cup fresh lemon juice

  • 2 tbsp. fresh orange juice

  • 2/3 cup shelled and toasted pistachios, finely chopped (mixed w/ 1 tbsp. of flour)

  • Confectioners’ sugar, chopped pistachios mixed with honey, lemon glaze, to finish

Directions

  1. Preheat the oven to 350°F and spray the bundt pan with cooking oil spray (or you can butter and flour the pan).

  2. In a large bowl, whisk together the flour, sugar, baking powder, baking soda, and salt. Set aside.

  3. In a separate smaller bowl, combine the ricotta cheese, olive oil, eggs, vanilla extract, honey, zests, and juices. Whisk until the mixture is smooth and without lumps.

  4. Add the wet ingredients to the dry ingredients and gently fold together using a spatula. Before the batter is fully combined, mix in the pistachio/flour and finish mixing the batter.

  5. Pour the batter into the prepared bundt pan and smooth the top with a spatula. Place in the oven for 40-45 minutes, or until a toothpick inserted in the center of the cake comes out clean.

  6. Allow the cake to cool for about 5 minutes before inverting onto a plate or cooling rack. Finish the cake whichever way you’d like! The cake will last in an airtight container for about a week.

CHEWY MOLASSES SPICE COOKIES

IMG_3479.jpg

Today we’re focusing on yet another cookie recipe that is a Christmas staple when it comes to treats: molasses spice cookies. Unlike gingerbread cookies that are molded into little gingerbread men, these are shaped into a classic cookie form that yields an unbelievably soft and chewy texture as well as the signature “cracks” on top. Furthermore, the cookies are rolled in crunchy turbinado sugar (or granulated sugar if that’s all you have) before going in the oven, which leaves the cookies with a beautiful, glittery finish. All of this is ideal if you plan on having cookies on display at your holiday party or if you’re gifting cookies to friends and family this year.

IMG_3115 2.jpg

The “spice” aspect in these cookies includes all your favorite warm and cozy spices that are so prominent this time of year. The most added spice in this recipe quantity-wise is ginger, which will always be a match made in heaven when paired with molasses. The other spices include the usual suspects like cinnamon, clove and cardamom, but I also throw in a small amount of freshly ground black pepper. There’s only 1/8th of a teaspoon in the recipe, but it definitely adds a subtle level of spicyness that makes for a more interesting cookie.

I actually used to make these molasses cookies with fresh ginger as well, but I’ve come to the realization that it’s not needed! Most people don’t have fresh ginger lying around and I wanted this recipe to be something that can easily be thrown together, especially if you want to quickly make a dessert for guests coming over during the holidays or to pass out as homemade gifts.

IMG_3332.jpg

For this recipe you can use either light or dark molasses, but just make sure you choose one that is unsulphured. Light molasses has a milder flavor and is usually the go-to when it comes to baked goods, whereas dark molasses is more bitter and robust-flavored. It’s up to you on which you choose to use in the recipe; maybe you can try baking a couple of batches using light molasses in one and dark in the other, and see which you prefer. Note: There’s also Blackstrap molasses, which is even more bitter than dark molasses, but I would recommend straying from this kind due to its intense flavor.

IMG_3347 2.jpg

I splurged on Valrhona white chocolate fèves (aka chocolate discs) from Whole Foods the other week and decided to “fancy” up these cookies by melting the chocolate and drizzling it over the cookies. I LOVE the look of it, and if you’re worried that the white chocolate would make the cookies overly sweet, it really didn’t and actually works really well with the molasses and spices! Furthermore, it makes the cookies look prettier and more Christmas-like with the beautiful white color against the shiny turbinado sugar. It’s an optional step but worth it if you’re planning on gifting these babies or showing them off. If you don’t want to spend $$$ on the Valrhona fèves like I did, simply purchase white chocolate bars, like Ghiradelli, or even white chocolate chips.

IMG_3391 2.jpg

Chewy Molasses Spice Cookies

Yields about two dozen cookies

Recipe adapted from Bon Appétit

Ingredients

IMG_3409 2.jpg
  • 2 cups all-purpose flour

  • 2 1/2 tsp. ground ginger

  • 1 tsp. ground cinnamon

  • 1/2 tsp. ground cardamom

  • 1/4 tsp. ground cloves

  • 1/8 tsp. freshly ground black pepper

  • 2 tsp. baking soda

  • 1/2 tsp. kosher salt

  • 1/2 cup (1 stick) unsalted butter, melted and slightly cooled

  • 1/3 cup granulated sugar

  • 1/4 cup dark brown sugar, packed

  • 1/3 cup molasses, light or dark

  • 1 large egg

  • Turbinado or granulated sugar, for rolling

  • Melted white chocolate, to finish (optional)

Directions

  1. In a small bowl, whisk the flour, spices, baking soda and salt together until combined. Set aside.

  2. In a medium bowl, whisk the melted butter, sugars, molasses and egg together. Using a spatula, fold in the dry ingredients and only mix until no flour bits remain. Really try not to over mix here! Cover the bowl with plastic wrap and refrigerate the dough for at least 30 minutes so it’ll be easier to roll the dough.

  3. Preheat the oven to 350°F and line a baking sheet with parchment paper. Using a cookie scoop or two spoons, Scoop out about 1 1/2 tbsp. of cookie dough and using your hands, roll into balls. Roll each cookie ball through turbinado or granulated sugar and place them about 2 inches apart on the prepared baking sheet.

  4. Bake for 9-12 minutes, flipping the tray halfway through, until golden and crackled. The cookies will also be puffed up a bit. Allow the cookies to cool on the baking sheet for 5 minutes before transferring to a cooling rack. Drizzle with melted white chocolate if desired and enjoy!

CLASSIC HOT TODDY

IMG_3270.jpg

Happy December, everyone! I know I’m not alone in saying that this is my favorite month of the year, because who doesn’t love the holidays, but I think I have a bit more to celebrate than the average person. On top of all the Christmas celebrations and whatnot, my birthday is the day after Christmas AND my anniversary with Alex is on the 22nd. So pretty much for a week straight there’s something to celebrate every single night. Do I sometimes wish that Alex and I met in June or that I was born in August? You bet I do. But in all actuality, it’s kind of fun to be in party overload and I really try to compartmentalize each event and not lump it all together. For example, when Alex and I are celebrating our anniversary, I try not to even think about what I have to bake for the Christmas Eve dinner or, how many presents I have left to wrap.

But before we get to the end of the month, I have some fun Christmas events coming up that I look forward to every year. One of those events is Hospitality Night: when the streets in downtown Laguna Beach are closed off and it’s one big Christmas party including live music, fake snow, and tons of shopping at all the local shops…and FREE wine and desserts! It takes place every year on the first Friday of December, aka tomorrow! When I was going to high school in Laguna, I NEVER wanted to go because I was a typical teen and thought it was lame but now that I’m older, I find myself collecting ornaments and genuinely getting excited over Christmas lights. I love it.

IMG_3301.jpg

Lately, it’s been pretty cold - for Southern California standards at least - and we’ve been having a ton of rain. With that, I’ve been craving colder weather-appropriate drinks like wines and today’s recipe: a Hot Toddy. I’ve never been one to enjoy whiskey drinks and although I’ve tried just about every whiskey cocktail that Alex has ever ordered or made at home, I haven’t been able to enjoy it. But when I tried a Hot Toddy for the first time a few year ago at Hospitality Night, I loved it because it was so comforting and cozy that I didn’t even notice the flavor of whiskey. To this day, it continues to be the only whiskey drink that I order.

When we were visiting Maine this last time, we went to a bar called The Snug (featured here in my Portland, Maine City Guide), on a very, very cold night. When I got to the bar and saw someone else drinking a Hot Toddy, I knew I needed to order one for myself. That experience became one of my favorite moments of the trip - warming up with a Hot Toddy while sitting in a private dark booth with friends, on a cold night in Maine. Perfect.

The recipe for a Hot Toddy is extremely easy and requires no skill, unless boiling water is not your thing. Along with your whiskey of choice (whether you prefer blended or bourbon), you’ll add a squeeze of fresh lemon juice and a bit of honey. To that, you’ll top off the drink with hot water, add a dash of ground nutmeg or cinnamon, and it’s good to go. Also, if you’d like to replace the water with your favorite brewed tea of choice, that is completely allowed. It’ll give the Toddy a bit more flavor and also allows you to mix up the drink based on what tea you use. And a bonus is that Hot Toddies are great for drinking when you have cold or flu symptoms!

P.S. My adorable mugs are from Cost Plus World Market, and I love them. They’re also perfect for hot tea and coffee.

IMG_3240.jpg

Classic Hot Toddy

Makes 1 drink

Ingredients

  • 1.5 oz whiskey (blended or bourbon)

  • 1 tbsp. honey

  • Squeeze of fresh lemon juice

  • 6-8 oz. boiling water

  • Pinch of nutmeg, fresh or ground, or ground cinnamon

  • Cinnamon stick, lemon slice, star anise, whole cloves, to rganish (optional)

Directions

  1. To a mug or heatproof glass, add the whiskey, honey and fresh lemon juice.

  2. Carefully add the boiling water to the glass and stir the drink with a spoon. Add a dash of nutmeg or cinnamon.

  3. Garnish with your choice of a cinnamon stick, lemon slice, star anise, or whole cloves. Enjoy while it’s warm.