ROASTED APPLE AND CHINESE FIVE SPICE SCONES

The other night, Alex and I were on our typical after-dinner walk when the topic of discussing our favorite month of the year came up. Yes, I know that’s a topic that’s usually saved for bad dates or icebreakers on the first day of summer camp, but we were honestly interested in what each other thought. We both agreed that October was far and away our favorite month for the same typical reasons: we love the change in weather and the cozier, chillier nights, the increase in watching horror movies all throughout the month leading up to Halloween, and lastly, all the seasonal food/drinks (apple pie, ciders, hearty soups, pumpkin baked goods, etc.) that start to creep back into our diets.

Alex brought up one more reason, a sentimental one, which was that October was the month in which we first ever visited Portland, Maine. Just in case you’re new here, Alex and I lived in Portland for about a year and a half starting in 2020, and we miss it greatly. Although there’s beauty to be found in just about every season of the year in Portland, whether it’s the abundance of blooming flowers in the spring after a long, hard winter, or the sun-drenched days of summer that are filled with beach/lake swimming, hiking, etc, it is autumn when Portland and the entire state of Maine truly peaks. From the beautiful crisp weather, to the blazing fall foliage showcasing gold and crimson colors, to visiting orchards for apples and other local harvests, it’s hard to think of a more ideal time. Essentially, visiting Portland in October led us to fall in love with the city so much that we moved across the country because of it.

Since our conversation led us to being nostalgic over Portland and reliving our favorite memories, I wanted to bake something that reminded me not only of when we were living there, but mostly of the visit where we were first introduced to the magic that is Maine. On our first morning in Portland (we had flown a red-eye in and arrived starving for breakfast), we had breakfast at the beloved Tandem Bakery. I’ve discussed my love for this bakery numerous times in various blog posts, but I’ll just say again that if you ever find yourself in Portland, make sure you stop in (early!) and get yourself anything from the pastry case… you won’t regret it. I’ve never had anything short of amazing from Tandem, whether it was their signature biscuits, slices of loaf cakes, or the various seasonal pies, but the scones were what always called to me. Ever changing to reflect what was in season, the scones at Tandem were my favorite because not only did they have the best texture and level of sweetness, they were unique flavor-wise.

Today’s recipe is an ode to Tandem and their perfect scones that I crave on a weekly basis. I can’t remember if the flavor I’m sharing with you today was the first kind I had ever tried at Tandem, but I’ll definitely say it was a favorite of mine. The scone is apples with Chinese five spice, and although it sounds simple enough, the scones are unique and unlike typical autumnal flavors. If you’re unfamiliar with Chinese five spice, it’s a blend comprised of cinnamon, star anise, fennel seed, clove, and peppercorn. It’s the perfect balance of earthy, sweet, and spicy, and works beautifully in baked goods. It can be found in normal grocery stores in the baking aisle, but just make sure you get a blend with the spices that I mentioned above since some of them might have cumin or bay leaves.

I decided to roast my apples before adding them to the scone dough because I feel like it not only led to a better and deeper caramelized apple flavor, but it also helped with avoiding having unbaked apples in the final product. I roasted the chopped apples with maple syrup, vanilla extract and a bit of ground cardamom (my forever favorite spice) to really drive home the cozy, fall flavors that I wanted these scones to possess. I know it’s adding more work/time with roasting the apples beforehand, but it truly makes all of the difference. One final, and optional, element of these scones is finishing them with an apple cider glaze. Apple cider can be pretty pricey, so if you don’t feel like purchasing it just for the glaze, it’s totally skippable.

Roasted Apple and Chinese Five Spice Scones

Yields 8 large scones

Ingredients

  • 1 large or two small apples, unpeeled and chopped (Pink Lady, Jazz or Braeburn work best)

  • 1 tbsp. maple syrup

  • 1/2 tsp. vanilla extract

  • 1/4 tsp. ground cardamom

  • 3 cups (360g) all-purpose flour

  • 1/3 cup granulated sugar

  • 1 tbsp. ground Chinese five spice

  • 1 tbsp. baking powder

  • 1/2 tsp. kosher salt

  • 1 1/3 to 1 1/2 cups heavy cream, plus more for brushing

  • 1 tsp. vanilla extract

  • Turbinado sugar, for topping

For the glaze (optional)

  • 1 cup confectioners’ sugar

  • 2-3 tbsp. apple cider

  • 1/2 tsp. ground Chinese five spice

Directions

  1. Make the roasted apples: Preheat the oven to 375°. Place the chopped apples in a small baking dish and toss with the maple syrup, vanilla and cardamom. Mix to combine and arrange in an even layer. Bake in the oven for about 30 minutes, or until fork tender, flipping halfway through. Allow the apples to cool completely before continuing (you can pop them in the fridge to speed this up).

  2. In a large bowl, whisk together the flour, sugar, Chinese five spice, baking soda and salt.

  3. Pour 1 1/3 cups of the heavy cream into a measuring cup and mix in the vanilla extract. Drizzle this mixture slowly over the dry ingredients while using a wooden spoon to gently mix it together (I actually use my hands so I can get a good feel for the dough). The goal is to have no dry spots left in the dough, so you may need to add more heavy cream. Add in a tablespoon at a time until no more flour bits remain, but try to avoid making the dough too sticky. Carefully fold in the roasted apples.

  4. Turn the dough out onto a lightly floured surface and knead it a couple of times. Using your hands or a rolling pin, work the dough into a 1-inch thick circle. Using a sharp knife, cut the circle into 8 wedges, transfer them to a large plate(s), and put them in the freezer for 30 minutes

  5. Preheat the oven to 400°F and line a baking sheet with parchment paper. Transfer the scones to the prepared baking sheet, leaving about 2 inches between each scone. Brush each scone with heavy cream and sprinkle with turbinado sugar.

  6. Bake the scones in the oven for 18-23 minutes, rotating halfway through, until the tops are a light golden brown. Let the scones cool for about 15 minutes before adding the glaze (optional).

  7. For the glaze: Sift the confectioners’ sugar into a small bowl (I always sift mine to ensure a smooth glaze) and add 2 tbsp. of apple cider as well as the five spice. Whisk thoroughly and add more apple cider if it’s too thick. Drizzle over the scones and enjoy!

KAUAI PHOTO JOURNAL / TRAVEL GUIDE

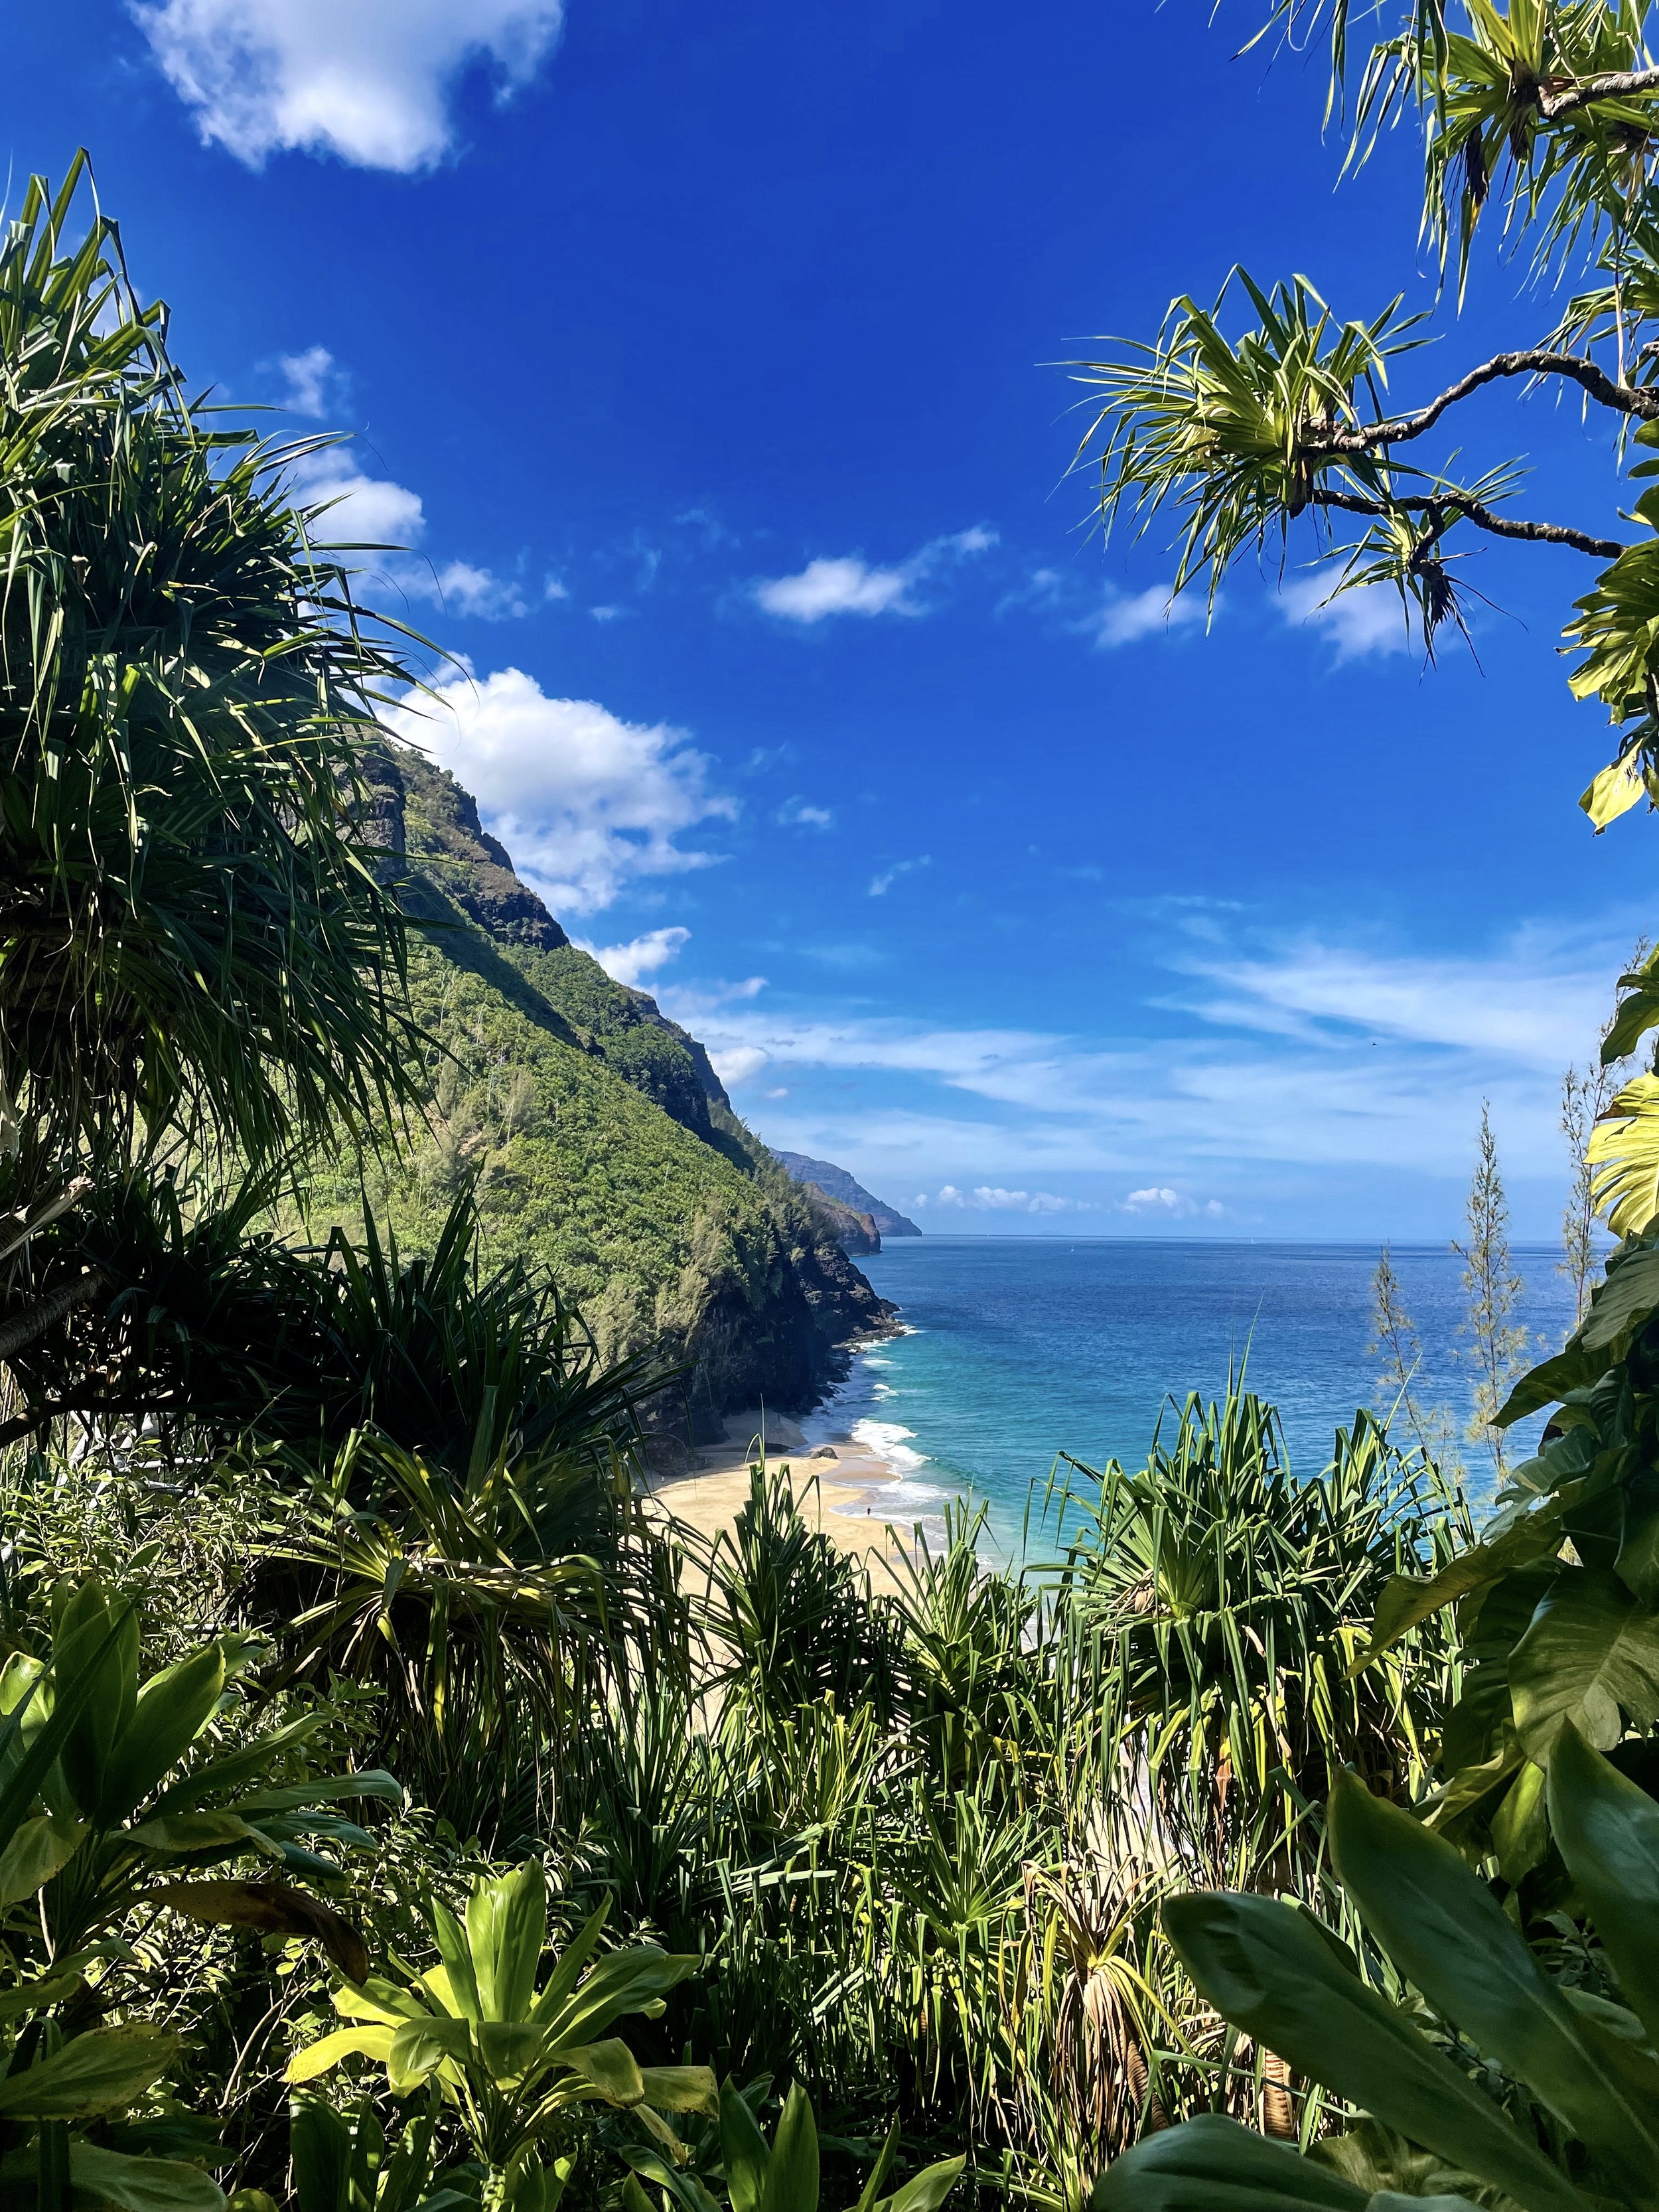
Hike view on the Kalalau Trail in Hā'ena State Park

After traveling to Hawaii for the first time last year and staying on the island of Oahu for my honeymoon, I never imagined that I’d be so lucky to visit another of the Hawaiian islands so soon. But when I had learned that I was pregnant earlier this year, I was interested in the concept of having a “babymoon”, aka a trip where you and your partner enjoy a ‘last hurrah’ of sorts before the baby arrives. Some people think babymoons are a bit ridiculous and that its selfish of the soon-to-be parents to take these trips, but I honestly think it’s pretty romantic and allows you to make some beautiful memories with your partner before your lives are forever changed. After coming back from our babymoon to Kauai, I can confidently say that not only was it worth it, but it turned out to be one of the best trips that my husband and I had ever gone on. When you’re on a babymoon, I feel like you’re 10 times more appreciative of the quality time with your partner and being able to do all the activities, whether leisurely or active, without worrying about your little one at home. It was a stress-free trip, yet we still did our fair share of exploring the island fully.

Sunset at Poipu Beach

Hibiscus near Tunnels Beach

Attempting to describe the beauty of Kauai is a very hard task because there’s just no words or photos that can do it justice; I had never seen such beauty in my life before. At one point I actually was in tears just over how perfect the moment was when I sitting on the sand at Tunnels Beach (pictures further below) looking at the beautiful blue water with jungle-y huge mountains in the background. The difference in vibes between Oahu and Kauai is night and day - Oahu was much more busier and packed with people, with countless activities and restaurants to visit, whereas Kauai is pretty quiet with a slowed-down way of things. There’s of course activities to do in Kauai, but almost all of the major ones can be squeezed in in a few days.

Driving on the North Shore at sunrise

We made the trip as cost-effective as possible and we even got lucky with finding fairly cheap airline tickets via Hawaiian Airlines. We stayed at VRBO rentals in lieu of the pricey resorts that Hawaii is known for, which greatly cut costs. We ate at casual restaurants or even got takeout a few times, which were usually our favorite meals because we’d bring our food to the beach. And because I’m a hungry pregnant woman, I also packed a bunch of travel-friendly snacks, like trail mix and dried fruits from Trader Joe’s, and made a couple batches of my favorite granola bars. This definitely saved us money since grocery stores in Kauai are pretty expensive regardless of what you’re buying. One aspect that was a non-negotiable for us was getting a rental car because we planned on doing multiple activities that were in different parts of the island. Kauai is much smaller than Oahu but I definitely think renting a car is worth it if you don’t plan on staying in the same town your entire trip.

A horse that was always standing near one of the driving bridges in Hanalei

We divided our trip by spending two nights on the South Shore with a condo in Koloa, and then three nights on the North Shore in Princeville in another studio-like apartment. Furthermore, anything on the western part of the island occurred while we stayed in the south, and anything east-related was saved for when we stayed north. We did this not only to prevent spending too much time in the car, but also because you can’t drive fully around the island. So for example, if we had wanted to go to Waimea Canyon on the west side while staying on the North Shore, it would have required us to backtrack around the majority of the island. Although neither of our rentals had an ocean view, we were very happy with both areas and were never further than a mile away from the beach. Koloa was a great little town right outside the more popular Poipu, that had plenty of beautiful beaches, restaurants and shops. And when we wanted to go somewhere in Poipu, it was a quick 5 minute drive for us. Like Koloa, Princeville is located right next to the touristy Hanalei in the North Shore and we felt it was also a prime location. One more thing to add: Kauai is so beautiful and green because of the amount of rain it receives - about 400 inches a year. So with that in mind, just expect that you’re going to experience some wet weather while you’re there, but it usually doesn’t last long. We chose to visit Kauai at a great time of the year, not only weather-wise but also because it wasn’t crowded at all, so I definitely recommend trying to visit in September, after Labor Day.

Below, I have enlisted my favorite recommendations and highlights from the trip by dividing it into two categories: 1) South Shore and Western Kauai and 2) North Shore and Eastern Kauai.

Sunrise on the South Shore

FAVORITE SOUTH SHORE + WESTERN ISLAND SPOTS/ACTIVITIES

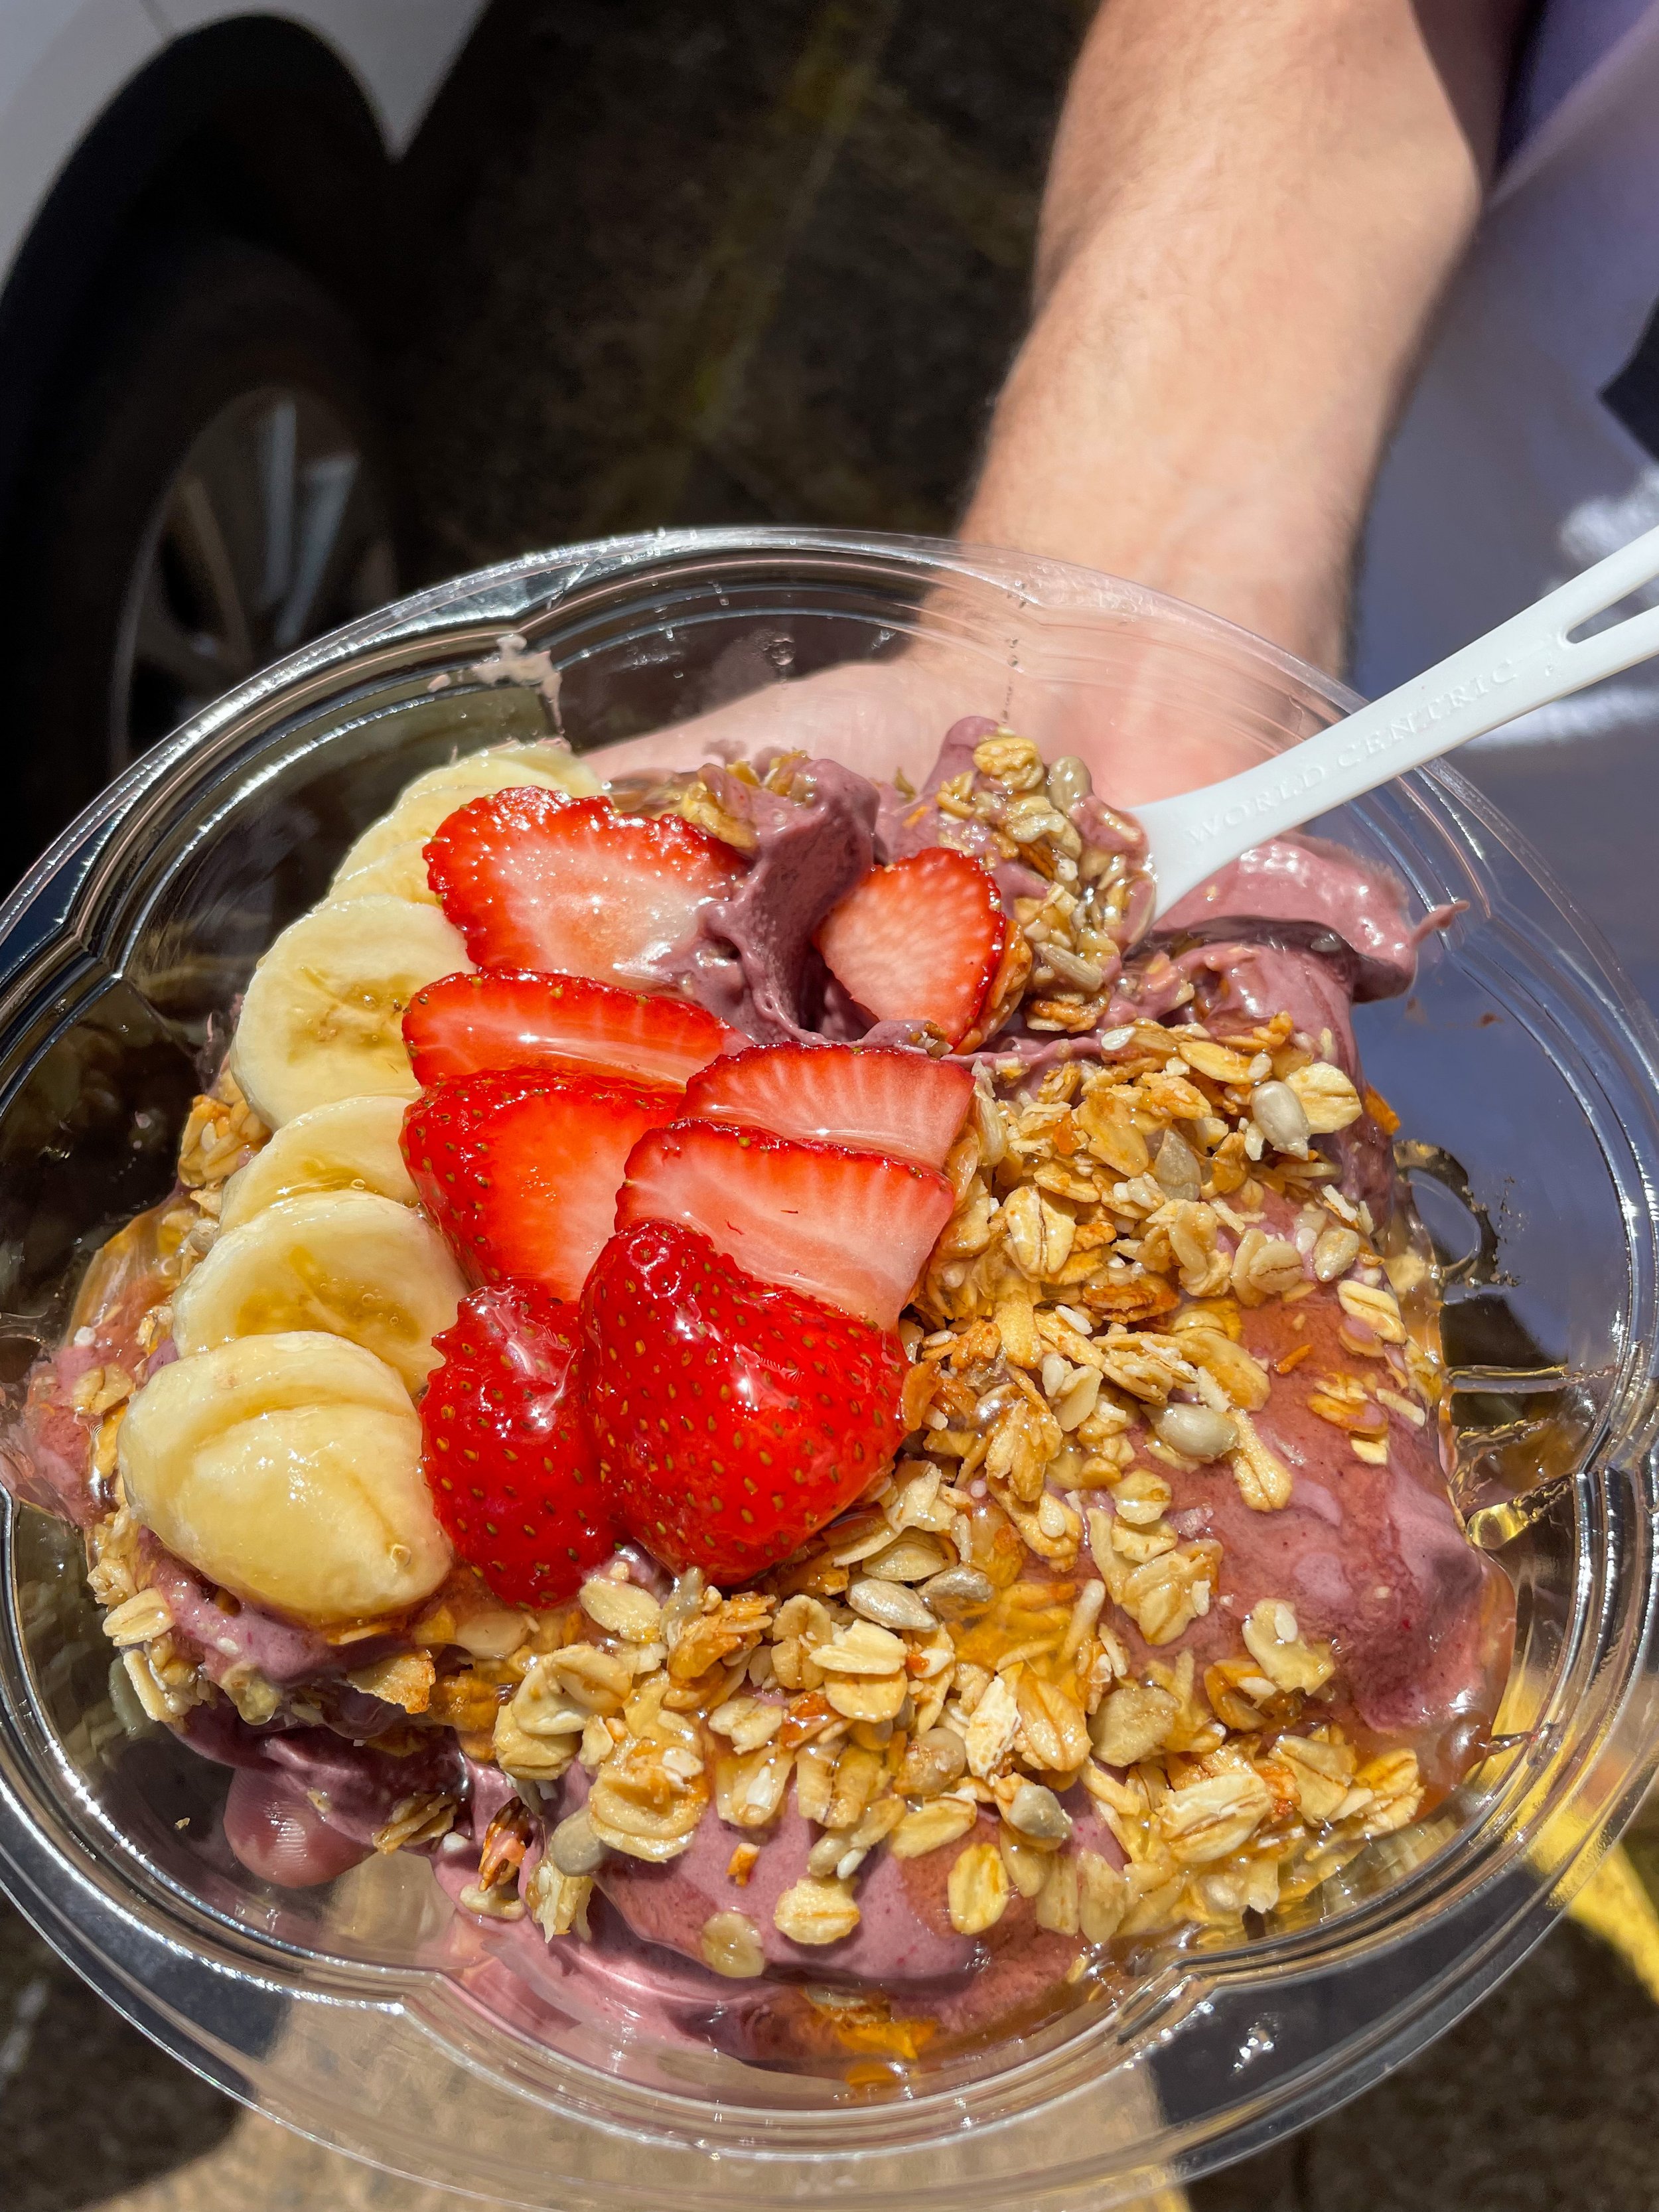
Anakēs Juice Bar - Located inside a market (Kukui’ula Market), Anakēs had the best açaí bowl that we tried in Kauai. Alex and I split a large ‘Funky Monkey’ with peanut butter, granola, honey and fresh fruit, and not only was it amazing, but very filling. They have multiple açaí bowls to choose from in addition to smoothies and fresh squeezed juices, and homemade oatmeal and overnight oats sold in to-go mason jars that looked delicious. It’s also right next door to the Mexican food spot Da Crack, which is just a little hole in the wall. We didn’t have a chance to eat there but based on the long lines every time we drove by it, I’m assuming it’s pretty good.

‘Funky Monkey’ açaí bowl from Anakēs Juice Bar

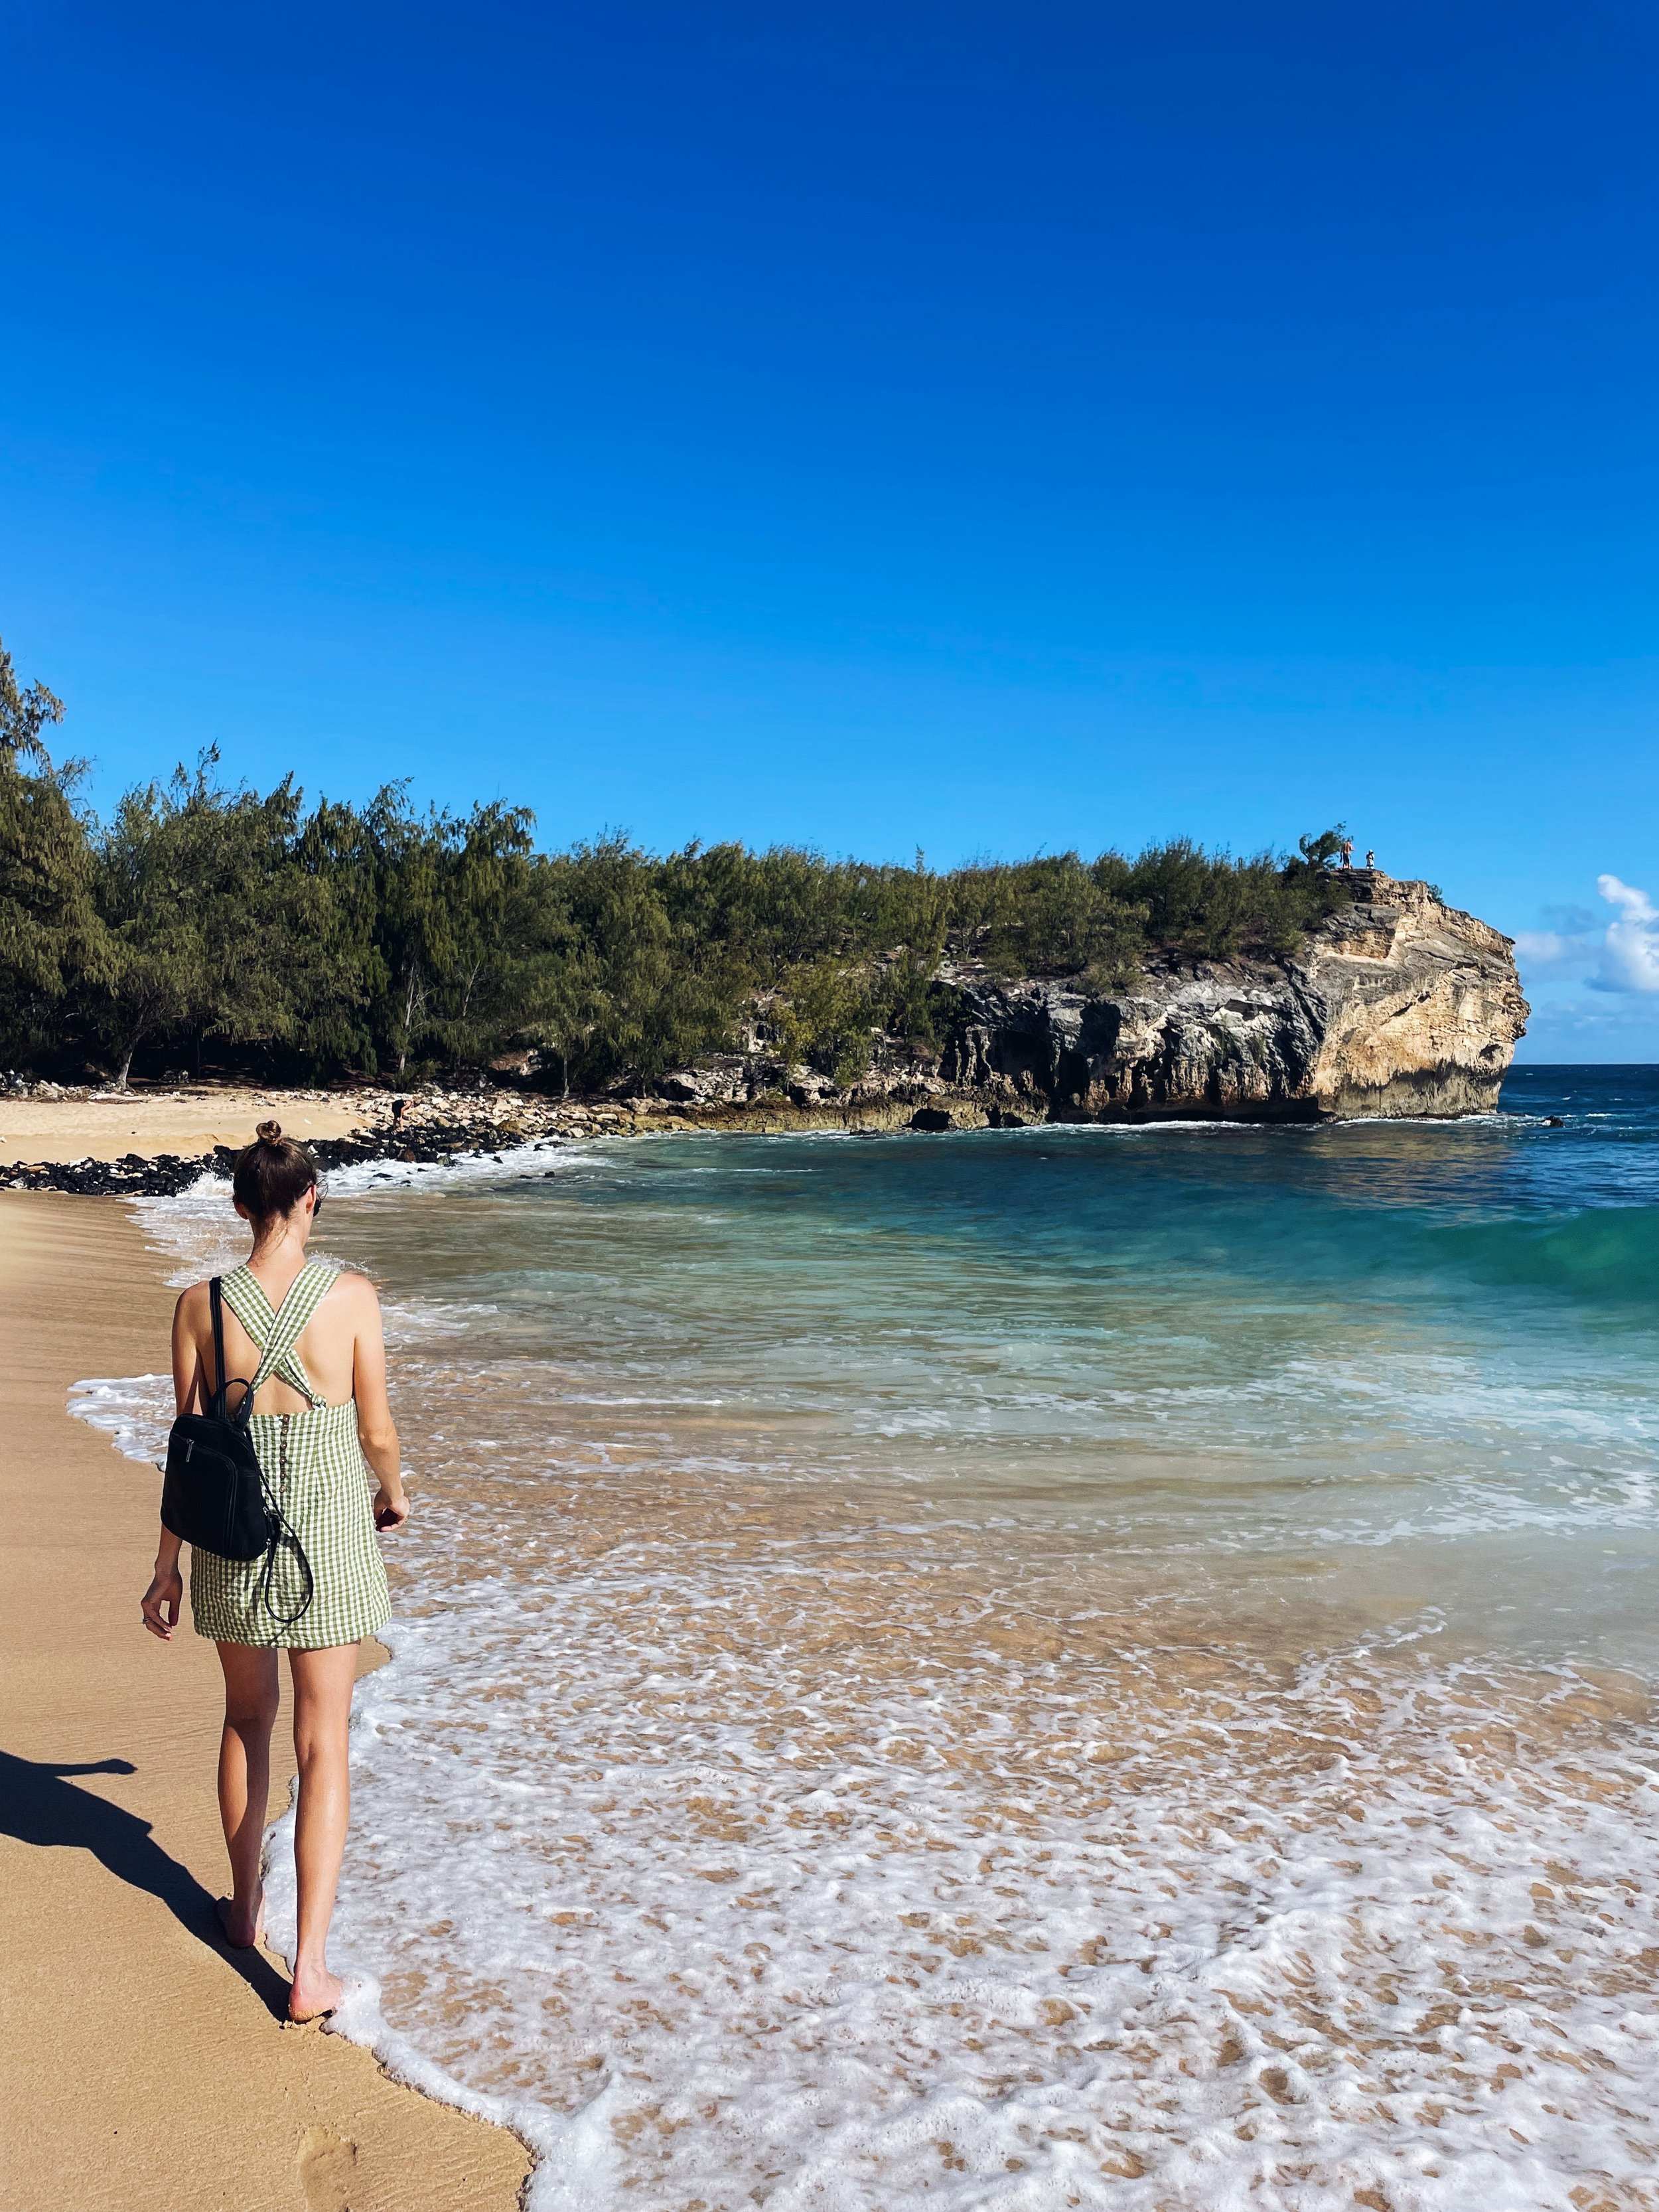
Shipwreck Beach - A beautiful beach that is more for sitting on the sand and watching the surfers, than it is for swimming. The waves are pretty rough here but it’s definitely a nice beach to walk along and put your feet in the water. Parking wasn’t an issue for us and there’s also bathrooms, showers and picnic tables. This beach also marks the beginning of the Maha’ulepu Heritage Trail, a 3.7 mile out-and-back hike that runs along the coast to Punahoa Point.

Taking a stroll on Shipwreck Beach

Tree Tunnel - You don’t have to go out of your way in order to drive through this mile-long tunnel of 500 huge eucalyptus trees - the drive from the airport in Lihue to Koloa/Poipu will take you right through it. It’s super easy to access and can easily be found via Google Maps.

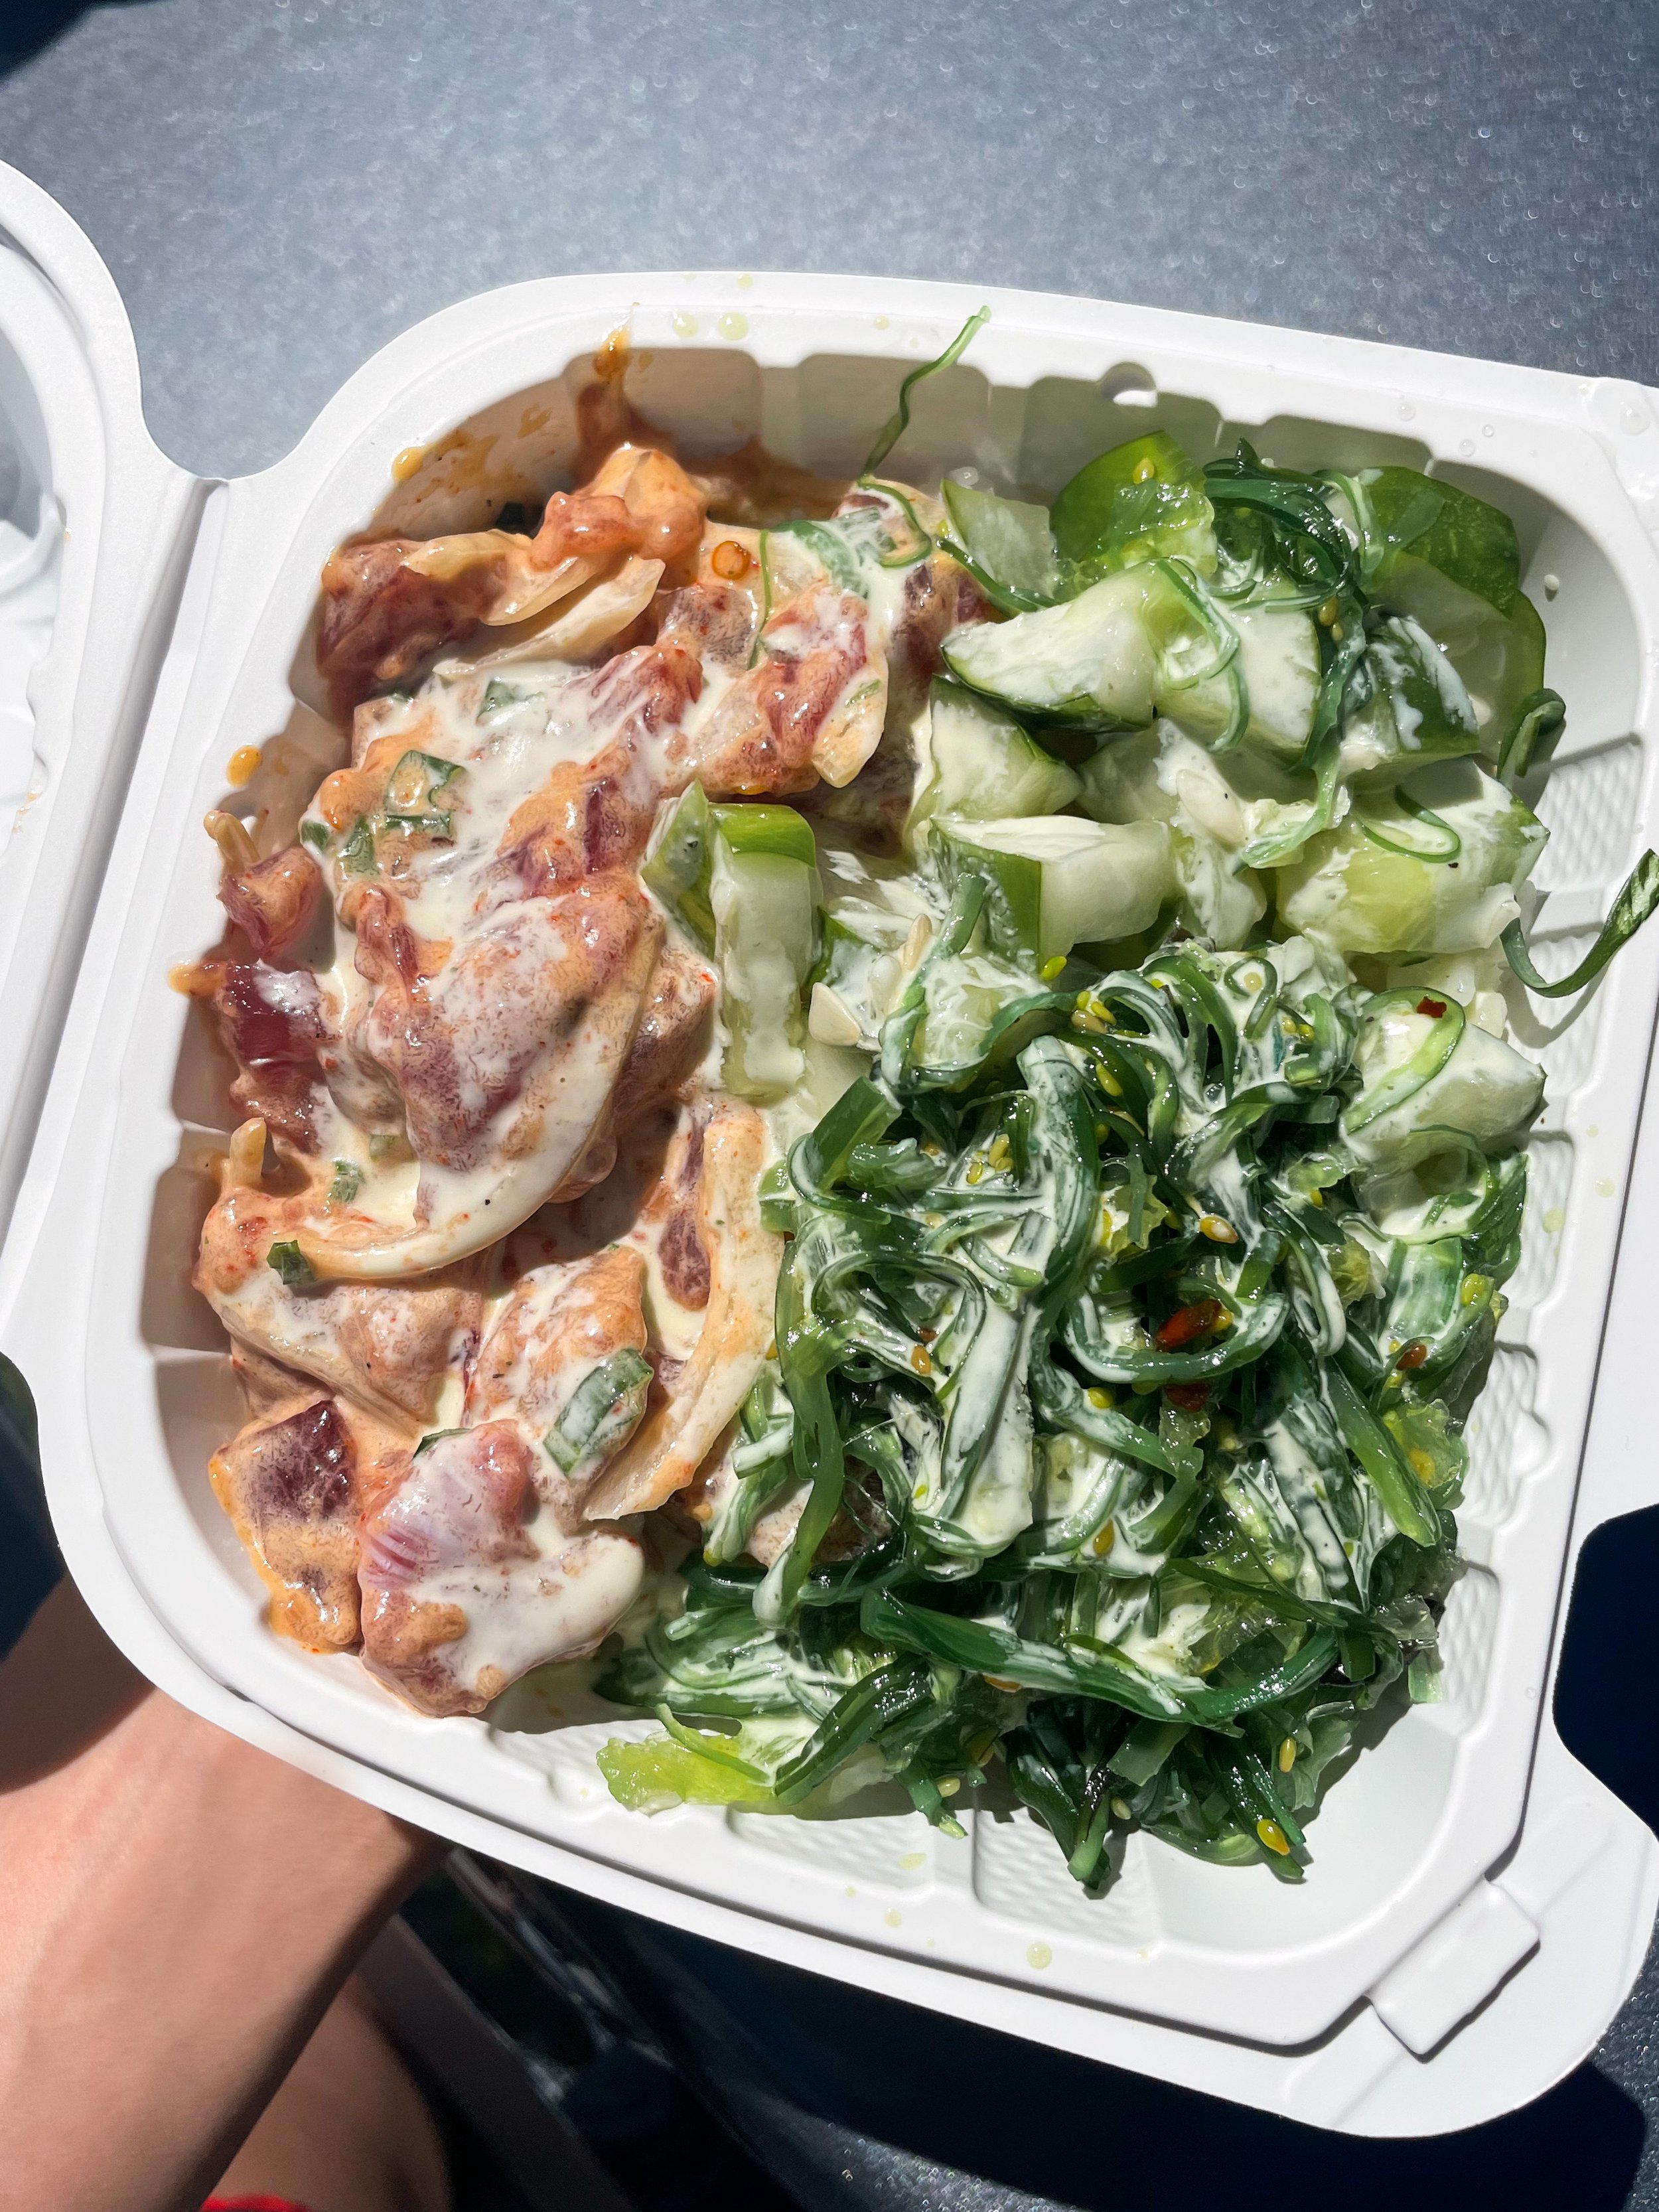
Koloa Fish Market - Alex had poke, the popular Hawaiian dish featuring raw fish, a couple of times on this trip but the poke plate that he ordered from Koloa Fish Market was by far his favorite (he also said it was one of the most delicious things he had ever eaten). His “small” order of spicy ahi tuna poke came with two sides, a cucumber salad and seaweed salad, as well as rice. I only tried a bite of the cucumber salad since I don’t eat seafood and it was incredible. If you’re not a seafood fan like I am, they also had other non-seafood items like fried chicken and kalua pork.

Poke bowl from Koloa Fish Market

Poipu Beach - Probably the most popular beach on the South Shore. We came here to watch not only the sunrise, but the sunset as well, which provided amazing views of both. Swimming here was perfect with little-to-no waves, and we also got to see huge sea turtles on the sand when we went at sunrise. Apparently, sea lions are known to hang out there as well. Parking was easy for us as there’s a big lot, and again, there’s bathrooms, showers and plenty of picnic tables.

Sunrise at Poipu Beach

Kalaheo Cafe and Coffee Co. - We stopped here for breakfast on our way up to Waimea Canyon and loved it. As always, I ordered a couple of pastries - a macadamia nut sticky bun and a strawberry banana scone - while Alex ordered an egg breakfast sandwich. Everything, including their cold brew coffee, was great, and the people who worked there were very friendly. Although we took our stuff to go, it looked like a popular spot to have a nice sit-down meal. Open for lunch and dinner as well.

Macadamia Nut Sticky Bun from Kalaheo and Coffee Co.

Waimea Canyon State Park - This is one of Kauai’s biggest attractions and for good reason. Waimea Canyon is dubbed “The Grand Canyon of the Pacific” and it’s plain to see why when you’re there. Exploring the state park can take as long as you want it to: there are multiple lookouts to drive to as well as various hiking trails with incredible views to explore. Since we were on a time crunch due to our scheduled boat ride, we chose to stick to the most popular lookouts including the main Waimea Canyon Lookout and the Kalalau Lookout. Admission to enter the state park is $10 per car as well as $5 per person, with no reservations needed beforehand.

Kalalau Lookout - Out of all of the lookouts while driving through Waimea Canyon, this is one that should not be missed. It gives you an amazing view of the Nā Pali Coast. Definitely try to get to the lookout in the morning, because you’ll be more likely guaranteed a clear view before the inevitable fog/clouds roll in.

Kalepa Ridge Trail - I read about this hike on some random travel blog and I’m so happy that I had stumbled upon it. The 1.9 mile out-and-back trail starts at the Kalalau Lookout and leads you to an even more epic view of the Nā Pali Coast. This hike was pretty difficult with some very steep and slippery parts and may not be best for those who have a fear of heights, but wow, it was totally worth it. Again, it would be best to do the hike in the morning when there’s a greater chance of having a clear view of the coast. Definitely recommended!

View of the Nā Pali Coast from the Kalepa Ridge Trail

Waimea Canyon Lookout

Capt. Andy’s Kauai Boat Tours - A must-see on Kauai is the beautiful Nā Pali Coast, which is best seen close-up either by boat or helicopter. Alex and I chose the former option and booked a trip via Capt. Andy’s, the most popular company on the island for catamaran boat tours and snorkeling adventures. It fortunately was also the only company that would allow me to ride at my stage of pregnancy: I was 25 weeks at the time and their cutoff for catamaran rides is 26 (pregnant women aren’t allowed on the rafting adventures). From their tour options, we settled on the 4-hour “Sunset Dinner Sail” on their 55-foot catamaran. Although we didn’t have the best weather, which we expected since rain is inevitable in Kauai, we had a great time and loved the views of the coast. Next time we go, we’ll definitely be booking through them again but for a snorkeling excursion to switch things up.

Sunset during our Sunset Dinner Sail via Capt. Andy’s Boat Tour

FAVORITE NORTH SHORE + EASTERN ISLAND SPOTS/ACTIVITIES

Tunnels Beach / Haena Beach - I’m pretty confident in saying that this was the most beautiful stretch of beaches I have ever stepped foot on. The views of huge green mountains paired with beautiful white sand and clear blue water were just so incredible and I could not stop talking about its beauty the whole time we were there. Parking is hard to come by, especially for Tunnels, where there’s only about 10 spots available, but there’s a bigger lot with bathrooms, showers and tables a mile away at the Haena Beach entrance. These beaches are ideal for snorkeling due to the coral reef and plenty of marine life, but we were very content with laying in the sand and swimming in the water for hours. Get there as early as possible to ensure parking.

Wainiha Country Market - We stopped in this adorable little market after Tunnels Beach just to check it out and were pleasantly surprised with how many local goods they had to offer. Although I was eyeing the homemade sweet breads, we settled on locally made popsicles, which we loved. Definitely a good place if you want to pick up some homemade/local souvenirs that aren’t kitschy.

Locally made popsicles bought at Wainiha Country Market

Sunset at Hanalei Bay on the North Shore

Kayaking Wailua River / Hike to Wailua Falls - This activity was a last minute addition to our trip and I’m so happy that we were able to squeeze it in. You can either kayak Wailua River and hike to the beautiful Wailua Falls with a tour group, or you can rent your own kayak through various rental agencies around the area. Alex and I chose the latter since we didn’t want to be at the mercy of a group that would probably move too slowly, since the tours usually take about 5 hours (we ended up completing everything in under 3). We chose to rent our kayaks from Wailua Kayak Adventures and had a very positive experience with them. Just be aware that if you plan on renting your own kayak, you will need to haul it to the river from the rental shop and back yourself, so a car is therefore needed. If you plan on hiking to Wailua Falls or Fern Grotto while on your kayaking adventure, I definitely recommend bringing hiking sandals and plenty of snacks/water to recharge.

Passion Bakery Cafe - This cafe located in Kapa’a was the perfect spot for us to fuel ourselves before our kayaking adventure. People are obsessed with their malasadas, which are essentially Portuguese donuts that can be found in bakeries throughout Hawaii, so there’s usually crazy long lines on the days they sell them (Tues/Thurs/Sat). Since we showed up on a non-malasada day, it wasn’t busy and we opted to try their other amazing pastries, like the macadamia nut sticky bun and guava puff.

Kayaking on the Wailua River

Trail to Wailua Falls

Hanalei Bread Co. - A very popular spot for breakfast and lunch that I was worried would be overrated, but we ended up eating there for breakfast all three mornings because it was that good. From their delicious coffee to the daily selection of pastries and other breakfast items, everything we tried was truly incredible. Their scones, like the pineapple coconut and mixed berry, were some of the best I had ever tried, and their savory items like the avocado toast and breakfast burrito were perfect as well. The prices may seem high, but the quality and portions definitely make up for it. People start to line up before the cafe even opens, so get there early or expect a long wait.

Apple danish and pineapple coconut scone from Hanalei Bread Co.

Hideaway Beach - Although this beach was kind of a struggle for us to get to, it was worth it just based on the views alone. Parking is hard to come by in the area since it’s mostly homes/condos nearby, so you may have to walk pretty far, and then it’s a steep hike down a cliff to get to the water. There are ropes to help you on the pathway down/up, but definitely take your time and wear appropriate shoes. The beach is gorgeous, albeit small, but definitely a little oasis that feels like a private beach.

Hideaway Beach

Tahiti Nui - A favorite restaurant among both locals and tourists, Tahiti Nui was our favorite restaurant for dinner and drinks (mocktails for me), and we ended up eating there a few times. It’s a lively atmosphere at night with live music, tons of people enjoying themselves and an overall super fun, yet laidback vibe. The food was great with plenty of options to choose from, like homemade pizzas, local fish, burgers and salads and they also do brunch on the weekends.

Kilauea Lighthouse - After living in Maine for a bit, we’ve come to appreciate lighthouses, so we definitely wanted to check this one out. Although we couldn’t enter the main entrance because we didn’t have a reservation, we still got an epic view (picture below) with the added bonus of saving money on admission, which I think was 10 dollars per person. This view is to the right of the main entrance gate and there’s actually a few parking spots so you can get out to see it.

Kilauea Lighthouse

Federico’s Fresh Mexican Cuisine - A very laidback Mexican food spot serving the classics like meat and fish tacos/burritos, quesadillas, tostadas, etc. We picked up takeout from here and brought it to watch the sunset at Tunnels Beach (highly recommend doing this).

Hā`ena State Park / Kalalau Trail - We were told by friends that hiking the Kalalau Trail within Hā`ena State Park was absolutely a must while on the island and we’re so thankful for the recommendation, because it was truly an incredible experience. This gorgeous (seriously an understatement) hiking trail runs along the Nā Pali Coast and has a few options when it comes to the length of the hike. The most popular, and shortest, option is hiking the first few miles to Hanakapi’ai Beach, which is what we chose to do mostly due to me being pregnant. Although a shorter hike, you still get insane views of the coast while walking through the coolest jungle-y trail. You’ll even see some fresh fruit growing like pink guava and mangoes. The other two hiking options include 1) a hike to Hanakapi’ai Falls, which is about 8 miles round trip, and 2) the full 22 mile roundtrip trip hike to Kalalau Beach. The latter takes at least a few days to complete and is best suited for advanced hikers. Regardless of what hike you plan on doing, you’ll need to make a reservation in advance in order to enter the state park (here’s the website). Also, don’t pass on taking a dip at the beautiful Ke’e Beach, which is located right next to the trailhead.

Walking along the Kalalau Trail

Hanakapi’ai Beach aka our destination on the Kalalau Trail

Anini Beach - This was the first beach we visited on the North Shore, and although it wasn’t our favorite, it was still beautiful and was the perfect swimming spot. It’s a pretty long strand of beach, so if you want to have some privacy, all you need to do is walk further away from the main entrance.

Fresh Bite Kauai - A food truck in Hanalei that we stopped at for lunch after our hiking in Hā`ena State Park. Even though we were starved and I’m sure anything would have tasted good to us at that point, the food here was honestly amazing. They specialize in salads, wraps/sandwiches and quinoa bowls that cater to not only vegetarians/vegans but meat-eaters as well. Excellent french fries as well!

Wishing Well Shave Ice - Our go-to spot for açaí bowls on the North Shore. Although not as good as the one we had at Anakēs, it still fulfilled our craving for the refreshing treat and we even visited the food truck a few times. Like the name suggests, they also serve shave ice as well as coffee and smoothies.

APPLE BUTTER RUGELACH

Yes, it’s me! I’m back with a new recipe after taking a break from the blog for the past, oh I don’t know, 9 months? But time flies when you feel like you just want to devote posting anything new strictly to Instagram as well as attempting to make Reels that will appeal to Gen Z. If you have no idea what I’m talking about, then I envy you greatly and let’s just all be thrilled that I have something new in this corner of the internet.

Another reason why I’ve been a bit pre-occupied is because I’m pregnant (!) and expecting a baby girl by the end of the year - she may have the same birthday as me or might even be a New Year’s Eve baby. I’m almost in my third trimester, which is wild, but Alex and I are very happy and cannot wait to meet our girl in about 12 weeks. I luckily never had any nausea, but at the same time, I haven’t had any fun pregnancy cravings (bummer!), so my baking throughout this journey has stayed about the same. If anything, I’m cooking a lot more dinners and getting ready to prepare a ton of freezer meals for when the baby is here. Exciting information, I know.

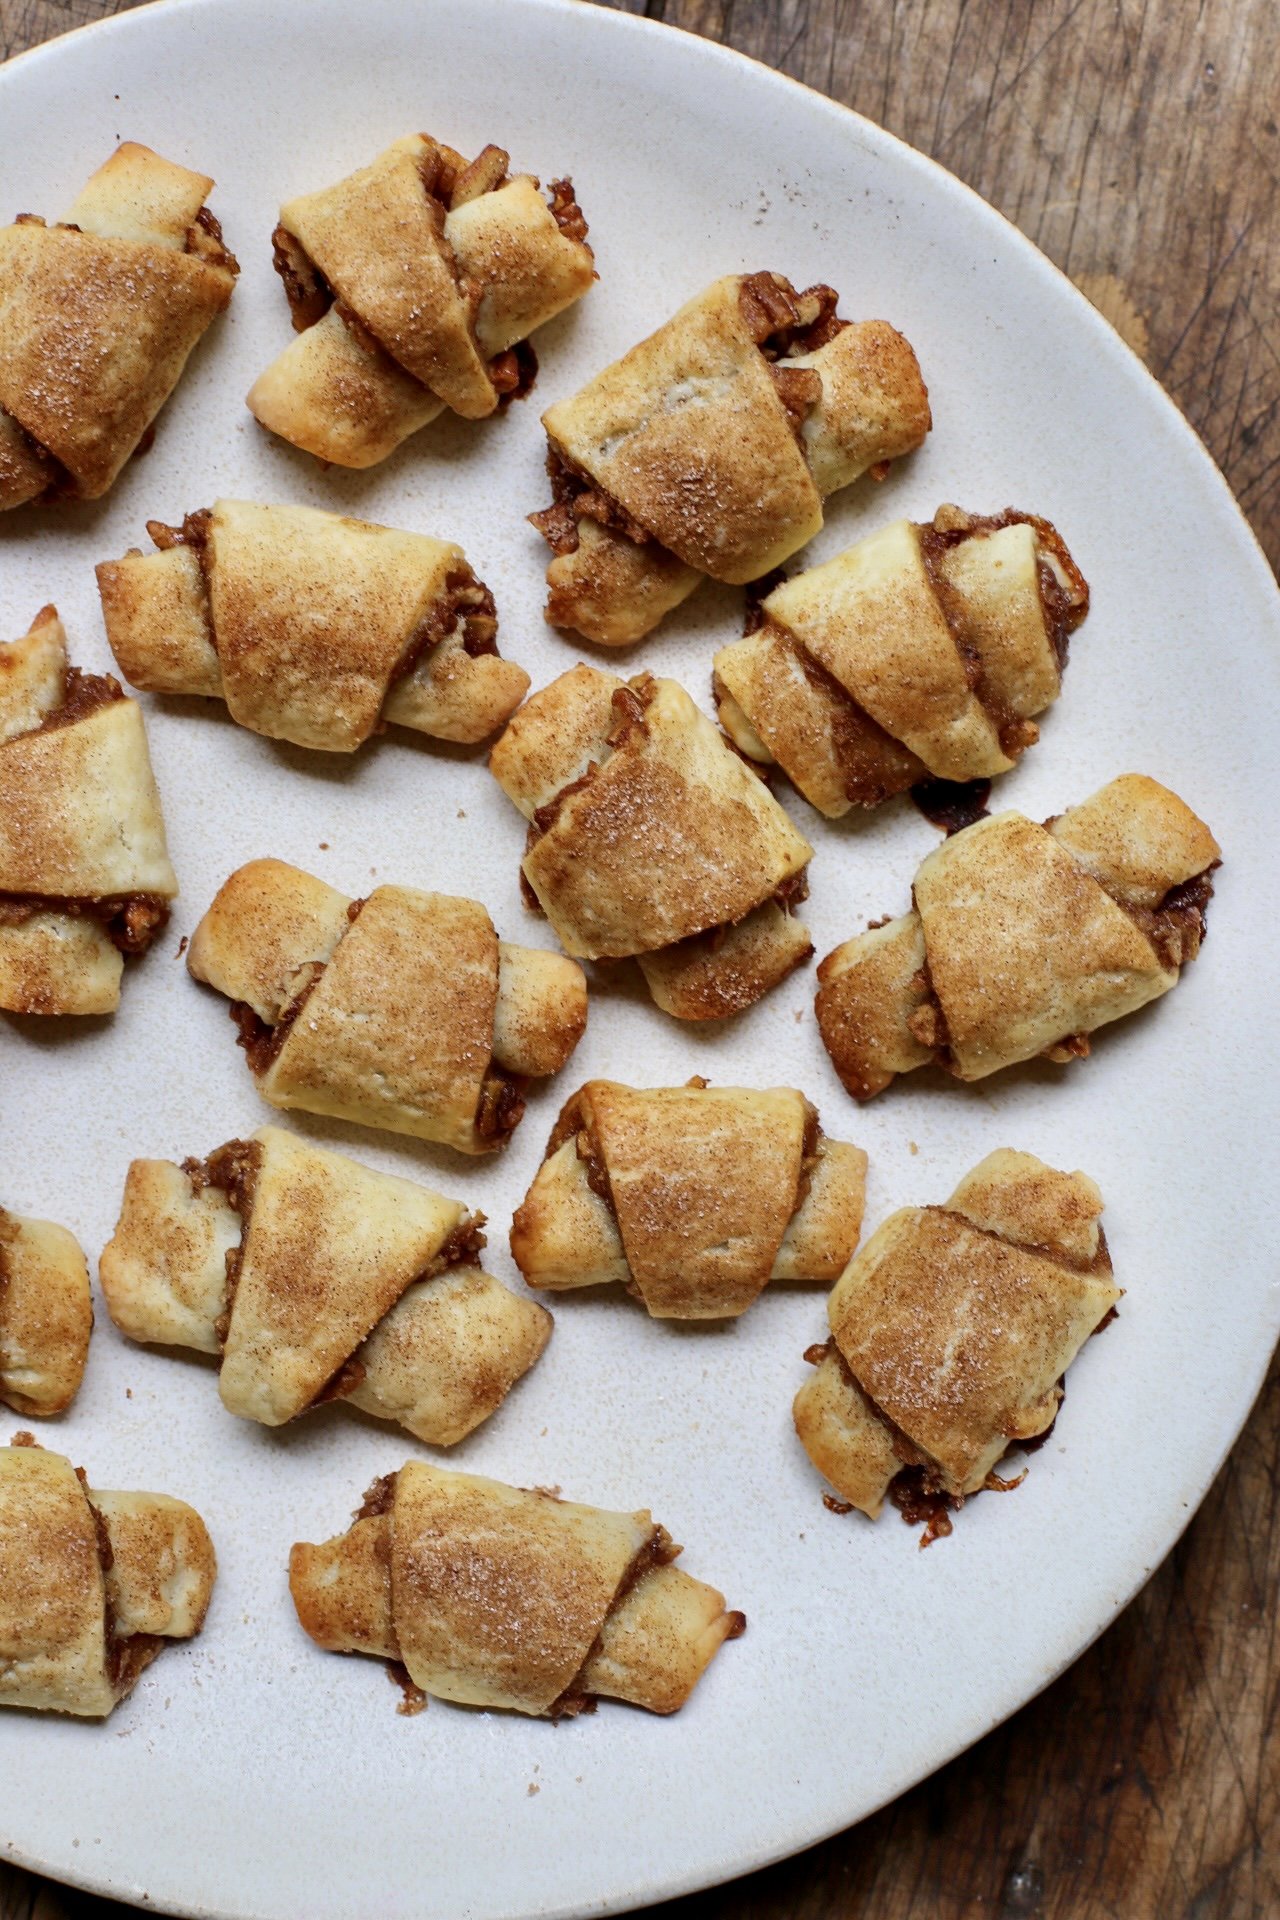
Anyway! Today’s recipe is one that is very near and dear to me simply because it’s literally one of my favorite things to eat in the whole world, and I cannot believe I hadn’t posted a recipe for it yet. The recipe is for rugelach, a popular Jewish pastry, that is essentially a cookie made out of a buttery, cream cheese dough that is filled with either jams, chocolate, nuts, dried fruits, or a combination of all of these. My go-to flavors when I visit a Jewish bakery are either apricot jam, cinnamon or chocolate filled, but honestly, I love them all and have yet to try a flavor that I didn’t enjoy. Although we’re not Jewish, my mom, sister and I all have a huge love for Jewish pastries, including babka, danishes, macaroons, and sufganiyah, so rugelach is something that I’ve happily eaten for years. Although I think it’s just about the best pastry in the world, not everyone knows about them, especially those who aren’t Jewish and I think that’s just about a crime. When I first started dating Alex. I had asked if he had ever tried them and he thought I was asking him about “arugula”, which still to this day makes me laugh.

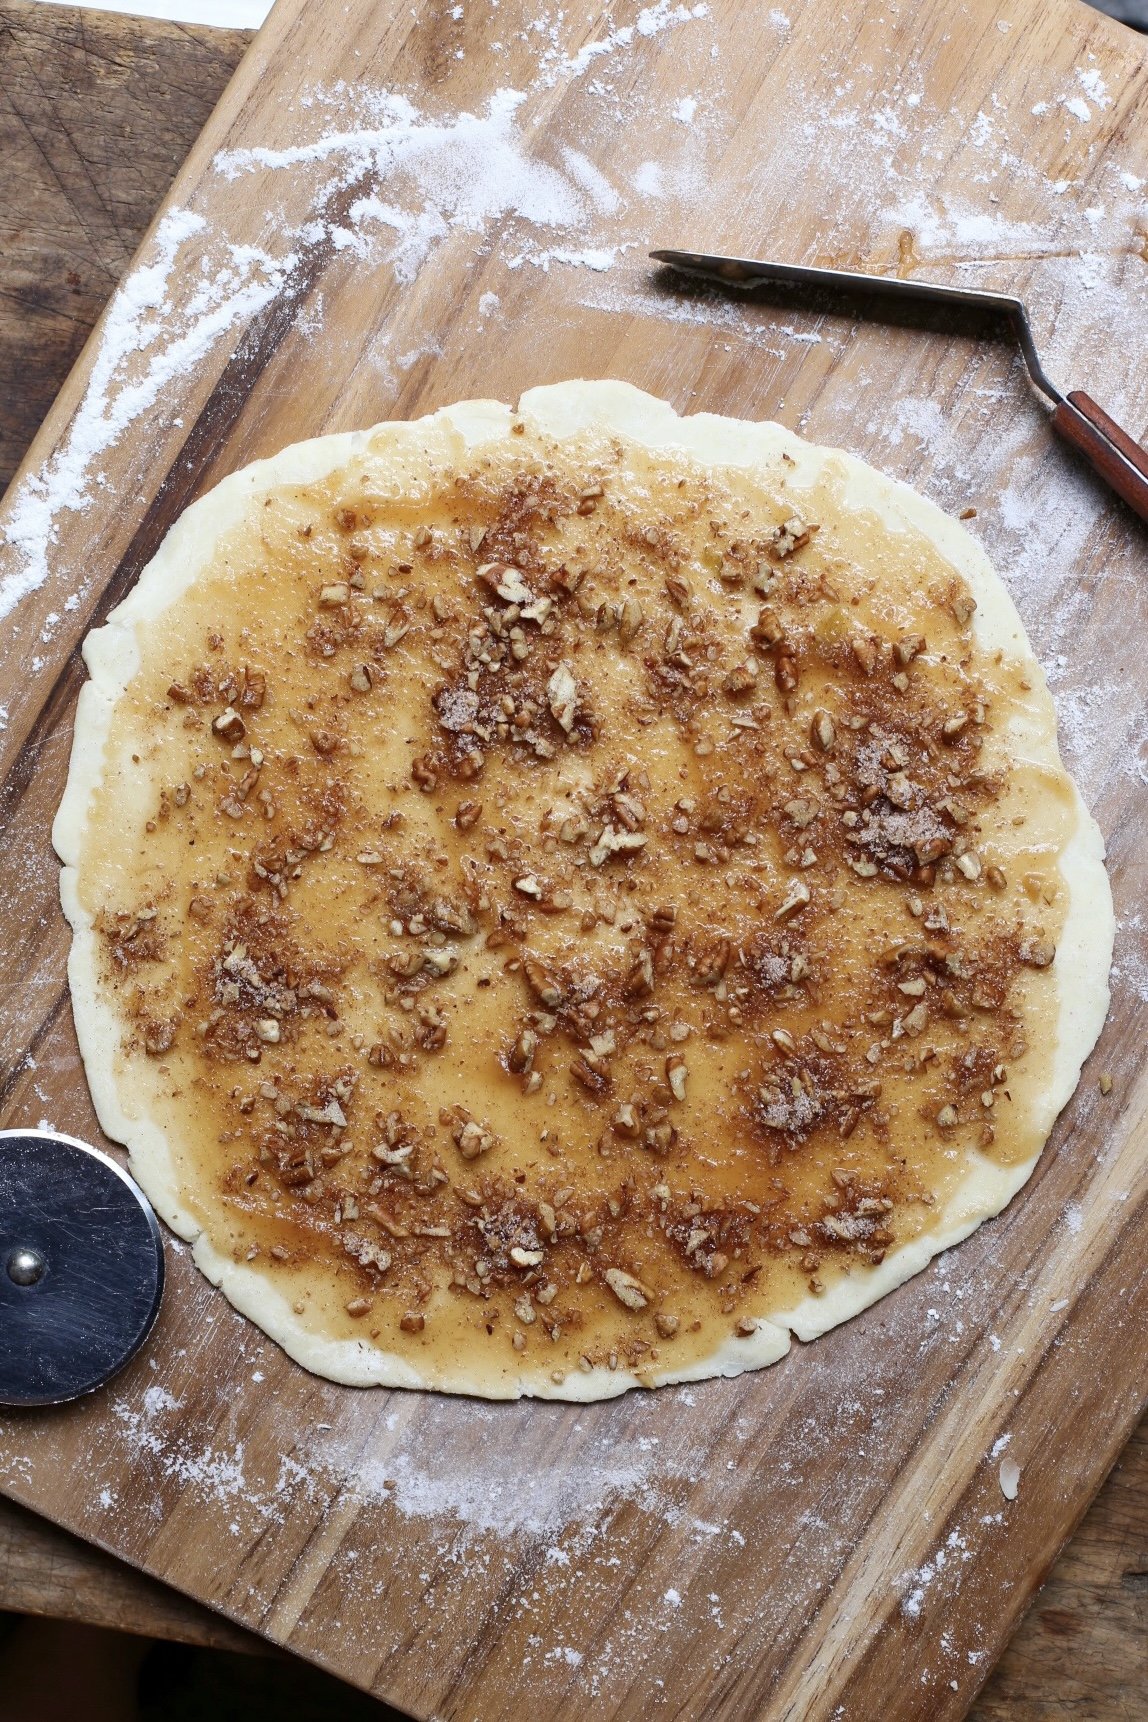
Unlike chocolate chip cookies where you portion out scoops of cookie dough to bake off, rugelach is kind of treated like a pie dough in that it is formed into a disc and then is rolled out and shaped into either crescent or rectangular spirals. For this recipe, I chose to make crescents which are formed by rolling the dough into a very thin - about 1/8th of an inch thick - circle. That’s about 10 inches in diameter, if you have a ruler lying around. Rugelach dough at first is very sticky and therefore needs to be refrigerated for at least 4 hours before rolling it out and shaping it, but I prefer just leaving it in the fridge overnight.

When it comes to rolling out the dough, don’t worry about making a *perfect* circle; I definitely don’t excel at rolling out doughs and usually end up with wonky edges and some cracks, but trust me when I say, it’ll still taste perfect in the end. Same goes for the filling and rolling of each individual cookie: some of the filling might “spill” out and even leak when baking in the oven, but that is totally normal and actually a good thing because it leads to a caramelized bottom that tastes amazing. I have made rugelach numerous times, and it’s rare that I get uniform cookies and that’s the beauty of them; each one is unique and has its own rustic look to it. Bottom line: rugelach is a very forgiving recipe and you shouldn’t be concerned with messing it up.

As for the filling, I decided that because it’s October and we’re starting to get cozy vibes here in California (I’m joking, it’s 77° and sunny here today), I wanted to put an autumn-spin on these. Instead of doing a simple raspberry or apricot jam, I chose to use apple butter, which is pretty much applesauce that is more cooked down and caramelized, as well as a mix of toasted chopped pecans/walnuts, sugar and cinnamon. It’s a fairly simple flavor combination, but tastes incredible and makes the whole house smell like fall when it’s baking in the oven. You can choose to make your own apple butter (here’s a link to my own recipe) or you can save yourself some time and buy it at the market. Another option would be to use pumpkin butter instead, which I’m fairly certain Trader Joe’s is selling right now. But feel free to save this recipe for the rugelach dough base and use any filling as you please in the future!

APPLE BUTTER RUGELACH

Makes 24 rugelach - recipe can easily be doubled

Ingredients

For the dough:

  • 4 oz. (1 stick) unsalted butter, room temperature

  • 4 oz. cream cheese, room temperature

  • 2 tbsp. granulated sugar

  • 1/2 tsp. vanilla extract

  • 1/4 tsp. kosher salt

  • 1 cup all-purpose flour

For the filling:

  • 1/2 cup apple butter, homemade or store bought

  • 1/2 cup finely chopped toasted pecans or walnuts

  • 2 tbsp. sugar

  • 1 1/2 tsp. ground cinnamon

To finish:

  • 1 lrg. egg mixed w/ 1 tsp. water (egg wash)

  • 2 tbsp. granulated sugar

  • 3/4 tsp. ground cinnamon

Directions

  1. Make the dough: In the bowl of a stand mixer fitted with the paddle attachment (or in a large bowl if using a hand mixer) cream the butter and cream cheese together until smooth, about a minute or two. Scrape down the sides of the bowl, and add the sugar, vanilla extract and salt. Mix to combine. With the mixer on low, slowly add in the flour and mix until incorporated. Turn off the mixer and transfer the sticky dough to a floured surface and shape it into a ball. Cut the dough in half and shape each half into about an inch thick disc and wrap each disc in plastic wrap and refrigerate for at least four hours, but preferably overnight.

  2. Prepare the filling: In a small bowl, combine the chopped nuts, sugar and cinnamon. Set aside.

  3. Take one of the chilled doughs out of the fridge, unwrap it, and place it on a floured surface. Allow it to soften a bit for 5-10 minutes for easier rolling. Using a rolling pin, roll the dough into about a 10-inch circle (does not need to be perfect!), which will be about an 1/8 of an inch thick. Spread half (1/4 cup) of the apple butter on the dough, leaving about 1/4in. border all around, and then spread half of the nut/sugar mixture over the apple butter.

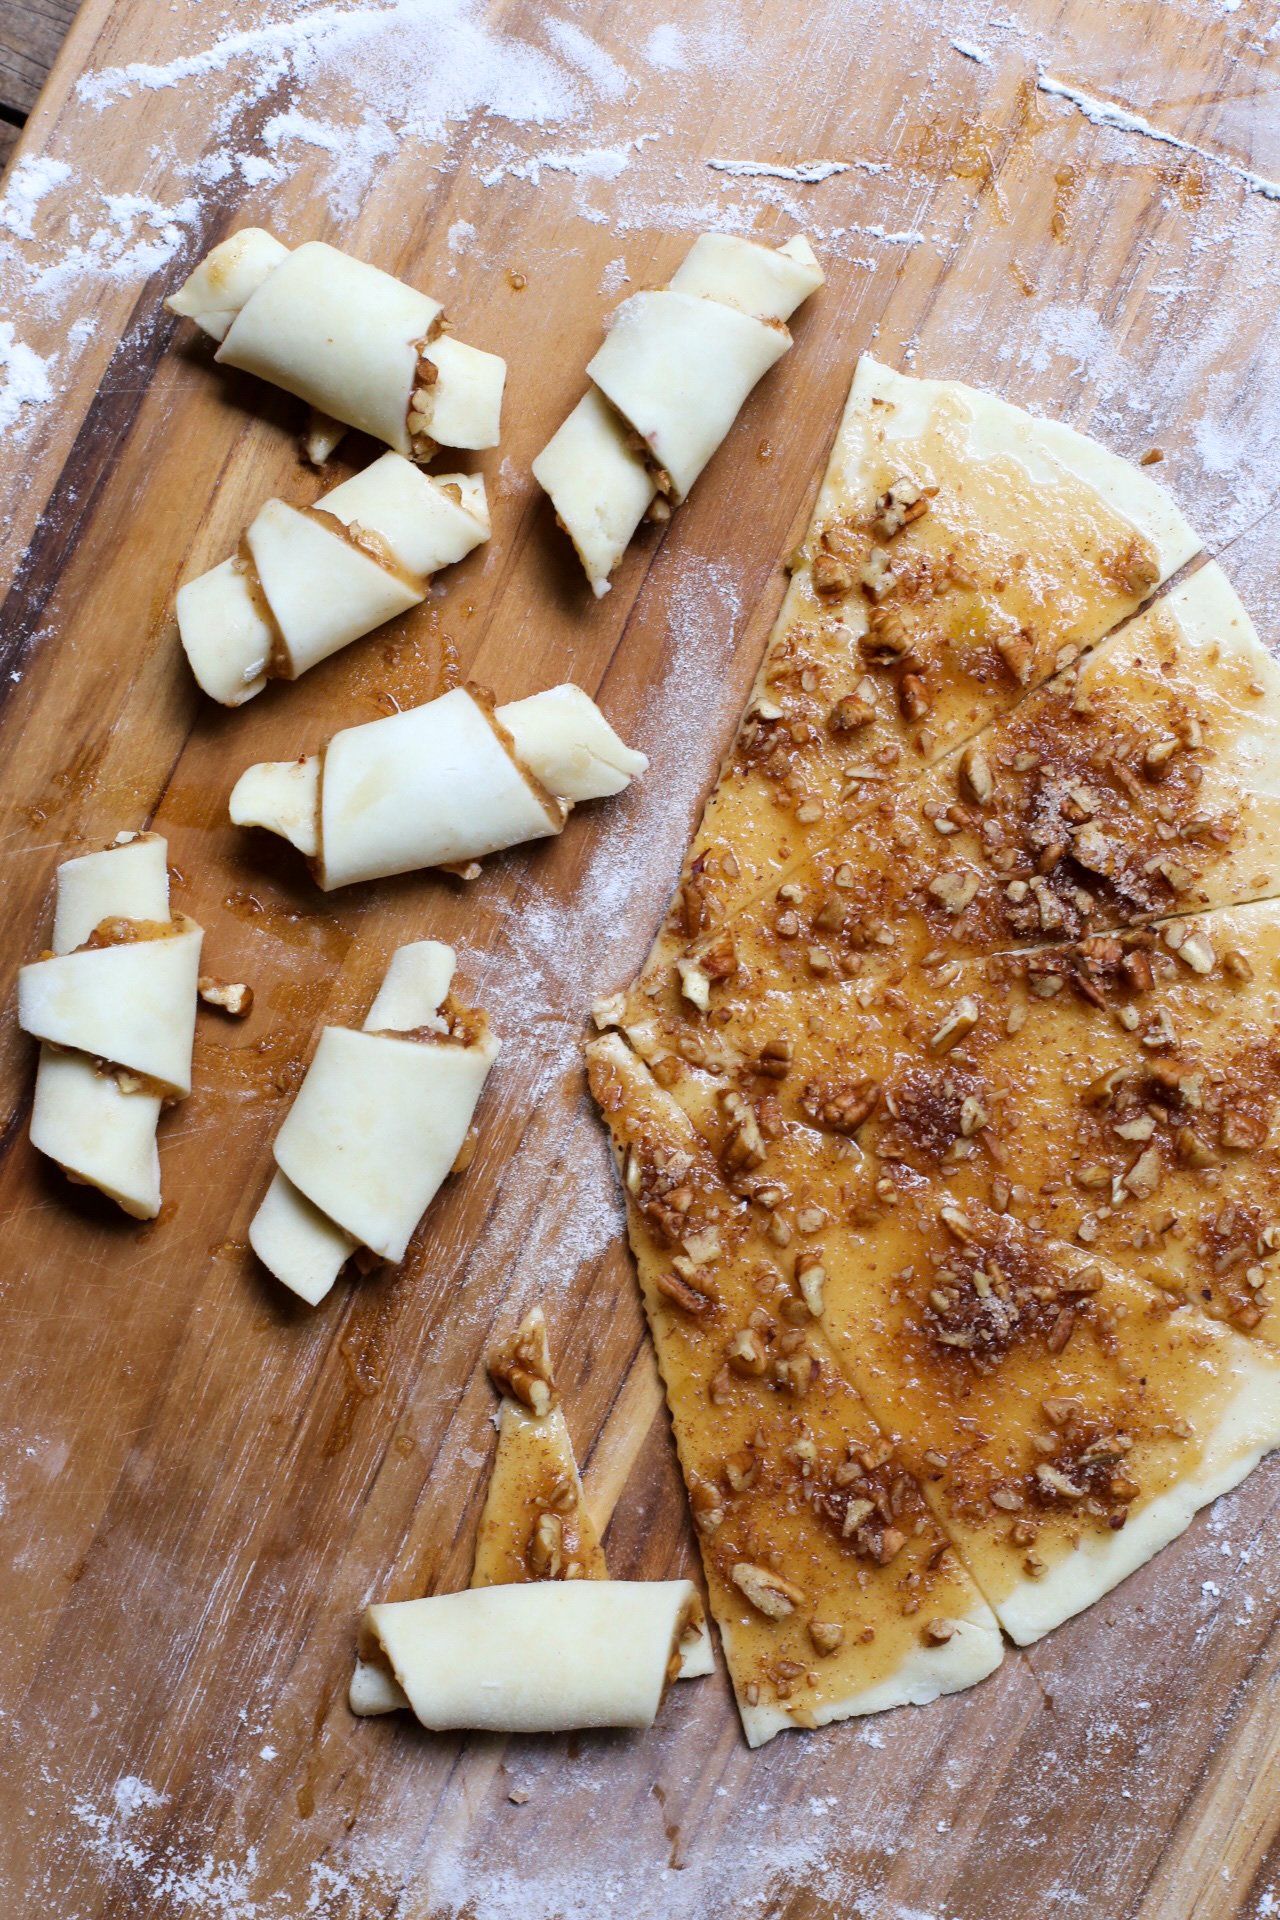
  4. Using a pizza/pastry cutter or sharp knife (I prefer the former), cut the circle into 12 even triangles. Roll each triangle into a crescent by starting at the wider edge and working your way toward the center (narrow side). Place each rugelach crescent on a parchment-lined baking sheet, with the crescent points facing down. Pop the baking sheet in the fridge while you work on the second dough disc.

  5. Preheat the oven to 350°. In a small bowl, combine 2 tbsp. of sugar and 3/4 tsp. of cinnamon - this is for finishing the rugelach. Take out the first set of rugelach from the fridge and brush each cookie with the egg wash and then give a generous sprinkling of the sugar/cinnamon mixture. Bake in the oven for 22-28 minutes, or until golden brown. Allow the cookies to cool on the baking sheet for a few minutes before transferring to a cooling rack. Repeat steps 3-5 for the second dough disc*.

    * I like to work on the second disc of dough while the first batch of rugelach is in the oven. Chill this dough for at least 10 minutes before popping it in the oven.