RESTAURANT STYLE SALSA + HOMEMADE TORTILLA CHIPS

IMG_5588.jpg

It's been a long and hard week... our family dog, Luka, sadly passed away last Saturday night. I know everyone has their own daily struggles and hardships, and they probably don't want to come to a food blog to read about someone else's problems BUT, I couldn't not say anything about our sweet boy.

We rescued Luka about 12 years ago, and he was actually the first dog that my family ever owned. Before Luka, all my family ever cared about was cats... at any given time from the day I was born, we consistently owned at least two kitties. But around the time I was a sophomore in high school, my mom decided that it was time to get our first dog, and we ended up finding Luka at an animal shelter in Mission Viejo. He was about 6 years old when we brought him home, so he lived a VERY long and nice life. My mom spoiled him like crazy, but we all gave him so much love, happiness, and whipped cream (his favorite treat). And in return, he gave us love, happiness, and a lot of shedded hair. We will miss that handsome pup so much, but I know that every day he spent with us was his happiest day. PLEASE consider adopting your next pet... there are so many animals in shelters that need a loving home.  

IMG_5483.jpg

Ok, enough sad talk! Let's move on to today's recipes. 

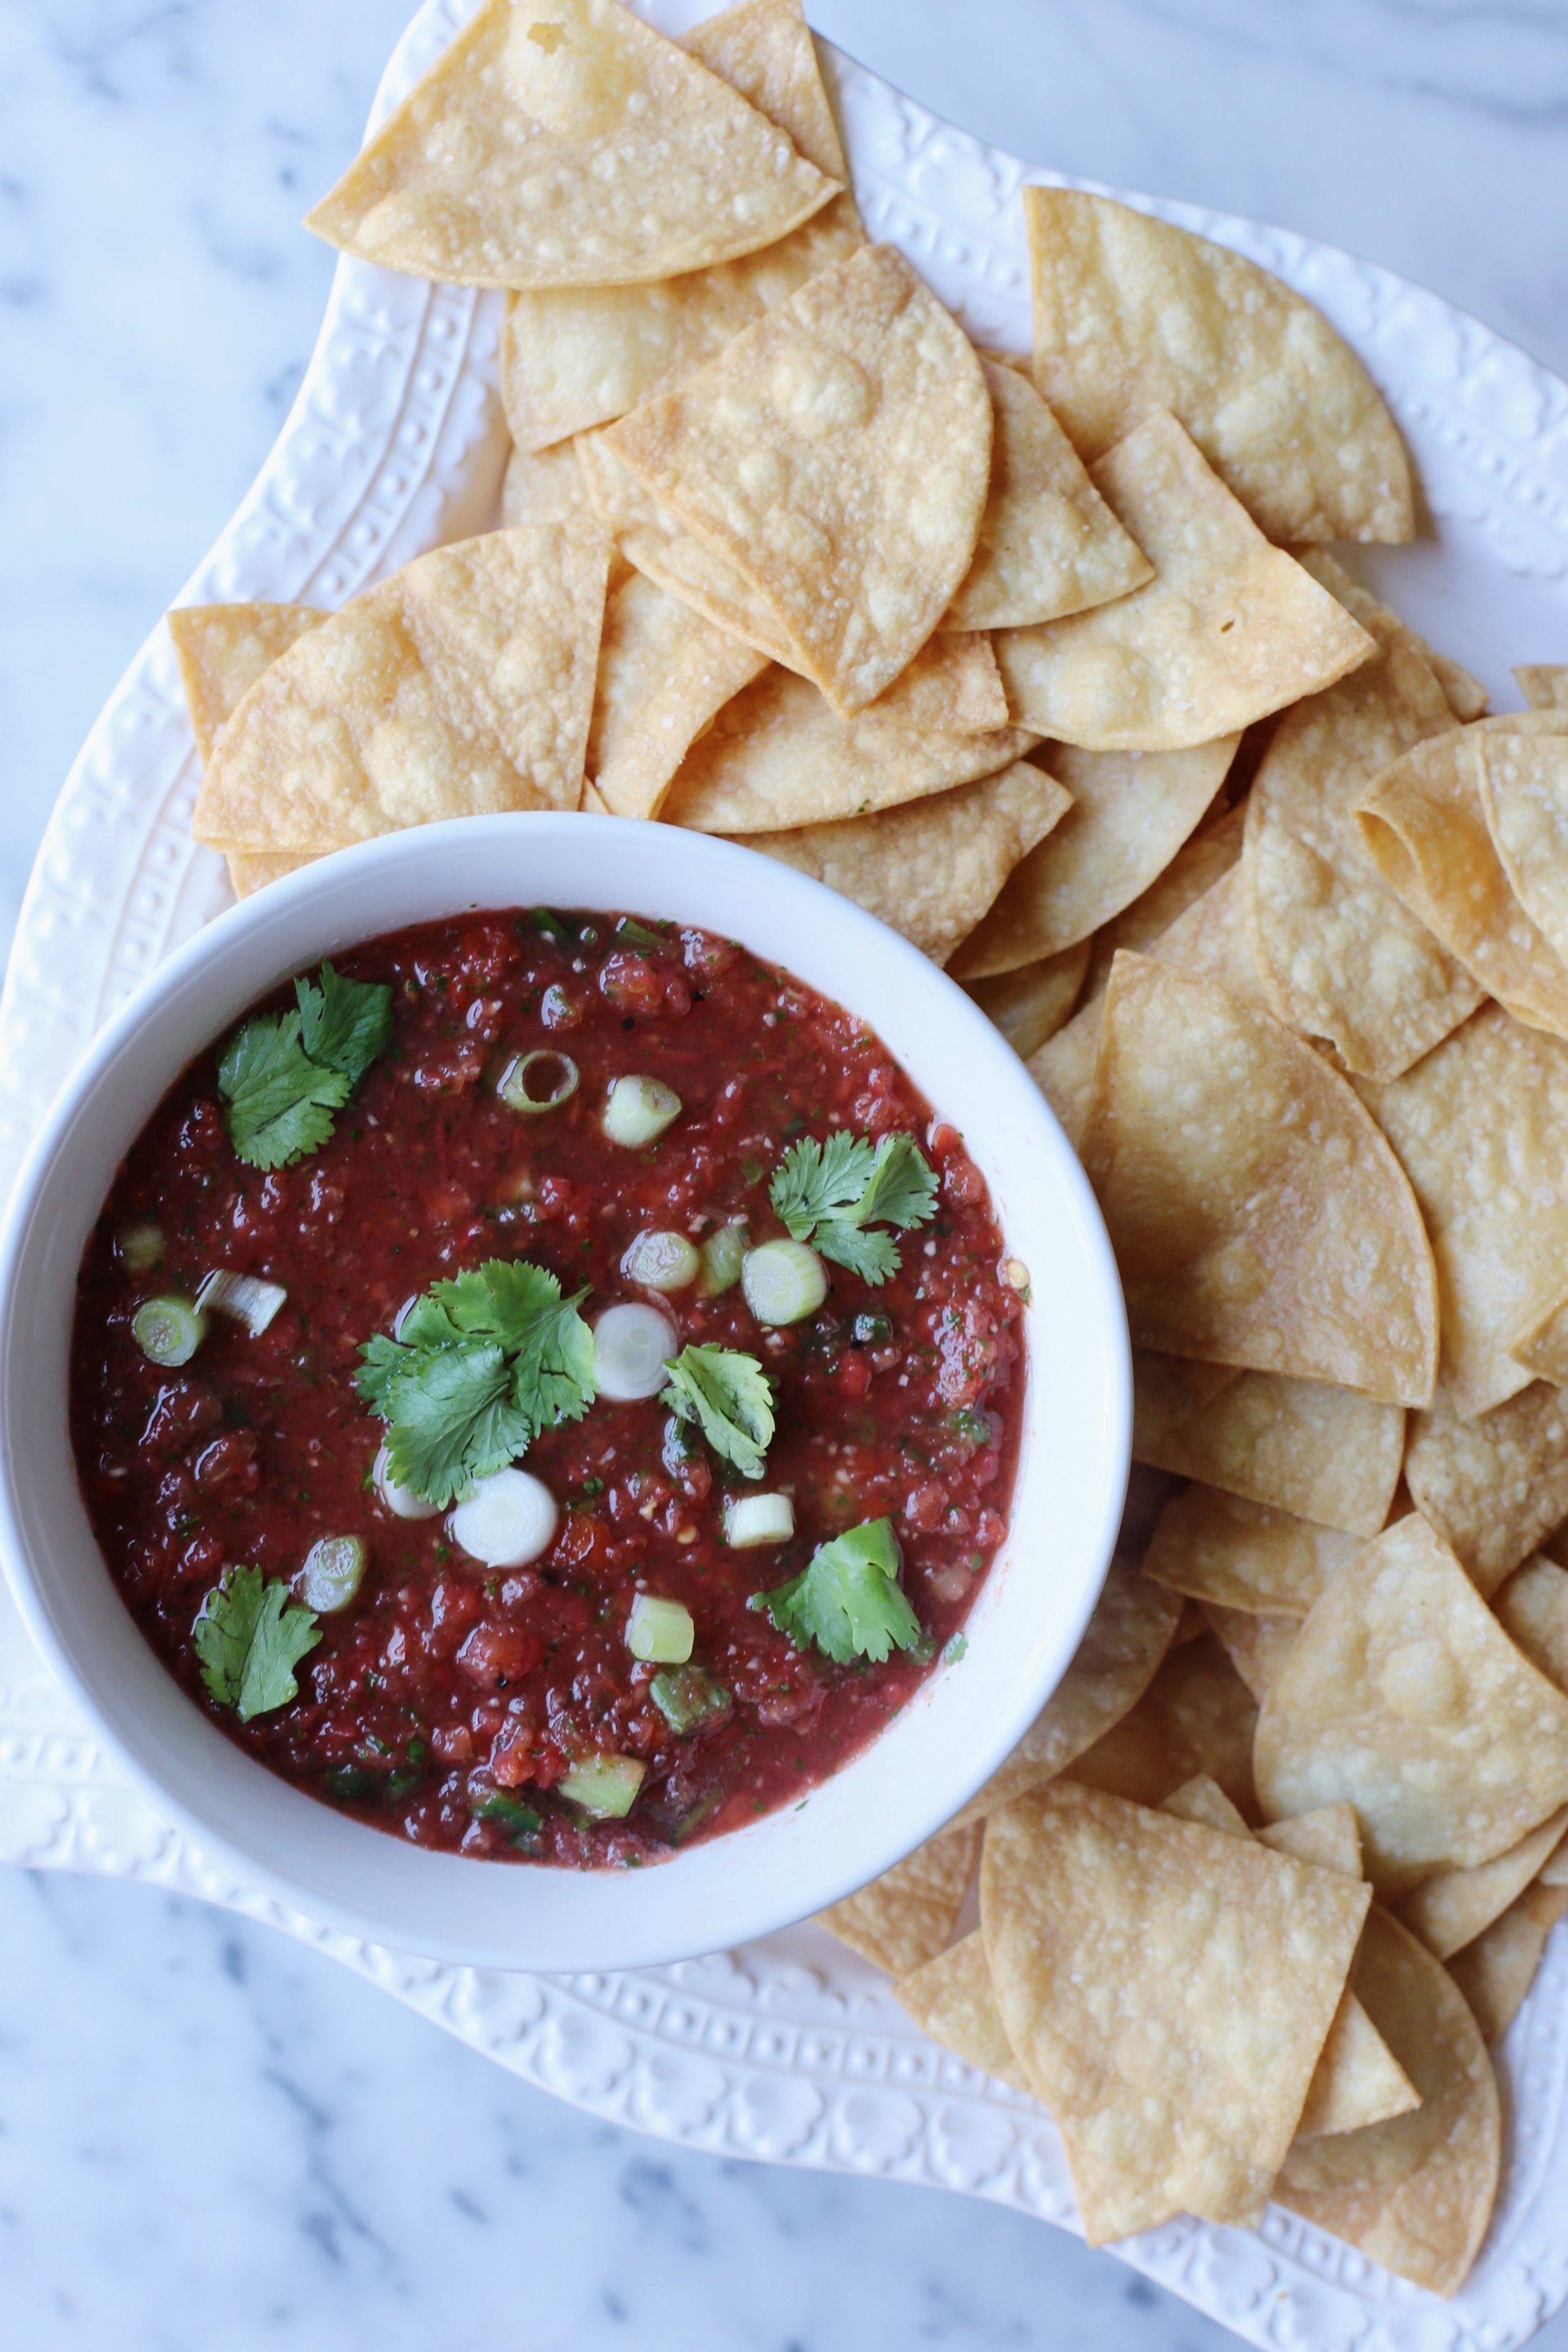
I don't know about you guys, but I could probably eat tortilla chips and salsa every single day of my life. There actually have been many nights where I was too lazy to cook myself a proper meal, and happily plopped down on the couch with a fresh bag of chips and a big bowl of salsa and/or guacamole. When I'm at home and using store-bought salsa, I'm not too picky about what kinds of salsas I like; I enjoy salsa verde, pico de gallo, etc. etc. But when I go out to eat at Mexican restaurants, I judge each place based on how good their house salsa is; salsa is a very important aspect of Mexican dining.

IMG_5509.jpg

Luckily, living in Southern California, I haven't run into the problem of having "bad" salsa, and I can probably name 10 places off the top of my head that crush the salsa game. My all-time favorite house salsas come from two Mexican restaurants here in Orange County: 1) Coyote Grill in Laguna Beach and 2) El Ranchito, which has multiple locations, but my favorite one is located in Orange. The salsas from these two restaurants are amazing to me in their own ways, with Coyote Grill's having an extra kick of black pepper and El Ranchito's having chunks of green onion in almost every bite.

IMG_5526.jpg

So, when my sister shared with me a simple, yet perfect salsa recipe that she created by using her new Vitamix, I decided to take that recipe and add my favorite salsa elements to it. The end result came out being insanely delicious! This salsa is definitely restaurant-worthy, if not on the same level: very fresh, a bit of heat, and undoubtedly addicting. I'm seriously surprised that I had leftover salsa to take pictures of for the blog because I couldn't stop eating it. I used my food processor for this recipe because I personally think it yields the best consistency, and makes it much easier than chopping up each ingredient. Don't have a food processor? Just stick to a blender, and I think the results will be similar.

And of course, what goes perfectly with fresh salsa? Warm, straight from the fryer, corn tortilla chips. Everyone should at least give homemade tortilla chips a try because I honestly think making that extra effort really pays off in the end. My only suggestion for making the chips is that having a kitchen thermometer is pretty vital to the process... the oil needs to be at 350°F in order to fry the chips.

IMG_5583.jpg


Homemade Tortilla Chips

Ingredients

  • 15-20 corn tortillas, cut into quarters (60-80 chips)

  • Vegetable or peanut oil, for frying

  • Salt, to taste

Directions

  1. In a large pot or Dutch oven, heat up 2-3 inches of oil - enough to cover the chips - over medium heat.

  2. When the temperature of the oil reaches 35o degrees F (a kitchen thermometer will come in handy here), begin adding about 10 tortilla quarters at a time to the pot. Using a slotted spoon or an Asian strainer, move the tortilla pieces around to prevent sticking and to let them evenly cook. After about two minutes, the tortillas will begin to change to a golden brown color and the oil will settle down - this is when the chips are done.

  3. Transfer the chips to a paper towel-lined plate or baking sheet, and immediately sprinkle generously with salt. Continue working in batches until all tortilla pieces are cooked. Enjoy the chips with my salsa recipe below!

Restaurant Style Salsa

Makes about 3-4 cups

Ingredients

  • 1/2 cup fresh cilantro leaves, lightly packed

  • 3 large garlic cloves

  • 1 serrano or jalapeño pepper, seeds and membrane removed

  • 8 Roma tomatoes, seeds removed

  • Juice from 1/2 a lime

  • 1 1/2 tsp. kosher salt

  • 1 tsp. freshly cracked black pepper

  • 1 bunch of green onions, white and light green parts, thinly sliced

Directions

  1. Add the cilantro, garlic, and pepper to the food processor fitted with the "S" blade and pulse until finely chopped.

  2. Next, add the tomatoes, lime juice, salt, and pepper and blend until no chunks of tomato remains - about 20 seconds.

  3. Transfer the salsa to a bowl and stir in the green onions. Add more salt and black pepper if needed.


RIP sweet Luka

RIP sweet Luka

SIMPLE SUMMER PLUM CAKE

IMG_3213.jpeg

Today's recipe has quite a bit of significance to me. Back in 2011, when I was in college in Chicago and only occasionally baking cupcakes and cakes from a box mix, and absolutely nothing from scratch, I discovered food blogs. I believe this was the time when food blogs, and any type of blog for that matter, were beginning to gain traction and it felt as if there was a new blog popping up on the internet daily. One of those blogs was Smitten Kitchen - a blog that is run by Deb Perelman that I still love and utilize to this day.

IMG_3081.jpeg

I randomly came across a recipe of Deb's, Strawberry Summer Cake, in the summer of 2011 when I was visiting Cleveland, Ohio and wanted to make something for the Fourth of July. The recipe looked innocent enough and I thought I'd give it a try, this being my first recipe baking from scratch without help from my mom, grandma, etc. Also, the house I was staying at had a beautiful, hunter green Kitchenaid stand mixer, and I was fortunately able to use it (this was also my first time using the machine). Needless to say, I made a bunch of mistakes while making the cake - I'm fairly certain I didn't use room temperature butter and got some eggshell in the batter that I had to fish out - BUT by some miracle, the cake ended up working out and tasted pretty good. 

Even though I didn't really get into baking until I moved back home to California a year later, I'll never forget that day in Cleveland and how it sparked something within me; I will always fondly think of that as my "first" baking experience.

IMG_3103.jpeg

7 years later, I like to think that a lot has changed when it comes to making a simple fruit cake, and more over, my skills in the kitchen. But for whatever reason, I never attempted to remake that strawberry cake until this past weekend when it somehow popped up on my radar again. But even though the cake calls for strawberries, I thought I'd take this recipe and use it as a base for something that I wanted to create. So, I went grocery shopping and looked for a fruit substitute that is in season right now - lo and behold, I landed on plums. 

Honestly, I can't tell you the last time I had eaten a red plum and I'm kind of kicking myself for not doing it sooner. I've always been more inclined to buying nectarines or peaches, but I gotta say that plums might be beating both of those right now. They are that good. And look at how beautiful they are! 

IMG_3119.jpeg

Luckily for me, the plums worked out perfectly with the cake. To put my own spin on it, I added some spices that I knew would work well with the fruit (AKA I googled what pairs well with plums). I added cinnamon, ginger, and a little bit of cardamom because it's what I had in my pantry and it turned out AMAZING. If ginger isn't your thing, you definitely can leave it out and just add more nutmeg or even add another spice in its place, like cardamom. 

I feel like this cake can easily pass as a breakfast dish; I would just maybe stay away from adding confectioners' sugar and whipped cream, and maybe topping it with greek yogurt instead with fresh plums. That sounds perfect to me!

IMG_3175.jpeg


Simple Summer Plum Cake

Makes (1) 9" or 10" Cake

Recipe adapted from Smitten Kitchen

Ingredients

IMG_3193.jpeg
  • 6 tbsp. unsalted butter, room temperature, plus more for pan

  • 1 1/2 cups (188g) all-purpose flour

  • 1 1/2 tsp. baking powder

  • 1/2 tsp. salt

  • 1 tsp. ground cinnamon

  • 3/4 tsp. ground ginger

  • 1/4 tsp. ground cardamom

  • 1 cup granulated sugar

  • 1 large egg, room temperature

  • 1 tsp. vanilla extract

  • 1/2 cup milk (any kind will work, including non-dairy - I used unsweetened almond milk)

  • 1 pound plums (about 4) halved, pitted, and cut into about 8 wedges per plum

  • 2 tbsp. turbinado sugar

  • Confectioners' sugar, whipped cream, and/or thinly sliced fresh plums, to finish

Directions

  1. Preheat oven to 350°F. Generously butter a 9-inch or 10-inch springform pan (or pie pan).

  2. Whisk together the flour, baking powder, salt, cinnamon, ginger, and cardamom in a medium bowl and set aside.

  3. In the bowl of a stand mixer fitted with the paddle attachment (or in a large bowl if using a hand mixer) cream the butter and sugar together, on medium speed, until light and fluffy, about 3 minutes. Add the egg, vanilla extract, and milk and mix until incorporated. Scrape down the side of the bowl.

  4. With the stand mixer on low speed, gradually add the flour mixture until smooth. The batter will be quite thick.

  5. Evenly spread the batter into prepared pan. Arrange the plums in a single layer over the batter with the skin side up. Sprinkle the two tablespoons of turbinado sugar over the top.

  6. Bake in the oven for 10 minutes, then lower the temperature to 325 degrees F and bake for another 50-60 minutes until the cake is golden brown and a toothpick inserted in the middle of the cake comes out clean.

  7. If using a springform pan, allow the cake to cool 10-20 minutes before running a knife around the edge of the pan and carefully remove the top. Allow the cake to cool completely on a rack before adding your topping of choice (confectioners' sugar, whipped cream, and/or thinly sliced fresh plums).

THICK + CHEWY DARK CHOCOLATE CHUNK + PISTACHIO COOKIES

C85D42F5-B09F-455D-9AE1-097ECC9CBF67.jpeg

So far on The Vivid Kitchen I've shared two cookie recipes that are very near and dear to my heart: 1) the always popular and uniquely-flavored salted toffee and brown sugar cookies and 2) the classic winning combo of white chocolate and macadamia nut. Today, I am giving you a cookie that is a re-creation of one  that I had while on vacation.

Like I've said before, a couple of summers ago Alex and I traveled to Prague for the first time ever. Our hotel was smack-dab in the heart of the city center and although it was VERY touristy, we were beyond excited to be so close to everything. One day when we were walking back to our hotel, I noticed the most charming looking café, largely due to the desserts (including perfect chocolate chip cookies) that were on display in the window. Alex and I went in without hesitation and ordered half a dozen of the cookies to take back with us to the hotel. When we got back, we realized that we were actually given all different kinds of cookies: some with cranberries, some with walnuts... but our favorite pairing by far was one with chunks of chocolate and crunchy bits of beautiful, green pistachios. 

AB1ED001-091B-422D-98EA-E8EB75813275.jpeg

Up until that glorious moment in Prague, I had never had pistachios in my cookies and so it completely blew my mind. After that day, we went back to the same bakery a couple of times just in order to get more of those cookies before our vacation was sadly over. When we got back home a week or so later, I immediately set out to recreate the "Prague cookies" that Alex and I fell in love with. I needed to keep the consistency similar because that aspect was very important as to why we loved it, and therefore the cookies needed to be very thick and very chewy. In order to get that amazing chewy and dense texture, this recipe calls for melted butter instead of room temperature, as well as an extra egg yolk. As for the thickness of the cookie, this comes from chilling the dough; chilling the dough for at least an hour ensures that the cookies won't spread as much as not chilling the dough at all. Cookie science!

6D7FD43D-F607-4CD8-910A-47B53AB5E78C.jpeg

The one difference between my cookies and the Prague café cookies is the amount of chocolate and pistachios added to the dough. Unlike the Prague cookies, where it was more dough-centric with sporadic bites of chocolate chips or pistachios, my cookies are filled to the brim with both. If I'm giving you a chocolate chunk and pistachio cookie, then by all means, that is exactly what you'll be getting in every single bite! 

When making chocolate chip cookies at home, I actually don't use chocolate chips but instead get the HUGE dark chocolate bars from Trader Joe's. This chocolate bar, weighing in roughly over a pound, is a staple in my refrigerator, and when I'm not breaking off pieces of it for dessert, I am saving it for cookies and other baked goods. I like using chocolate bars for the chocolate component in cookies because I get to chop it up into all different shapes and sizes, which leads to some interesting (re: delicious) pools of chocolate in the cookies. If you're forever a true fan of chocolate chips, then of course feel free to substitute for them here. But please make sure they are dark chocolate chips, or bittersweet! 

FD48980E-9BAF-463D-A66D-A6D913D56ABA.jpeg

Thick and Chewy Dark Chocolate Chunk and Pistachio Cookies

Makes about 25-30 cookies

Recipe adapted from Cook's Illustrated

F4BDDCF0-885A-49F4-B616-8C18F44F497D.jpeg

Ingredients

  • 2 cups plus 2 tbsp. all-purpose flour

  • 1/2 tsp. baking soda

  • 1/2 tsp. salt

  • 3/4 cup (12 tbsp., 6oz.) unsalted butter, melted and cooled slightly

  • 1 cup light or dark brown sugar, packed

  • 1/2 cup granulated sugar

  • 1 large egg

  • 1 large egg yolk

  • 2 tsp. vanilla extract

  • 3/4 cup unsalted pistachios, toasted and roughly chopped

  • 1 cup (about 8oz.) dark chocolate chunks

  • Flaky sea salt, to finish (optional)

Directions

  1. In a medium bowl, sift together the flour, baking soda, and salt. Set aside.

  2. In the bowl of a stand mixer fitted with the paddle attachment, or in a bowl large enough for a hand mixer, mix the melted butter, brown sugar, and granulated sugar for about 2 minutes.

  3. Add in the egg, egg yolk, and vanilla extract. Mix until incorporated. Scrape down the sides of the bowl.

  4. All at once, add in the flour mixture and carefully mix on low speed for about 10 seconds before turning the speed up to medium until everything is combined. Do not over mix. Using a spatula, fold in the chocolate chunks and pistachios. Cover bowl with plastic wrap and refrigerate for at least 1 hour.

  5. Preheat the oven to 325°F. Line a baking tray with parchment paper, and using a spoon or a cookie scoop, scoop out 1-2 tablespoons of dough for each cookie. Bake for 10-12 minutes. Finish cookies with a sprinkle of flaky sea salt if desired. Allow the cookies to sit on the tray for a couple of minutes before transferring to a cooling rack. Enjoy!