CHOCOLATE CHEESECAKE W/ CHOCOLATE GRAHAM CRACKER CRUST

IMG_5943.jpg

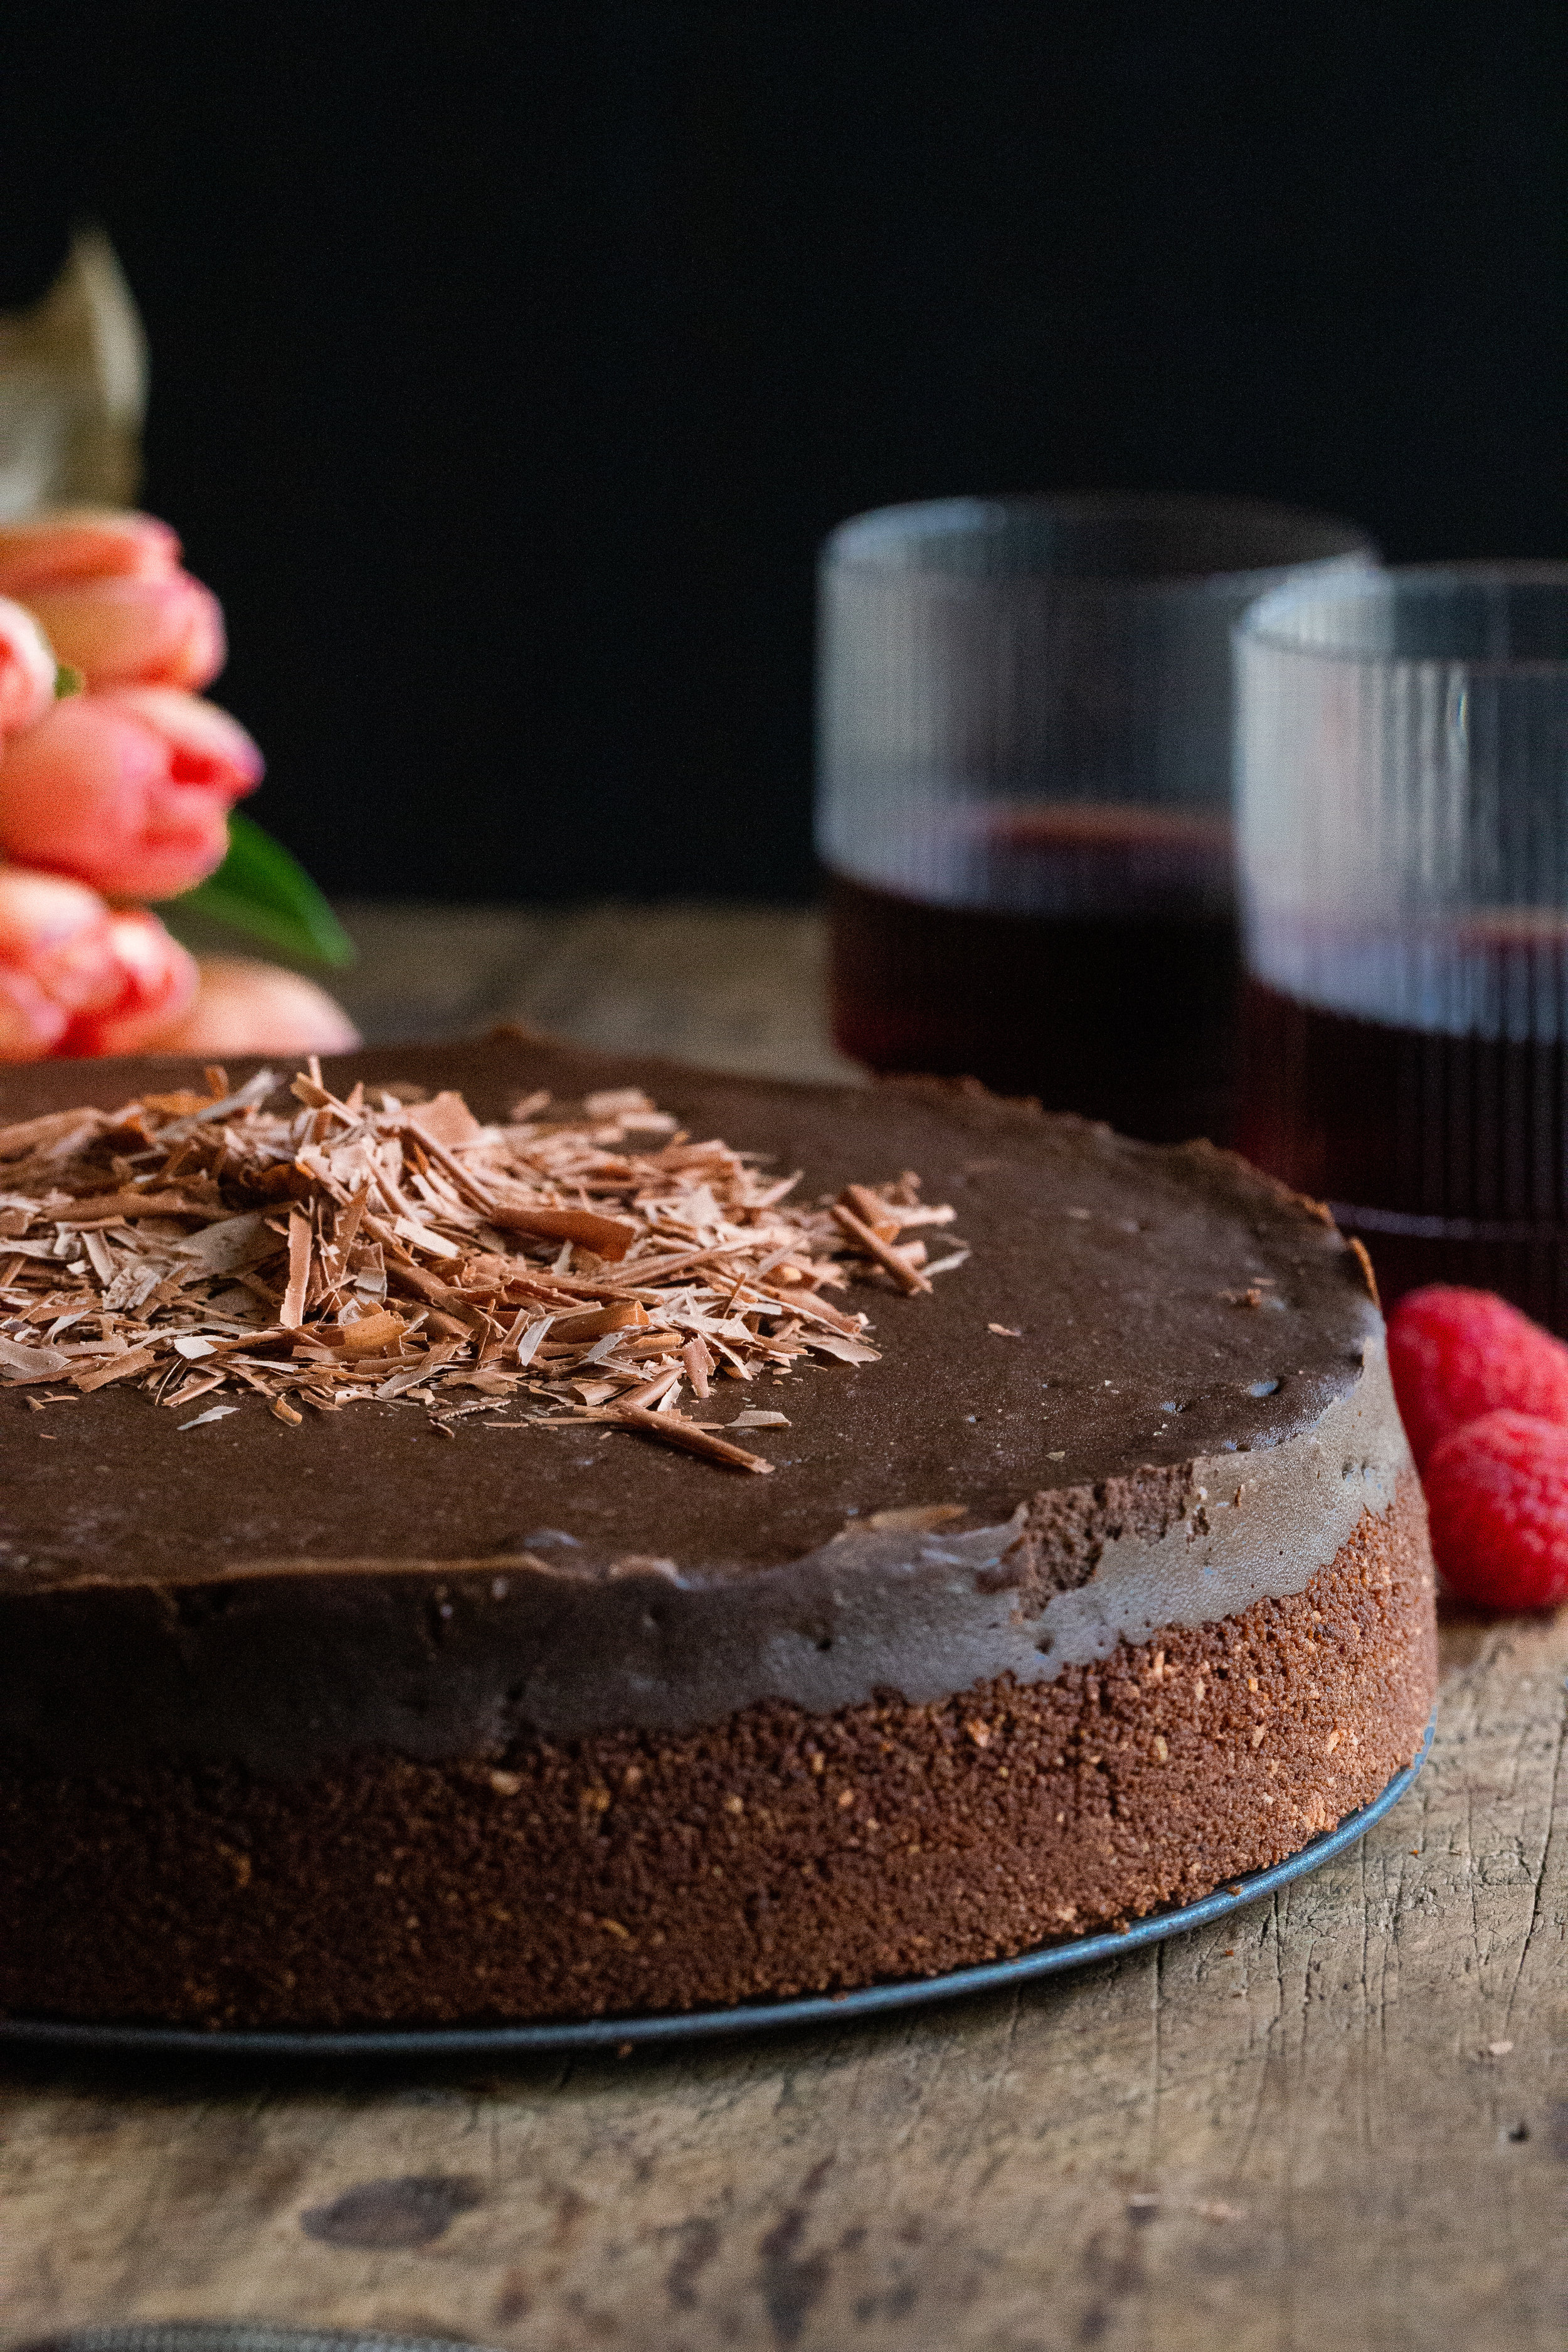
As promised, today I am giving you the ideal dessert for Valentine’s Day that is equal parts decadent and addicting: the ultimate rich and creamy chocolate cheesecake. Earlier this week, I shared my recipe for lemon poppy seed buttermilk waffles that are fresh, light and perfect for Valentine’s Day breakfast/brunch. So I wanted to go the opposite direction for dessert and give a rather sinful dish that will hit you over the head with it’s rich and chocolate-y flavor.

As far as desserts go, Valentine’s Day is all about chocolate and since I’m at the point where I can make cheesecakes in my sleep ever since my Pumpkin Cheesecake post, I thought it was about time to give my recipe for my favorite chocolate version. I was planning on giving this recipe back at Christmastime, because I usually serve this for our Christmas Eve dinners, but I decided to put it off and wait for the right time. A day where you show people how much you love them with extravagant gifts, flowers and desserts? Valentine’s Day is definitely the right time for this recipe.

IMG_6127-2.jpg

Chocolate cheesecakes are typically made with an Oreo crust and although Oreos are my favorite cookies in the entire world (I’ve put much thought into this), I didn’t want to take anything away from the cheesecake filling. Like ketchup, if there’s Oreos in any dish, that is the dominant flavor that you will be tasting, so I decided to stick with my favorite graham cracker crust but put a spin on it by adding cocoa powder. I was hesitant that the cocoa powder wouldn’t really come through against the graham crackers, but the end result was absolutely delicious and I couldn’t be happier with it. Alternately, you can make it a bit easier for yourself and buy chocolate graham crackers from the grocery store and skip the cocoa powder.

As for the filling, it’s a rather straightforward recipe for a cheesecake and the only chocolate that is added comes from two cups of chocolate chips. Because we won’t be using any other kinds of chocolate in the filling like cocoa powder or chocolate bars, I recommend opting to use a higher end brand of chocolate chips, such as Guittard or Ghirardelli. We’re making a chocolate cheesecake that has no bells or whistles and so we want the chocolate that we’re using to be high quality. And if you have chocolate bars laying around, definitely make chocolate shavings and top your cheesecake with it! It’ll add a dramatic touch to the cake and can also cover up any cracks that may occur.

IMG_6017.jpg

But we won’t have any cracks, will we?! The last time we made cheesecakes together, I gave pretty detailed directions in how to achieve a flawless looking cheesecake. To summarize: 1) all ingredients for the filling need to be at room temperature. In this recipe, this means the cream cheese and eggs, but not the milk since it will be warmed up in the microwave; 2) do not over mix the batter! Over mixing adds too much air which will cause the cheesecake to rise too quickly in the oven and therefore fall and develop cracks; 3) bake the cheesecake in a water bath - an optional but highly recommended step that not only insures a crack-free cheesecake, but leads to a cheesecake with a smooth, moist, and creamy texture; and 4) allow the cheesecake to cool properly meaning slowwwwwwwly. It’s best to leave the cheesecake in the oven for an hour after it’s done baking (with the oven turned off), and then bring it to room temperature on a cooling rack before eventually transferring it to the fridge.

Let’s go back to the water bath method for a minute. If you’re having trouble visualizing exactly what it’s supposed to look like, here’s a video that should give you some clarity. And if you’re like me and worried about water getting into your springform pan despite having the foil wrapped around it, there’s the option of using slow cooker liners. You simply wrap the liner around the springform pan, tie the excess bag in a knot, and then wrap foil around it. I got this idea from the blog, Life, Love and Sugar, and if you click here, you’ll see step-by-step photos on how to do it.

Ands that’s it! I know all of this information seems a bit daunting and may lead you to consider running to get a box of chocolates from Sees Candy instead. But, please don’t! Homemade is always so much more meaningful even if it comes out looking like a hot mess or tastes a bit off. Trust me on this! And if you’re single, this cheesecake will be perfect for your Galentine’s Day party for you to split with all your girlfriends, or you can make this and send your kids to school with it to share with their class. Or do like Alex and myself, and slowly chip away at it each day and cry when it’s all gone.

IMG_6020-2.jpg

Chocolate Cheesecake w/ Chocolate Graham Cracker Crust

Makes (1) 9 or 10-in. cheesecake

Recipe adapted from King Arthur Flour

Ingredients

For the crust:

IMG_5908.jpg
  • 1 3/4 cups graham cracker crumbs

  • 3 tbsp. light brown sugar

  • 1/2 cup unsweetened cocoa powder

  • 6 tbsp. (3/4 stick) unsalted butter, melted

For the filling:

  • 2 cups chocolate chips, semisweet or bitter

  • 1/2 cup milk, 2% or whole works

  • 1 tsp. espresso powder (optional, but recommended to intensify chocolate flavor)

  • 3 (8 oz.) packages of full-fat cream cheese, room temperature

  • 1 cup granulated sugar

  • 4 large eggs, room temperature

  • 1 tsp. vanilla extract

  • 2 tbsp. all-purpose flour

Directions

Make the crust:

  1. Move the oven rack to the lower-middle position and preheat the oven to 350°F.

  2. In a bowl, mix the graham cracker crumbs, brown sugar, cocoa powder, and melted butter and transfer to a 9 or 10 in. springform pan. Using the back of a measuring cup, firmly press the crust mixture into the bottom of the pan as well as the sides. Try to get the crust as evenly spread as possible. If the sides aren’t perfect, no worries.

  3. Bake in the oven for 10 minutes. Remove from oven and let cool while preparing the filling. Keep the oven on at 350°F.

Make the filling:

  1. In a microwave-safe bowl, melt the chocolate chips and milk together until smooth. Do this in 30 second intervals, stirring well after each time, and being careful not to burn the chocolate. Once melted, stir in the espresso powder (if using) and set aside.

  2. In the bowl of a stand mixer fitted with the paddle attachment (or in a large bowl if using a hand mixer) beat the cream cheese on medium speed for 2 minutes, and then add in the sugar and cream together until no lumps remain. Scrape down the sides of the bowl.

  3. Add the eggs one at a time on low speed, making sure each one is incorporated into the mixture before adding the next. Add the vanilla extract and flour. Scrape the sides of the bowl again.

  4. With the mixer on low, slowly add the melted chocolate and milk mixture to the bowl. Once all is added, turn off the mixer and finish mixing the filling using a spatula, making sure to get anything that may be down at the bottom of the bowl (this area usually gets left untouched when using a mixer). Pour the cheesecake filling into the pan and spread it evenly.

Prepare the springform pan/water bath

  1. Boil a full kettle of water for the water bath. While the water is heating up, carefully place the springform pan in the slow cooker liner (this is an optional step, but if partaking, I provided a link above that has a visual for this), and then finally, tightly wrap the pan in 1-2 pieces of foil. Place the wrapped springform pan inside of a roasting pan. Once the water is boiled, you can either 1) pour in the water while the roasting pan is in the oven or 2) pour in the water with the roasting pan out of the oven. Either works, just try not to have the oven door open for too long if you choose option 1.

  2. Bake the cheesecake for 45-55 minutes. The center of the cheesecake will still have a wiggle to it, but the outer edges will be set. Turn off the oven, crack the door slightly, and leave the cheesecake in there for one hour.

  3. Remove the cheesecake from the oven and allow it to cool completely on a cooling rack before transferring it to the refrigerator. Chill the cheesecake for at least 4 hours before eating it. When ready to serve, run a knife around the edge of the pan and remove the springform pan piece. Top with shaved chocolate, raspberries, homemade whipped cream, etc. Cheesecake will last up to 5 days in the refrigerator - just cover it with plastic wrap.

LEMON POPPY SEED BUTTERMILK WAFFLES + BLUEBERRY MAPLE SYRUP

IMG_6391.jpg

Now that we’ve entered the month of February, I of course am going to give a few recipes for the holiday that either people avoid like the plague or fully embrace: Valentine’s Day. I guess I fall somewhere in between these two categories in that I don’t hate the holiday, but I don’t expect my boyfriend to make reservations at a fancy restaurant or give me an extravagant gift like a diamond necklace. I DO however enjoy the two of us making a big dinner, cocktail in hand, while wearing our pajamas. That to me is so much more romantic and fun than sitting next to strangers at a busy restaurant.

Oh, and I like flowers. Flowers are nice. (Hi, Alex!)

One other aspect that I enjoy doing for Alex on V-Day is baking him something decadent for dessert and/or starting the day for him with an amazing breakfast. On most days, breakfast at home is pretty boring and consists of peanut butter toast and greek yogurt. But on Valentine’s Day, I kick it up a notch (I’m Emeril now) and sometimes make Alex pancakes and bacon or an egg scramble filled with whatever veggies I have on hand in the fridge. To say that Alex loves this is an understatement; he appreciates this small gesture so much and I know it makes his day. So I think waking up a little earlier and whipping up a more exciting breakfast for your significant other is about the nicest thing one can do at 7:30 in the morning.

IMG_6320.jpg

Not sure on what to make for your SO for the love-filled holiday? Let me make the tough decision for you and tell you that you NEED to make these lemon poppy seed buttermilk waffles! And while we’re at it, let’s have you make a homemade blueberry maple syrup (with no added sugar!) to drown those waffles in. Waffles for breakfast is not only delicious and much more exciting than cereal, but actually comes together fairly quickly and will certainly impress whoever you make them for.

Ever since I received a waffle maker this past Christmas, I have been making a new batch of waffles every single weekend (literally) for Alex and myself. I luckily found a recipe that I absolutely love and not only tastes incredible fresh from the maker, but freezes exceptionally well - all you have to do is pop them in the toaster, press the defrost button, and they’ll have the same texture and taste as the day you made them. So, I decided to take that recipe and put my own spin on it by using the classic flavor combo of lemon and poppy seed. We’re currently in the midst of citrus season and so the addition of bright and flavorful lemon zest and juice really brightens up the waffles and gives it such a fresh taste.

As for how many waffles this recipe will yield you, it really all depends on what kind of maker you own. I personally have this one (I love it btw), and with scooping out about 1/3 cup portions, I get 12-14 waffles. If you have the round waffle maker, I would suggest following the manufacturer’s directions on how much batter to use per waffle.

IMG_6340.jpg

And let’s not forget the blueberry maple syrup! My favorite toppings for when I eat waffles have always been maple syrup and blueberries, so I decided to combine the two to make life a bit easier. Three ingredients + a stovetop + less than 10 minutes of your time = an elevated take on the kind of syrup you find on the table at IHOP. The finished result is a bit more liquid-y than normal maple syrup, but this won’t bother you the moment you take your first bite. And regardless, there are whole blueberries added to the syrup at the end so you’ll get the best of both worlds.

Do me (and your SO) a favor and make these waffles for Valentine’s Day! And if for some weird reason breakfast isn’t your thing, I’ll be posting a Valentine’s Day-friendly dessert next week.

IMG_6393.jpg

Blueberry Maple Syrup

Yields about 1 1/2 cups

Recipe adapted from Food Network

Ingredients

  • 2 1/2 cups fresh blueberries, divided 

  • 1 cup pure maple syrup

  • Squeeze of fresh lemon juice

Directions

  1. In a medium saucepan, combine 1 1/2 cups of the blueberries with the maple syrup and lemon juice. Heat over medium temperature for about three minutes, or until the berries have softened a bit.

  2. Using the back of a wooden spoon, crush the berries against the side of the saucepan. Do this carefully, because the berry juice will be very hot. After a few more minutes, the mixture will begin to simmer and foam, and that is when it’s done.

  3. Pour the mixture through a strainer placed over a medium sized bowl and discard the blueberry solids left behind. Stir in the remaining 1 cup of blueberries and allow to cool a bit before enjoying. Transfer leftover maple syrup to a glass container, like a mason jar, and refrigerate. 

Lemon Poppy Seed Buttermilk Waffles

Yields about a dozen waffles, depending on waffle maker 

Recipe adapted from The Worktop

Ingredients

IMG_6380.jpg
  • 3 tbsp. granulated sugar

  • 2 tbsp. fresh lemon zest

  • 1 1/2 cups white whole wheat flour or whole wheat flour (all-purpose works as well)

  • 2 tbsp. poppy seeds

  • 2 tsp. baking powder

  • 1/2 tsp. baking soda

  • 1/2 tsp. salt

  • 1 1/2 cups buttermilk

  • 1 tbsp. fresh lemon juice

  • 1 tsp. vanilla extract

  • 2 large eggs

  • 1/2 cup (1 stick) unsalted butter, melted and slightly cooled

Directions

  1. In a medium size bowl, using your hands or a whisk, massage/mix the granulated sugar and lemon zest together until fragrant (this helps release the oils in the zest). Add the flour, poppy seeds, baking powder, baking soda and salt. Whisk together. 

  2. In a large bowl, add the buttermilk, fresh lemon juice, vanilla extract and eggs, and whisk until incorporated. Slowly add the melted butter while continuing to whisk, so as not to curdle the cold buttermilk. 

  3. Add the wet ingredients to the dry ingredients, and mix until just combined. Do not over mix! Allow the batter to sit at room temperature for 10-15 minutes. 

  4. Preheat your waffle maker and spray with cooking spray. Add about 1/3 cup of batter for each waffle, but do whatever size works best for you in your personal waffle maker. Cook until the waffles are golden brown, about 4 minutes. 

  5. Repeat until all batter is used up. Enjoy your waffles with blueberry maple syrup, a pat of butter, and/or a sprinkling of confectioners’ sugar. Waffles freeze extremely well: just pop the frozen waffles in your toaster, hit the defrost button, and they’ll taste exactly the same as on the day you made them.

UNION SQUARE CAFE'S BAR NUTS

IMG_4980.jpg

Today I am giving you quite possibly the easiest recipe that you can find on The Vivid Kitchen thus far. We’re taking a break from desserts and baked goods this week in lieu of making something that will work perfectly for your Super Bowl viewing party. I’m talking about bar nuts, and not just any bar nuts but Union Square Cafe’s version of the seriously addicting snack. For those who don’t know, Union Square Cafe is a famous restaurant in NYC and comes from the mastermind restaurateur, Danny Meyer. He later went on to open other highly accoladed spots like Gramercy Tavern and Eleven Madison Park, the latter being a Michelin-starred restaurant. Although Union Square Cafe is a high-end restaurant with a sophisticated menu, their bar nuts are almost as famous as the restaurant itself. A quick google search will show that I am far from the first person to share this recipe, but I’ve found that still, a good amount of people in my circle had never heard of or tried these I introduced them. So, I want to spread the bar nuts love a little further today!

I’ve made these bar nuts at least 15-20 times since I discovered the recipe in my coveted Genius Recipes cookbook from Food52, about 4 years ago. Every time I go to a Cinespia screening at the Hollywood Forever Cemetery where we picnic before viewing a film, it’s a no-brainer among my friends that I will be bringing a batch of the nuts. At my sister’s wedding, I made a HUGE batch of these, enough for 115 people, but with only almonds because we just so happened to find pounds of them in my mom’s freezer. Each table at the wedding had a cheese platter filled with crackers, fruit, and the seasoned almonds (my mom, aunt, and I made each platter mere hours before the ceremony) and it was the perfect appetizer.

IMG_4610.jpg

The only problem with these bar nuts is that once you start eating them, you honestly can’t stop. I have no problem stopping myself from eating an entire can of Pringles, and I know I can only eat one single Lay’s potato chip, but with Union Square Cafe’s nuts, there’s no stopping. In fact, I never make them just for Alex and I to have at home because we both will eat nothing else until they’re all gone. And on Thanksgiving, I’m not allowed to make them because putting them out before dinner would ruin everyone’s appetite. Have I given enough proof that these nuts are amazing and that you need to make them?

As for what nuts to use, the choice is yours. You may include pecans, walnuts, Brazil nuts, peanuts, almonds, cashews or hazelnuts. These are all the nuts that are found in Union Square Cafe’s blend. But could you add pistachios or macadamia nuts? Of course you can! You also get to decide how much of each nut you want in your batch: you can have more almonds and less cashews, you can use only pecans, or you can use every single nut I listed above. Just as long as you use 800 grams (1 3/4 lbs. or 28 oz.) worth of nuts, you’re good to go. I find that the easiest way to measure out the nuts is by using a kitchen scale, especially if you’re using an array of nuts.

IMG_4619.jpg

It’s important that I note that you need to buy raw and unsalted nuts! We need to toast them ourselves so that the seasoning “paste” we make - consisting of melted butter, brown sugar, chopped fresh rosemary, cayenne pepper, and salt - will adhere to the warm nuts. I made two tiny changes to the seasoning paste which is that I use a bit more butter than what is called for (about 2 tbsp. instead of 1) and I finely chop the fresh rosemary. Over the years, I’ve found that these two modifications make for not only a tastier batch, but allows for the nuts to receive a generous coating of seasoning deliciousness. So that’s why in the recipe below, I have written 1-2 tbsp. of melted butter. I suggest starting with 1 tbsp. and see if it works for you, and if not, remember to add an extra half tablespoon or so the next time you make them! Because there will definitely be a next time.

Make these for your Super Bowl party please! Or any party or get together for that matter. I promise that these nuts will get more compliments than your main dish that took hours to prepare.

P.S. Have leftover fresh rosemary and not sure what to do with it? Make my lemon and rosemary madeleines!

IMG_4869.jpg

Union Square Cafe’s Bar Nuts

Makes about 5 cups

Recipe from Union Square Cafe via Genius Recipes

Ingredients

  • 1 3/4 lb. (800g, 28oz.) raw and unsalted assorted nuts (peanuts, cashews, Brazil nuts, pecans, walnuts, almonds, hazelnuts)

  • 1-2 tbsp. unsalted butter, melted (see note above)

  • 2 tbsp. finely chopped fresh rosemary

  • 2 tsp. dark brown sugar, packed

  • 1/2 tsp. cayenne pepper

  • 2 tsp. kosher salt

Directions

  1. Preheat the oven to 350°F. Evenly spread the nuts on a large baking sheet (if all nuts do not fit on one sheet, divide between two and toast at the same time). Toast the nuts for 10 minutes, or until lightly golden brown and fragrant.

  2. Meanwhile, prepare the seasoning. In a large bowl (large enough to fit the nuts), combine the melted butter, fresh rosemary, brown sugar, cayenne pepper and salt. When the nuts are finished, immediately transfer to the bowl with the seasoning and thoroughly mix to coat. Add more salt or cayenne if needed. Enjoy warm, but I think they’re best at room temperature when the coating has settled.