BLUEBERRY LEMON MUFFINS

IMG_8860.jpg

Since this past Sunday, aka Daylight saving time, I’ve been craving summer-y dishes like strawberry ice cream and peach pie. Yes, we’re only in the middle of March, but the moment it stays lighter later and we get to enjoy sunshine for a couple more hours, my mind immediately goes into summer mode. I know that I don’t live in an area where there will be winter-y weather for about 1-2 more months, but after record low temperatures and rainfall in Southern California, I’ve never been more excited for warmer weather.

On top of beautiful weather, we’ve been enjoying wildflower super blooms as well as the annual migration of butterflies from Mexico to the Pacific Northwest (the painted ladies). Walking outside and seeing hundreds upon hundreds of butterflies is quite honestly one of the most beautiful sights and it’s amazing to see how it’s positively affecting everyone’s mood. I sometimes forget how lucky I am to live in such a awe-inspiring area and I’m trying to take full advantage of my surroundings. More hikes are in my future!

IMG_8623-2.jpg

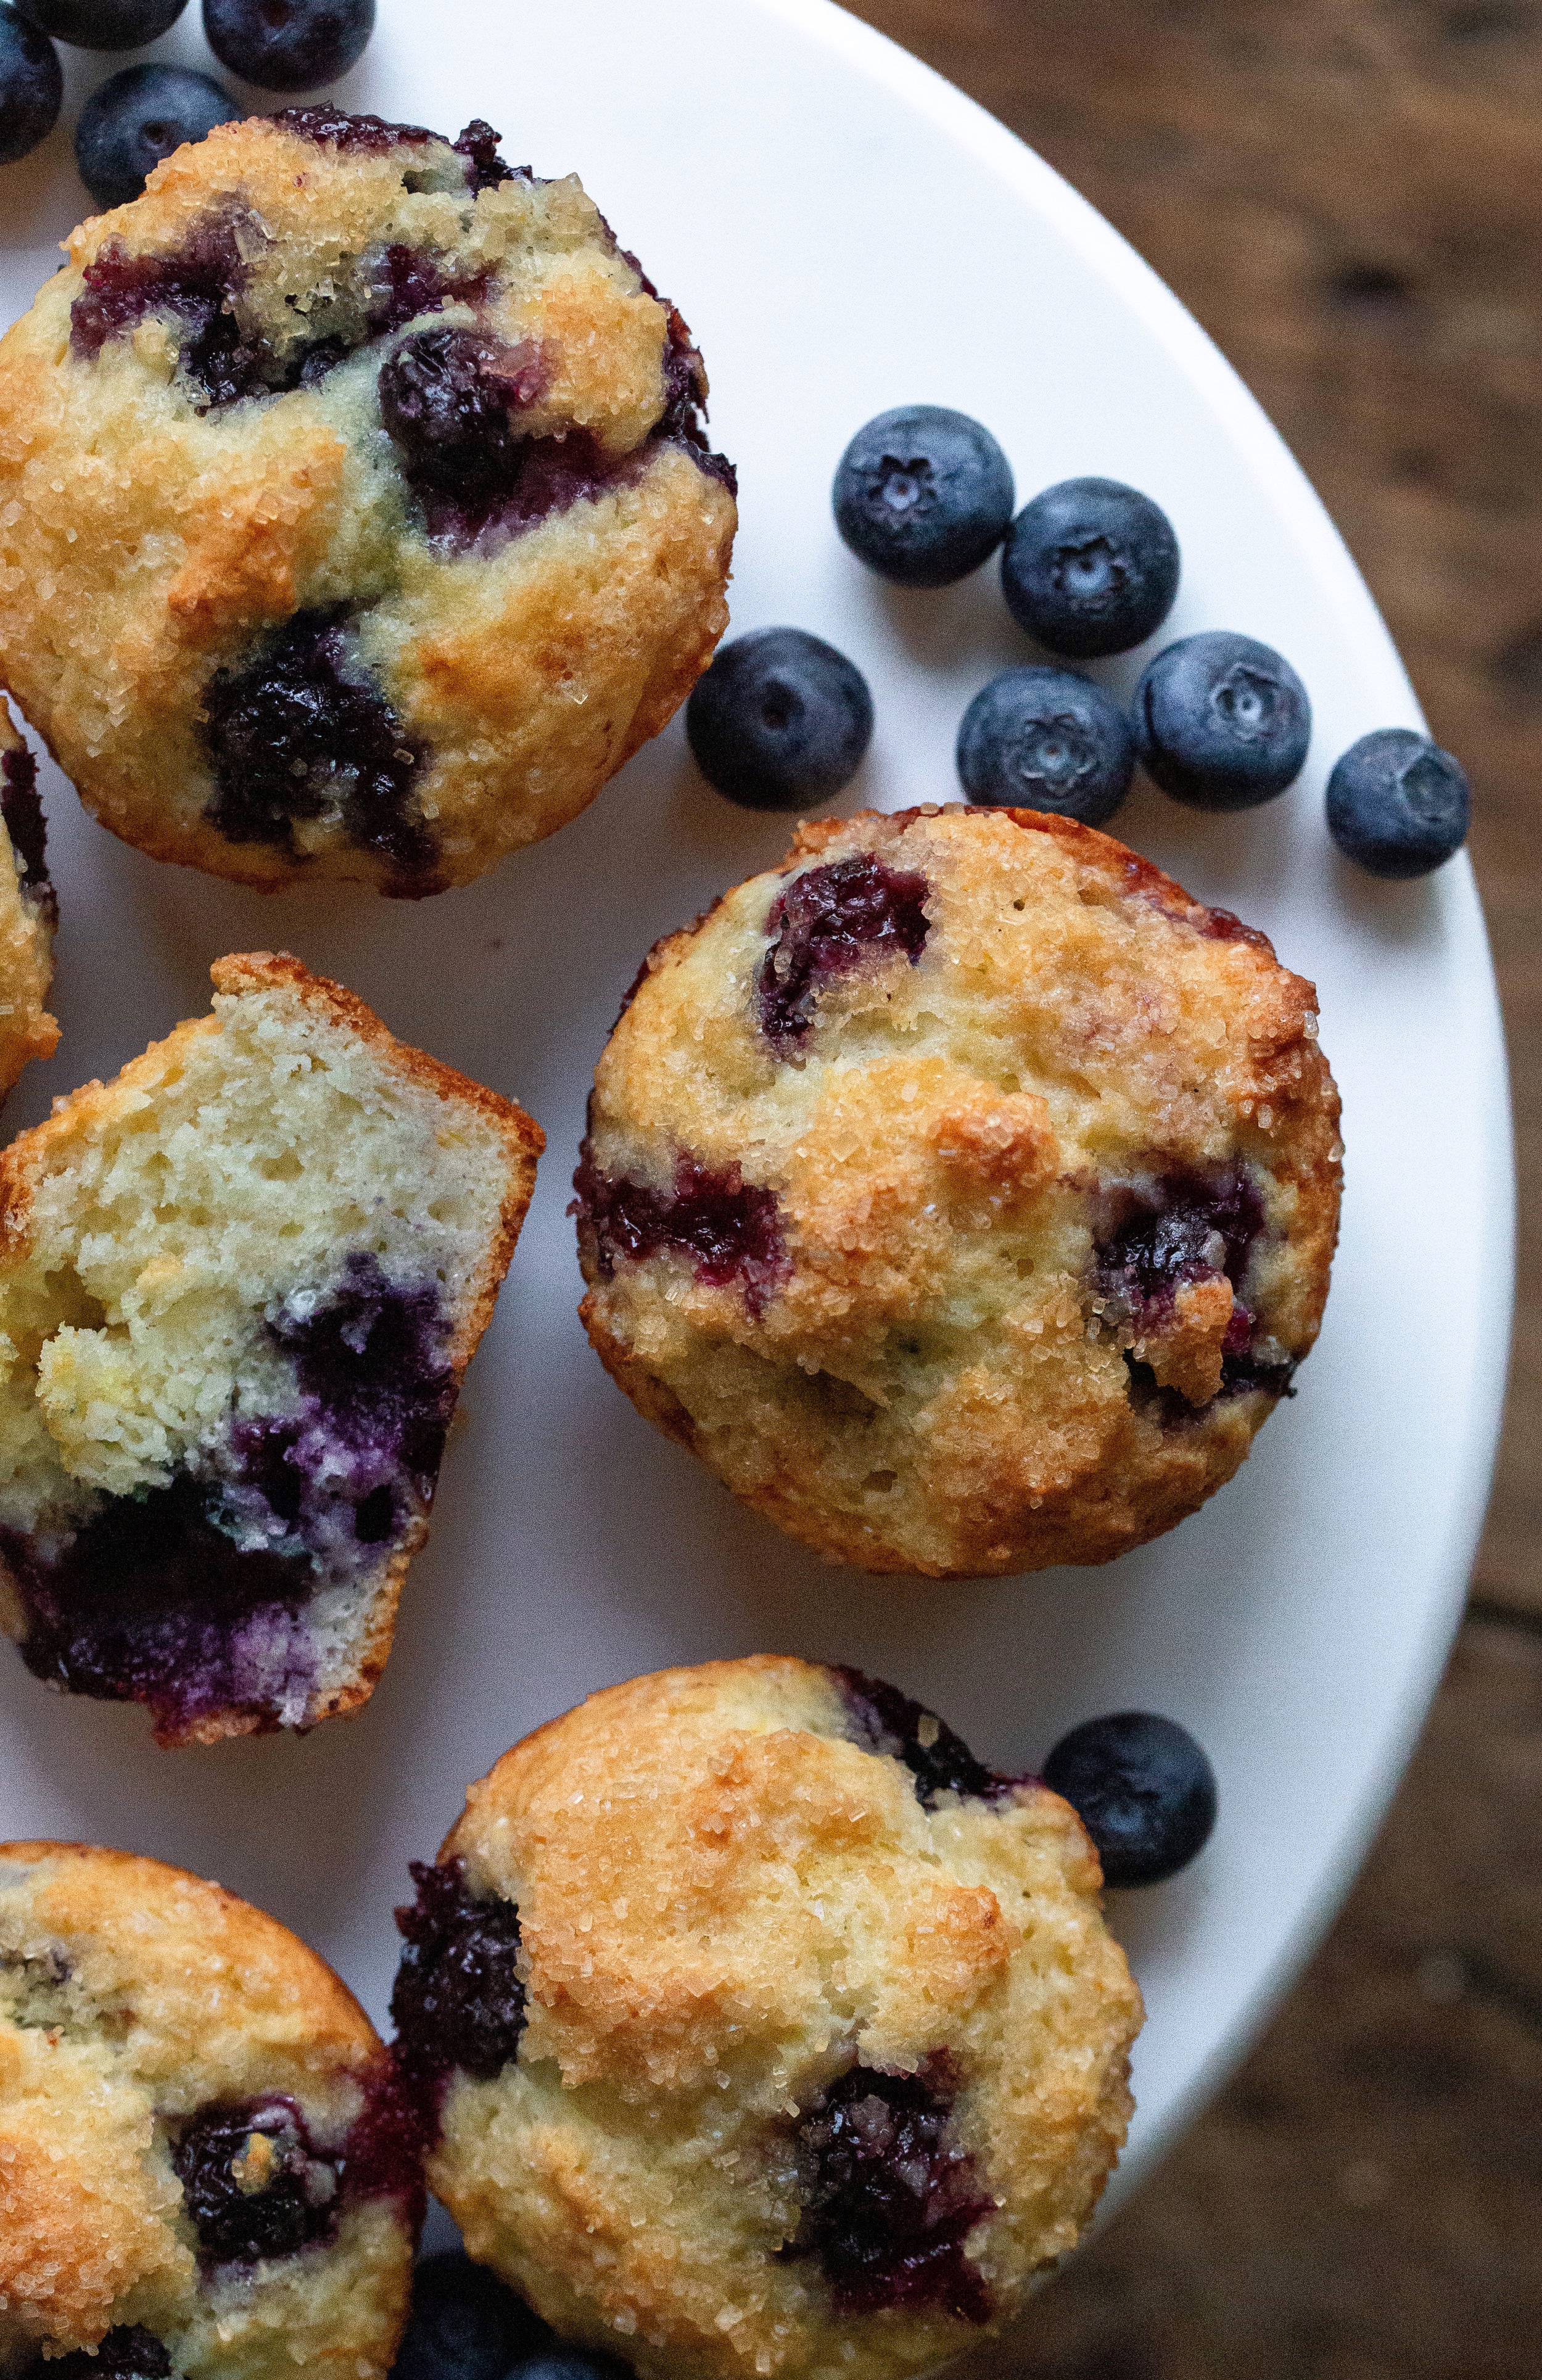
So, today I wanted to work with a produce that is best in the summertime, but can actually be utilized all year long. Blueberries. Even though blueberries are at their peak in California from May to July/August, I eat them every single day with my breakfast. Blueberry is the one fruit that I just can’t seem to enjoy for a limited amount of months; I’d rather have a mediocre blueberry than no blueberry at all. When it comes to blueberries in dishes, I’ve always been a major fan of perfectly simple blueberry muffins. The recipe I’m giving you today is that and so much more.

I really wanted to use wild blueberries for this recipe because I find that they’re SO delicious and bursting with flavor, but since it’s still wintertime, the only wild blueberries available are frozen. I attempted to use the frozen wild blueberries that I found at Trader Joe’s but they completely stained my dough - literally, I was left with blue muffins. Although the flavor was still there, I couldn’t accept the color and decided to go with plain fresh blueberries. My advice is using fresh berries is much easier even though berries aren’t at their peak of ripeness at the moment. I promise that the berries that I bought at the grocery store still made the muffins amazing, and just think how much better it’ll turn out when you make these again in the summertime.

IMG_8822.jpg

Below in the recipe, I give the optional step to make an easy glaze for the muffins. The glaze, which is simply confectioners’ sugar and fresh lemon juice whisked together, is optional because I personally think the muffins are perfect as is, especially since there’s the crunchy topping, thanks to a heavy sprinkling of turbinado sugar. But, I did make a couple of batches with the glaze and the few people I gave them to went crazy over it and thought it was mandatory that I include it in this post. So whether you’re a muffin purist like me or if you fall into the category of “more is more”, you have the option to glaze or not. Glaze half of the batch if you want!

IMG_8851.jpg

Blueberry Lemon Muffins

Yields 12 standard muffins

Recipe adapted from Smitten Kitchen

Ingredients

  • 1/2 cup granulated sugar

  • Zest of 1 large lemon

  • 5 tbsp. unsalted butter, melted and slightly cooled

  • 3/4 cup sour cream or yogurt (plain or Greek)

  • 1 large egg

  • 1 1/2 tsp. baking powder

  • 1/4 tsp. baking soda

  • 1/4 tsp. salt

  • 1 1/2 cups all-purpose flour

  • 1 1/4 cups fresh blueberries (see my note above regarding frozen)

  • 1 1/2 - 2 tbsp. turbinado sugar

    Optional: Lemon Glaze

  • 1 1/2 cups confectioners’ sugar

  • 3-4 tbsp. fresh lemon juice

Directions

  1. Preheat the oven to 425°F. Grease a 12-count muffin tin with cooking spray or butter, or line with cupcake wrappers.

  2. In a large bowl, using your hands or a whisk, massage/mix the granulated sugar and lemon zest together until fragrant (this helps release the oils in the zest). Add the melted butter, sour cream/yogurt and egg, and whisk until well incorporated. Stir in the baking powder, baking soda and salt.

  3. Using a spatula, carefully fold in the flour and blueberries until you can no longer see any dry ingredients. Do not over mix!

  4. Using a spoon or an ice cream scoop, fill each muffin cavity 3/4 full with batter. Evenly sprinkle a heaping 1/2 tsp. of turbinado sugar over each muffin.

  5. Bake for 5 minutes at 425°F, and then turn the oven down to 350°F and bake for another 18-20 minutes, or until a toothpick inserted in the center comes out clean. The blast of initial heat helps the muffins get their height.

  6. Allow the muffins to cool in the pan for a couple of minutes before taking them out. Drizzle each muffin with the lemon glaze (optional, recipe below). Muffins are best eaten on the day they are baked, but can be enjoyed for 1-2 days after if covered and left at room temperature.

Lemon Glaze

  1. In a small bowl, combine the confectioners’ sugar and the fresh lemon juice with a whisk. Start with 3 tbsp. of fresh lemon juice, and add more only to reach your desired consistency.

JUMBO SALTED TAHINI CHOCOLATE CHIP COOKIES

IMG_8330-4.jpg

Since last Monday, I’ve been out of commission due to pulling my lower back while I was working out. I was in the middle of a fitness class and pushed myself a little too hard and wound up severely hurting my back. I left the gym so upset with myself for allowing that to happen and the worst part is that I didn’t even feel like going to class that day! You know those inspirational posters in gyms that say something along the lines that no one ever regrets a work out after they’re done… that’s a lie! I should have listened to my body and stayed home and went for a walk instead.

IMG_7938.jpg

Anyway, I took healing my back seriously and spent the next couple of days icing it properly and relied on Aleve to alleviate the pain. Simply walking was just about the hardest task to accomplish and every step I took was painful. BUT here I am 9 days later, and I’m just about good as new. I haven’t gone back to my normal routine of exercises, but I instead have been doing low-impact cardio (walking, elliptical, recumbent bike) and I’ve actually been enjoying the low intensity.

I’m telling you guys all of this because I didn’t mean to take a week off from the blog! I attempted baking and photographing these cookies last week when I could finally walk around with less pain, but the act of hunching over to take pictures was not helping out my situation in any way. This led to all of my photos coming out subpar and there was no way I was going to post them without liking them. I waited til Monday when I was feeling much better, baked and reshot the cookies, and now I’m much happier with the outcome.

IMG_8325-4.jpg

Recently, it had occurred to me that I haven’t posted a “standard” chocolate chip cookie recipe yet. And I’ve given much thought as to why I haven’t done this and it could be because all of my personal favorite cookies are a step-up from the original cookie that everyone loves. Whether it’s adding toasted pistachios, or a big sprinkling of flaky sea salt, or using olive oil in place of butter, my taste for cookies aren’t what’s usually found at a local bakery. Of the six total cookie recipes that The Vivid Kitchen has to offer - including olive oil brownie cookies, toffee brown sugar cookies, and ginger molasses cookies - it apears that I’ve been focusing on giving cookie recipes that are not only amazingly delicious, but a little unique.

So once again, I’m giving another cookie recipe that has one aspect to it that sets it apart from other chocolate chip cookies. This comes from the addition of tahini: a paste made from ground sesame seeds that is a staple in Middle Eastern cuisine. In America, we’re mostly accustomed to eating tahini via hummus, where tahini is a vital ingredient. Because of this, the idea of putting tahini in sweets is a bit mind-boggling to most, but tahini is actually a very popular component in an array of desserts like tarts, ice cream, and cookies.

IMG_8224.jpg

When I first tried tahini on its own, I wasn’t in love with the taste or texture and of course, this made me hesitant to add it to my cookie dough. The texture is akin to a natural nut butter in that you have to stir it well before eating it in order to incorporate the oils. As for the taste, it’s pretty unique with a roasted and bitter flavor, and just something you wouldn’t think would work well in desserts. BUT IT TOTALLY DOES. The tahini isn’t exactly prominent in the cookies but gives it a bit of a nutty flavor and even accentuates the chocolate. Seriously, these are up there as one of my favorite chocolate chip cookies. Ever.

If you want your cookies to have pools of chocolate much like the ones you see in my photos, this is done by roughly chopping up bars of chocolate and then sifting the chocolate in order to discard the powder that is created from chopping. You’ll be left with a variety of chocolate chunk sizes, which is key to getting those pockets of chocolate-y goodness. And to further the savory/sweet relationship that we have going on with adding tahini to the cookie dough, finishing the baked cookies with a healthy sprinkling of flaky sea salt is a must.

One last thing: I decided to make these cookies huuuuge, which is something I normally opt not to do. I wanted them to be bakery-style aka big, and in the end I was super happy with the results. If you want to make normal-sized cookies, just make sure to adjust the baking time by about 5 minutes, or keep a good eye on them around the 8 minute mark.

IMG_8275.jpg

Jumbo Salted Tahini Chocolate Chip Cookies

Yields about a dozen large cookies

Recipe slightly adapted from David Lebovitz

Ingredients

IMG_8297-4.jpg
  • 1 cup plus 2 tbsp. all-purpose flour

  • 3/4 tsp. baking soda

  • 1 tsp. kosher salt

  • 4 oz. (8 tbsp., 1 stick) unsalted butter, room temperature

  • 1/2 cup tahini, well stirred

  • 1/2 cup light brown sugar, packed

  • 1/2 cup granulated sugar

  • 1 large egg, room temperature

  • 1 large egg yolk, room temperature

  • 1 1/2 tsp. vanilla extract

  • 10 oz. (about 2 cups) bittersweet/dark or semisweet chocolate chunks or chips

  • flaky sea salt

Directions

  1. In a medium bowl, whisk together the flour, baking soda, and salt. Set aside.

  2. In the bowl of a stand mixer fitted with the paddle attachment, or in a bowl large enough for a hand mixer, beat the butter, tahini and both sugars on medium speed until light and fluffy, about 2-3 minutes.

  3. Add in the egg, egg yolk, and vanilla extract. Mix until well incorporated. Scrape down the sides of the bowl.

  4. All at once, add in the flour mixture and carefully mix on low speed for about 10 seconds before turning the speed up to medium until everything is just combined. Do not over mix. Using a spatula, fold in the chocolate chunks or chips. Cover the bowl with plastic wrap and refrigerate for 12 hours. Note: if you cannot simply wait that long, wait at least 1 hour before baking off the cookies.

  5. Preheat the oven to 325°F. Line a baking tray with parchment paper, and using a spoon or an ice cream scoop, scoop out 4-5 tablespoons of dough for each cookie (about 2.5oz each). Bake 6 cookies at a time because they will spread significantly. Allow the cookies to bake for 14-15 minutes or until the cookies are golden brown on the edges and slightly pale in the center.

  6. Once out of the oven, immediately sprinkle each cookie with flaky sea salt. Allow the cookies to sit on the baking sheet for 5 minutes before transferring to a cooling rack. Enjoy!

BLACKBERRY + HAZELNUT YOGURT POUND CAKE

IMG_7200-2.jpg

I have some pretty exciting (exciting for me, boring for you) news: Alex and I just booked another trip back to Portland, Maine! If you’ve been following along with The Vivid Kitchen, I think it’s pretty obvious by now how much we love Portland and would do anything to live there, so the fact that we managed to book our third trip there in less than two years is amazing.

This will be the first time that we’ll be visiting in the springtime, so we can’t wait to see how different the city will be... there may be snow on the ground or it could be raining every other day, but we won’t mind that at all! Something else different about this trip is that this is the first time we’ll have a rental car. This means we’ll be able to check out places we’ve been dying to see outside of Portland, like Palace Diner in Biddeford, The Purple House in North Yarmouth, and most importantly, ACADIA (!!!). If you have any recommendations for must-see spots outside of Portland, I’m all ears.

IMG_7222.jpg

Now that I have Portland on the brain and I find myself once again googling more restaurants and bars to hit for our upcoming trip, I’m reminiscing about all of our favorite spots that we fell in love with over the past two trips: Bonobo for the most incredible wood-fired pizzas, Belleville for insanely flaky and buttery croissants and swirl buns, and LFK for creative cocktails. But one of our favorite breakfast haunts for some of the best pastries in the city is Tandem Coffee + Bakery, and it is where I drew inspiration from for today’s recipe.

On our last trip to Portland, Alex and I went to Tandem for an early morning breakfast, since their breakfast sandwiches, served on the best biscuits ever, are incredible. But if you’ve ever visited Tandem before, it goes without saying that you can’t leave without ordering from the bakery’s daily selection of baked goods ranging from cakes to cookies to pies. On this particular day, it was their scone selection that caught my attention: a blackberry and hazelnut flavored scone. The golden brown pastry looked like a textbook perfect scone, and the moment I had my first bite I fell deep in love with the flavor combination. Yes, a nut and berry combo isn’t that crazy of an idea for scones, but blackberries and hazelnuts together was new to me and I knew that I had to test it out in other kinds of baked goods when I got home.

IMG_7404.jpg

Which brings me to this amazingly simple and not too sweet, blackberry and hazelnut yogurt pound cake. This recipe is slightly adapted from the ingenious Alison Roman, author of the cookbook Dining In and regular contributor to The New York Times food section and Bon Appétit. Alison got a lot of recognition for Dining In, at first due to a cookie recipe that went viral (which I tried and loved), but she has gone on to show that just about any recipe that she shares with the world, is not only approachable but exceptionally delectable. I’ve cooked a handful of her recipes (sweet and savory) which are all great, but I’ll always have a soft spot for her yogurt and honey pound cake with raspberries (from her cookbook). I love a solid loaf cake recipe and how it only gets better the longer it sits in your fridge - loaf cakes like this one and banana breads are always better the next day, in my opinion.

So, I took Alison’s recipe, tweaked it a bit and tried the recipe with the blackberry and hazelnut flavor combination. The end result is seriously delicious and addicting, and something that I will make over and over again. Paired with the incredible and moist crumb due to the added Greek yogurt (or sour cream if you prefer) and the lightly sweetened taste due in part to a combination of honey and granulated sugar, this pound cake is a winner. In similar fashion with my citrus ricotta bundt cake with pistachios, I finished this cake with a good amount (re: a lot) of hazelnuts doused in honey, so if you’re bringing this to a friend’s house or a party, people will know what they’re getting themselves into… and the added crunch of even more hazelnuts makes the cake better, of course. Finish with a dusting of confectioners’ sugar and you’ll have a beautiful cake ready to go.

I can’t wait to visit Portland again for more inspiration for my blog and I so look forward to eating some of the best food and drinks that the city has to offer.

IMG_7239.jpg

P.S. This is my 50th blog post! Woo!

Blackberry and Hazelnut Yogurt Pound Cake

Makes 1 standard loaf cake (9x5 inch pan)

Recipe adapted from Alison Roman via Dining In

Ingredients

IMG_7407-2.jpg
  • 1 1/2 cups all-purpose flour, plus 1 tbsp. for berry and nut mixture

  • 2 tsp. baking powder

  • 1 tsp. kosher salt

  • 2 cups fresh blackberries

  • 1/2 cup toasted hazelnuts, coarsely chopped

  • 1/2 cup granulated sugar

  • 1/4 cup honey

  • 3/4 cup plain whole-milk Greek yogurt (or sour cream)

  • 1/3 cup neutral oil, like vegetable or grapeseed

  • 2 large eggs

  • 1/2 tsp. vanilla extract

  • Roughly chopped hazelnuts, honey, confectioners’ sugar, etc. to finish

Directions

  1. Preheat the oven to 350°F. Generously grease a 9x5 inch loaf pan with butter or nonstick cooking spray.

  2. Whisk the flour, baking powder and salt together in a medium bowl. Set aside.

  3. In a small bowl, mix the berries and nuts together with 1 tbsp. all-purpose flour (to prevent them from sinking to the bottom of the cake while baking). Set this bowl aside as well.

  4. Combine the sugar, honey, Greek yogurt, oil, eggs, and vanilla in a large bowl, and whisk until incorporated. Using a spatula, slowly fold the dry ingredients into the wet ingredients. Do not over mix. Carefully add the berry/nut/flour mixture to the bowl.

  5. Pour the batter into the prepared loaf pan and smooth over the top with a spatula. Bake in the oven for 60-70 minutes, rotating the pan once halfway through. The cake will be done when the cake is a deep golden brown and a toothpick inserted in the center comes out with only a few crumbs.

  6. Allow the cake to fully cool in the pan on a cooling rack before removing and transferring to a plate. Top the cake with hazelnuts mixed with honey and/or confectioners’ sugar. Store the fridge wrapped in plastic wrap. In my opinion, loaf cakes are always best the next day!