STRAWBERRY CREAM SCONES

IMG_4916.jpg

When I was working on this post earlier this week, I was worried that sharing another scone recipe so quickly after my first one wouldn’t make for ideal content, and that you guys would be bored. Little did I know that it’s been almost an entire YEAR since my cranberry-orange scones recipe went live, so apparently I don’t have the best sense of time! With that said, it’s a new year and it’s high time that I grace you all with another scone recipe.

IMG_4503.jpg

Unlike my previous scone post, these strawberry cream scones are different in a few ways: both visually and ingredient-wise (and I don’t mean the obvious central flavor components). For as long as I’ve been baking scones, I’d always formed them into the standard triangular shape that we are all accustomed with. But over the past year or so, I kept finding myself saving Instagram posts that featured scones baked in a round shape since I found them to look so appealing and different. So I finally gave it a shot using my 3” round cookie cutter and I couldn’t be happier with the results. I found the whole process very simple (think of it like cutting out sugar cookies), and I’ll most likely continue to shape my scones like this for the foreseeable future.

IMG_4724.jpg

As for the difference in flavor, I had always made my scones with butter, whether it was incorporated into the dough via tiny cubes or grated using a box grater, but these strawberry cream scones actually don’t have any butter in them! As I’m sure you’ve already guessed from the name of these scones, the fat in this recipe comes from the addition of heavy cream. I didn’t even know that butter-less scones existed (I guess I’m not so well-versed in the world of scones), so I was pretty hesitant of what the outcome would be like, both texture and taste wise, but they came out so incredibly tender and soft. And I found that making these scones is actually much easier because you don’t have to worry whether you properly incorporated the butter into the dough or not, or obsess over keeping the dough as cold as possible so that the butter in the dough doesn’t melt. Although I love my cranberry orange scones, these cream scones are reigning supreme in my kitchen at the moment.

IMG_4718.jpg

As always when making scones, you have to stick to the usual rule of avoiding over mixing the dough which could lead to tough scones. And if you ask anyone what a scone’s texture should be, the word “tough” hopefully should never leave their mouths. So when making the dough, work mindfully, especially when it comes to the step of adding the heavy cream. Although you may use a wooden spoon or a fork for this step, I actually believe that your own two hands are the best tools. This way, you can actually feel for the dry pockets in the dough and therefore will know if you need to add more heavy cream or not. It’s definitely messier using your hands but can make it more fun. Please just try not to have nail polish or jewelry on!

To finish the scones before popping them in the oven, you’ll give each one a brush of heavy cream and a generous sprinkling of raw/turbinado sugar. The scone dough by itself isn’t that sweet, as it shouldn’t be, and so the turbinado sugar on top not only provides an amazing crunchy texture, but a little welcomed sweetness that you’ll get with each bite. If you don’t have turbinado sugar, you can substitute with regular granulated sugar.

IMG_4770.jpg

Strawberry Cream Scones

Yields about 8 large scones

Recipe adapted from King Arthur Flour

Ingredients

  • 3 cups all-purpose flour

  • 1/3 cup granulated sugar

  • 1 tbsp. baking powder

  • 1/2 tsp. kosher salt

  • 1 tbsp. lemon zest

  • 1 1/3 to 1 1/2 cups heavy cream, plus more for brushing

  • 1 tsp. vanilla extract

  • 1 cup chopped fresh strawberries

  • Turbinado sugar, for topping

Directions

  1. In a large bowl, whisk together the flour, sugar, baking soda, salt and lemon zest.

  2. Pour 1 1/3 cups of the heavy cream into a measuring cup and mix in the vanilla extract. Drizzle this mixture slowly over the dry ingredients while using wooden spoon to gently mix it together (I actually use my hands so I can get a good feel for the dough). The goal is to have no dry spots left in the dough, so you may need to add more heavy cream. Add in a tablespoon at a time until no more flour bits remain, but try to avoid making the dough too sticky. Carefully fold in the strawberries.

  3. Transfer the dough to a lightly floured surface and knead it a couple of times with your hands. Mold the dough into a disk and press it until the dough is about 3/4” thick. Using a 3” cookie/biscuit cutter dipped in flour, cut out the scones - you will have to re-roll the dough once more in order to get 8-10 scones. Place the scones onto a plate and place them in the freezer for about 15 minutes.

  4. Preheat the oven to 425°F and line a baking sheet with parchment paper. Take the scones out of the freezer and place them on the baking sheet. Brush each scone with heavy cream and sprinkle generously with turbinado sugar. Bake in the oven for 14-17 minutes, or until the scones are a light golden brown and baked through.

  5. Scones are best if they are eaten right out of the oven, but will keep for a couple of days when stored in an airtight container at room temperature.

SIMPLE OLIVE OIL CAKE W/ ROASTED BLUEBERRIES

IMG_4475.jpg

For the past 10 days, I’ve been beaming with love for a new person in my life: my niece, Imogen. Baby Immy came into this world at 5:06pm on August 12th and ever since that minute, my life has changed. The love that I have for her is something I’ve never felt before and the moment I was able to finally hold her, I basically broke down sobbing - I would do anything for her and anything to keep her safe and happy. She has the longest legs, looks exactly like her daddy and loves going on walks around the neighborhood. Life before Immy was pretty boring.

I’ve been going back and forth to Los Angeles to see Immy and help out my sister and brother-in-law in any way I can. If your friend or relative has had a newborn baby, I have a list of some ways to go about in helping out the new parents. 1) bring over a bag of groceries - ask what they need so they won’t have duplicates but also surprise them with other grocery items that you’d think they’d like (bonus if you bring the mom a bouquet of flowers) 2) do the dishes or a load of laundry, and/or take out the trash - these things tend to add up rather quickly and if you notice that their sink, laundry hamper or trashcan is full, just jump on in and get to work, 3) simply hold/watch the baby - this allows mom and dad a moment to relax and perhaps go take a nap or shower and feel human again. Even if the parents are taking shifts, any moment that their brain can just relax and not be fixated on the baby is probably the most help you can give them, and 4) cook a meal for them or bring over a nourishing dish/snack - the parents won’t have much energy or time to be cooking healthy meals, so bringing them a meal that can easily be reheated at a later time will help tremendously. Besides the groceries that I had brought my sister, I also baked a batch of these granola bars which are packed with protein, fiber and healthy fats, all things that breastfeeding mothers need.

Lastly, and most importantly, just go and hang out with the parents! Chances are, they are really bored from being cooped up at home and would love someone to talk to.

IMG_4289.jpg

Alright, no more baby talk (for now).

I’ve spoken before on my l0ve for desserts made with olive oil and have even shared a few recipes highlighting it, like my olive oil brownie cookies and olive oil and maple granola. Besides desserts, I’d say that 99% of my meals are cooked with olive oil; I essentially only buy butter for baking and also because Alex enjoys cooking with it from time to time. So whenever I come across a dessert recipe that is made with olive oil, I’m much more intrigued to see what the outcome tastes like. Today’s recipe of a very simple olive oil cake with a hint of lemon is one of these desserts and it quickly became a tried and true recipe of mine.

Besides the amazing rich flavor and moist texture that this cake gets from the addition of olive oil, it is extremely easy to bake and all ingredients can easily be found in your kitchen (I have lemons in my fridge at all times because I drink lemon water every morning). There’s nothing fancy about this cake which is a huge reason as to why I love it. You can serve it with nothing on top (it’s that good) but if you’re wanting to add a little something to make it more beautiful, a sprinkling of powdered sugar or a dollop of whipped cream should do the trick. Or, you can be like me and add a spoonful of saucy roasted blueberries. Not only does this add color to the cake but a little bit of tartness and sweetness. The whole process of making roasted blueberries takes less than 30 minutes (I’m including the time it takes to preheat the oven) and it definitely elevates the cake. If you don’t want to add the roasted blueberries to this cake, you can always save the recipe for another use like adding it to a cheesecake or a stack of waffles.

IMG_4208.jpg

In the original recipe, the citrus used was actually the zest and juice of an orange, but since I already have an orange-centric cake on my site, I figured I’d go with lemon, especially since lemon and blueberries work so well together (the roasted blueberries also get a squeeze of lemon juice). But if you are partial to orange-flavored cakes, you can definitely swap it in, and maybe do roasted raspberries with a squeeze of orange juice instead! I haven’t tried this, but I don’t see why it wouldn’t work.

IMG_4440.jpg

Simple Olive Oil Cake

Yields (1) 9-inch cake

IMG_4462.jpg

Recipe adapted from Maialino Restaurant recipe via Food52

Ingredients

  • 1 3/4 cups granulated sugar

  • 2 tbsp. lemon zest (about 2 medium lemons)

  • 2 cups all-purpose flour

  • 1/2 tsp. baking powder

  • 1/2 tsp. baking soda

  • 1 1/2 tsp. kosher salt

  • 1 1/3 cups extra-virgin olive oil

  • 1 1/4 milk, whole or 2% works

  • 3 large eggs

  • 1/2 cup fresh lemon juice (about 2 medium lemons)

Directions

  1. Preheat your oven to 350°F. Grease a 9-inch springform pan (in a pinch, you can use a 9-inch cake pan, but it may overflow) with cooking spray, olive oil, or butter.

  2. In a medium size bowl, using your hands or a whisk, massage/mix the granulated sugar and lemon zest together until fragrant (this helps release the oils in the zest). Add the flour, baking powder, baking soda and salt. Whisk together and set aside.

  3. Whisk the wet ingredients (olive oil, milk, eggs and lemon juice) together in a separate large bowl. To this, add the dry ingredients and whisk until just combined. Pour the batter (it will be very liquid-y) into the prepared springform pan and bake for 60-70 minutes, or until a toothpick inserted in the center comes out clean. The top and sides of the cake will be a deep golden brown color.

  4. Allow the cake to cool on a rack for 30 minutes before removing the springform pan piece, then let it cool for another hour or two before you slice in.

Roasted Blueberries

Ingredients

  • 2 cups fresh blueberries

  • 2 1/2 tsp. granulated sugar

  • Squeeze of fresh lemon juice

Directions

  1. Preheat the oven to 450°F. Place the blueberries either on a parchment-lined rimmed baking sheet or in a deep baking dish. I prefer the latter option because it is easier to collect all the juices post-roasting.

  2. Sprinkle the sugar over the berries and roast in the oven for 10-15 minutes, taking the pan out once or twice to move the berries around to ensure even roasting. You want the berries to be in tact shape-wise but a good amount of their juices to be released (see picture above for reference). Once out of the oven, add the squeeze of lemon juice and gently mix the berries. Add a spoonful to each slice of olive oil cake or serve with waffles, pancakes, cheesecake, etc.

PEACH + BLACKBERRY PIE BARS

IMG_3731.jpg

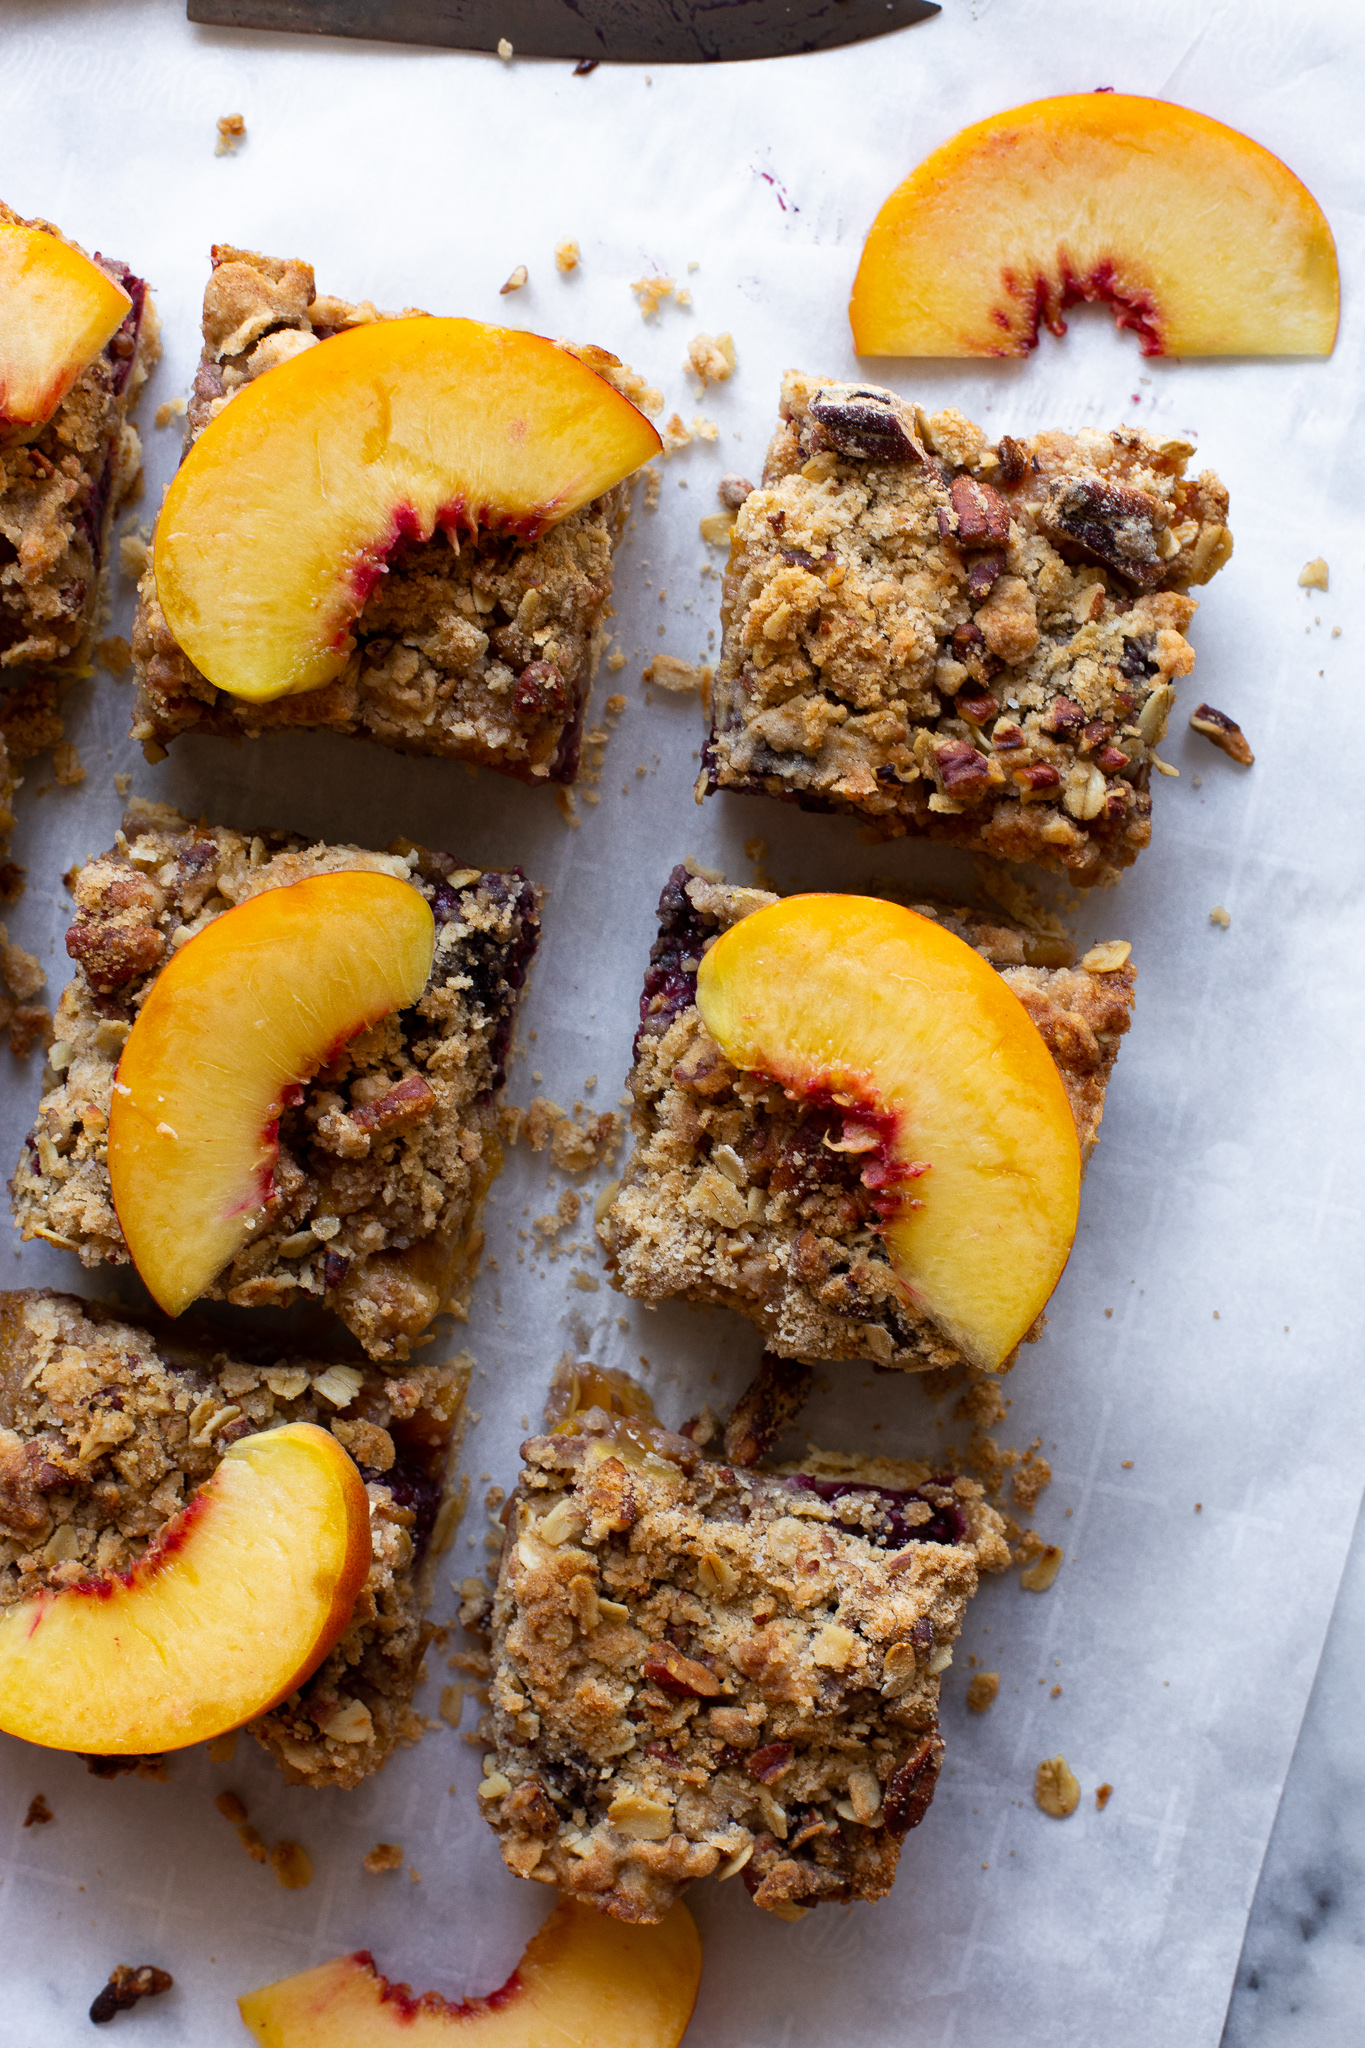
Hi. It’s me. The food blogger who has been posting recipes for about a year and a half now and who still hasn’t shared ONE traditional pie recipe yet! I believe I’ve mentioned it before in a previous post, but pies aren’t my strong suit and if someone asked me to make them a pie, I would most likely have a panic attack and then pick one up from Marie Callendars and said I baked it.

When I tell other bakers that I’m nervous of making pies, they’re usually understanding… if you didn’t grow up baking them or at least practice the process over the years, pies can definitely be daunting. There’s the stress of making the dough, from having to worry about your warm hands melting the butter to allowing the dough to chill in the fridge. You have to be proactive when it comes to avoiding a “soggy bottom”, which means figuring out if you need to parbake the crust or not. And then (what I fear the most) is making your pie look beautiful whether it’s with a perfect lattice crust or the cutesy little dough flower or leaf cut-outs that you see bakers doing on Pinterest and Instagram. I am not an arts and crafts kind of person (I can barely cut in a straight line) and therefore the thought of decorating a pie is just not fun to think about. I’m not saying pie is the hardest thing to make! I’m just saying that there is a lot to consider when attempting to bake one.

public.jpeg

So, this is why I LOVE making galettes, tarts, and today’s recipe: pie bars. These three categories of desserts are all super forgiving in almost every step along the way and just seem to be much less fussy than when tackling a pie. Since I’ve given you a recipe for a galette and a tart, it’s time to work with the very straightforward and simple recipe of pie bars. Pie bars take everything you would normally find in a pie - a crust, a filling of your choice, and a topping in the form of a crisp or streusel. No difficult lattice work to be found here!

And mark my words, I promise that I will do an apple pie recipe around Thanksgiving time. Apple pie à la mode is up there when it comes to my favorite desserts, so I will definitely work on perfecting a recipe to share with you all.

public.jpeg

Since we’re in the midst of stone fruit and berry season, I thought we’d take a fruit from each category and marry them together for these pie bars. I choice to work with yellow peaches and blackberries, but feel free to switch it up to your liking and substitute the stone fruit with apricots, nectarines, plums or pluots, and the berry component with raspberries or blueberries.

Sidenote: I visited the Laguna Beach Farmers Market this past weekend and tried the most amazing stone fruit I’ve come across yet: cherums! It’s a hybrid of cherries and plums and they’re so crunchy and flavorful, and they were the perfect dessert for our beach picnic later that day. Try to get a hold of them at your local farmers market! Picture of them above (along with the pluots that I also bought).

IMG_3707.jpg

The crust for these pie bars isn’t exactly a typical pie crust recipe, but actually the shortbread crust that I used for my lemon bars. This crust is made with three ingredients (flour, powdered sugar, and melted butter) and comes together in less than 5 minutes. There’s no chilling, no rolling out; all you need is to mix the ingredients together and then press it into the bottom of the baking dish with your hands or a spatula.

As for the filling, you can play around a bit with a couple of things: 1) how much sugar you’ll be adding and 2) what kind of spices you wish to use. If your fruit isn’t exactly at the peak of ripeness, I would suggest adding an additional tablespoon or so of sugar to what I have suggested below in the directions, and if your fruit is perfectly sweet, follow the recipe as written. For the added spices, I stuck to those that are most commonly found in pies, but you can use your favorites whether than means adding only cinnamon, a combo of nutmeg and ginger, or a little bit of each.

Lastly, for the topping, we’ll be using a crisp mixture, which basically means a streusel topping but with old fashioned/rolled oats added. I kept it simple and added only a bit of cinnamon to my mixture but once again, you can add more spices to your liking, but I’d recommend sticking to adding no more than 1 teaspoon of spices combined. I also added chopped pecans for extra crunch and flavor, but adding nuts is totally optional.

public.jpeg

Peach and Blackberry Pie Bars

Makes about 9-12 bars, depending on size

Ingredients

For the crust:

public.jpeg
  • 1 cup all-purpose flour

  • 1/4 cup confectioners’ (powdered) sugar

  • 6 tbsp. unsalted butter, melted

For the filling:

  • 2 medium unpeeled peaches (about 1.5-2 cups), chopped

  • 1 (6 oz.) package of blackberries

  • 1/4 cup granulated sugar

  • 1 tbsp. all-purpose flour

  • 1/4 tsp. ground cinnamon

  • 1/4 tsp. ground ginger

  • 1/4 tsp. of ground nutmeg

  • Pinch of salt

  • 1/2 tsp. lemon zest

  • 1/2 tsp. vanilla extract

For the crisp topping:

  • 1/2 cup all-purpose flour

  • 1/4 cup old-fashioned/rolled oats

  • 1/4 cup brown sugar, packed

  • 1/2 cup chopped pecans (optional)

  • 1/2 tsp. cinnamon

  • 1/4 tsp. salt

  • 1/4 cup (half a stick) unsalted butter, chilled and cut into small pieces

Directions

  1. Preheat the oven to 350°F. In a bowl, mix together the melted butter, flour and sugar until well incorporated. The dough will be a bit crumbly. Transfer the dough to an ungreased 8x8 baking dish (alternatively, you can line the dish with a piece of parchment paper if you wish to pull the entire baked good out). Using your hands or the back of a spatula, press the dough evenly into the dish.

  2. Bake the shortbread crust for about 15-17 minutes, or until the dough has firmed up and is golden. Set aside to cool, but keep the oven on at 350°F.

  3. In a large bowl, toss all “filling” ingredients (everything from peaches to vanilla extract) together gently using a spatula. Set aside to allow the fruit to macerate a little.

  4. For the crisp topping, add all ingredients except for the chilled butter to a medium bowl. Mix together using a whisk. Add the butter and use your fingertips to work it into the mixture until crumbs form.

  5. Pour the fruit filling over the slightly chilled shortbread crust and then evenly sprinkle the crisp topping over the fruit (using a spoon or your hand). Bake in the oven for 35-45 minutes, or until the crisp topping is golden brown and the fruit is bubbling. Allow the pie bars to cool completely before cutting into them. Serve with ice cream or whipped cream.