WHITE CHOCOLATE MACADAMIA NUT COOKIES

B564D5C9-E6E8-4928-853B-B9AC141AAA2B.jpeg

This past weekend, I celebrated the birth of a very special person in my life... MY DAD. Martin is the one who gave me my chin (ugh), my long legs (yay) and a very nice life filled with 100% of his support in all things I do. I don't want to embarrass him by praising him too much, BUT he is literally the hardest working person I know, will go above and beyond to help others out before he would even think to do something for himself, and makes me laugh every time I talk to him on the phone (every day). Also, he's responsible for introducing me to films that I would have never watched if it weren't for him (The Cabin Boy, Kung Pow: Enter the Fist, Bio Dome... and many other great, GREAT movies). 

A486EAF3-181C-44B0-952B-3638A655F9B1.jpeg
0DF0320C-F085-4AF4-A852-AC6ABDF636F9.jpeg

On top of all of these amazing attributes, my dad really likes his sweets. Whenever I bring him something I baked, he'll usually give me a hard time about the dessert not being good or not wanting any of it, but before I know it he'll have eaten the whole thing and wants more. Typical dad stuff.

6E0546A4-83CA-4F41-BE54-A20AE5CEB552.jpeg

Since we celebrated my dad's birthday by going to a Dodgers game on Saturday and the Grand Prix on Sunday, I wanted to bake him something that was very travel-friendly and not going to sit in the car for hours. Enter these amazingly delicious white chocolate macadamia nut cookies.

White chocolate macadamia nut cookies (which I will refer to as WCMC from now on in order to keep my sanity) are often overlooked in the cookie world. Most people would probably name off at least five types of cookies on their list of favorites (chocolate chip, peanut butter, Oreos, etc.) before even thinking of WCMC. Maybe it's because white chocolate (which is technically not chocolate due to the lack of cocoa solids) isn't as popular among other types of chocolate, but in my eyes all chocolates are equal: I will eat and enjoy all of them equally. When combined with macadamia nuts, which also are delicious and very fragrant, you have a match made in cookie heaven. So with that said, these cookies are REALLY good and smell more amazing than any other cookies I've ever baked, I swear! WCMC need to be appreciated more, ok? Ok.

1B84D75D-A701-497A-B1AE-4B80FB75EDA0.jpeg

White Chocolate Macadamia Nut Cookies

Recipe adapted from Sally's Baking Addiction

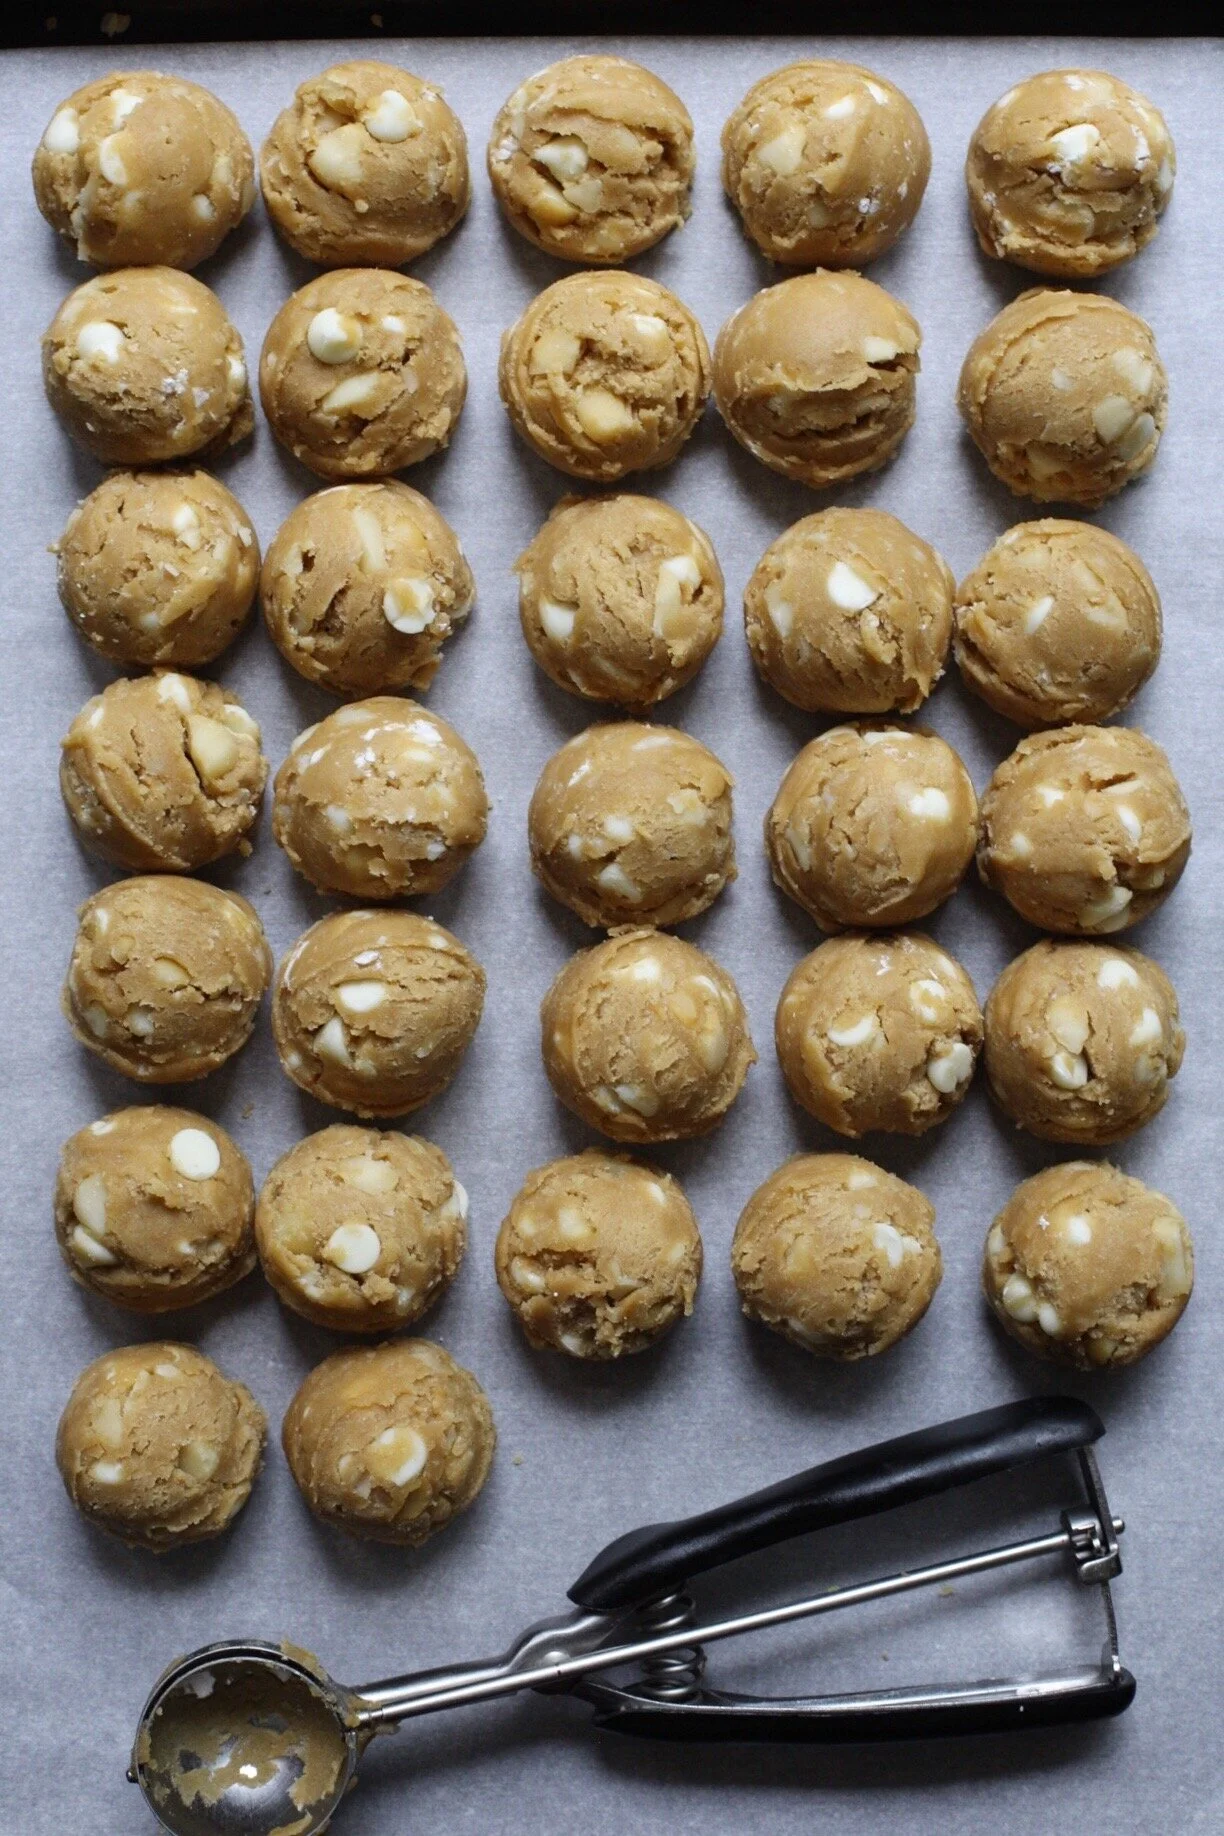
Yields about 30 cookies

Ingredients

8881E96A-13A3-42C8-8F0A-101D1213F7DE.jpeg
  • 2 cups plus 2 tbsp. all-purpose flour

  • 1/2 tsp. baking soda

  • 1/2 tsp. salt

  • 3/4 cup (1 1/2 sticks) unsalted butter, room temperature

  • 1 cup packed brown sugar, light or dark

  • 1/2 cup white sugar

  • 1 large egg, room temperature

  • 1 large egg yolk, room temperature

  • 2 tsp. vanilla extract

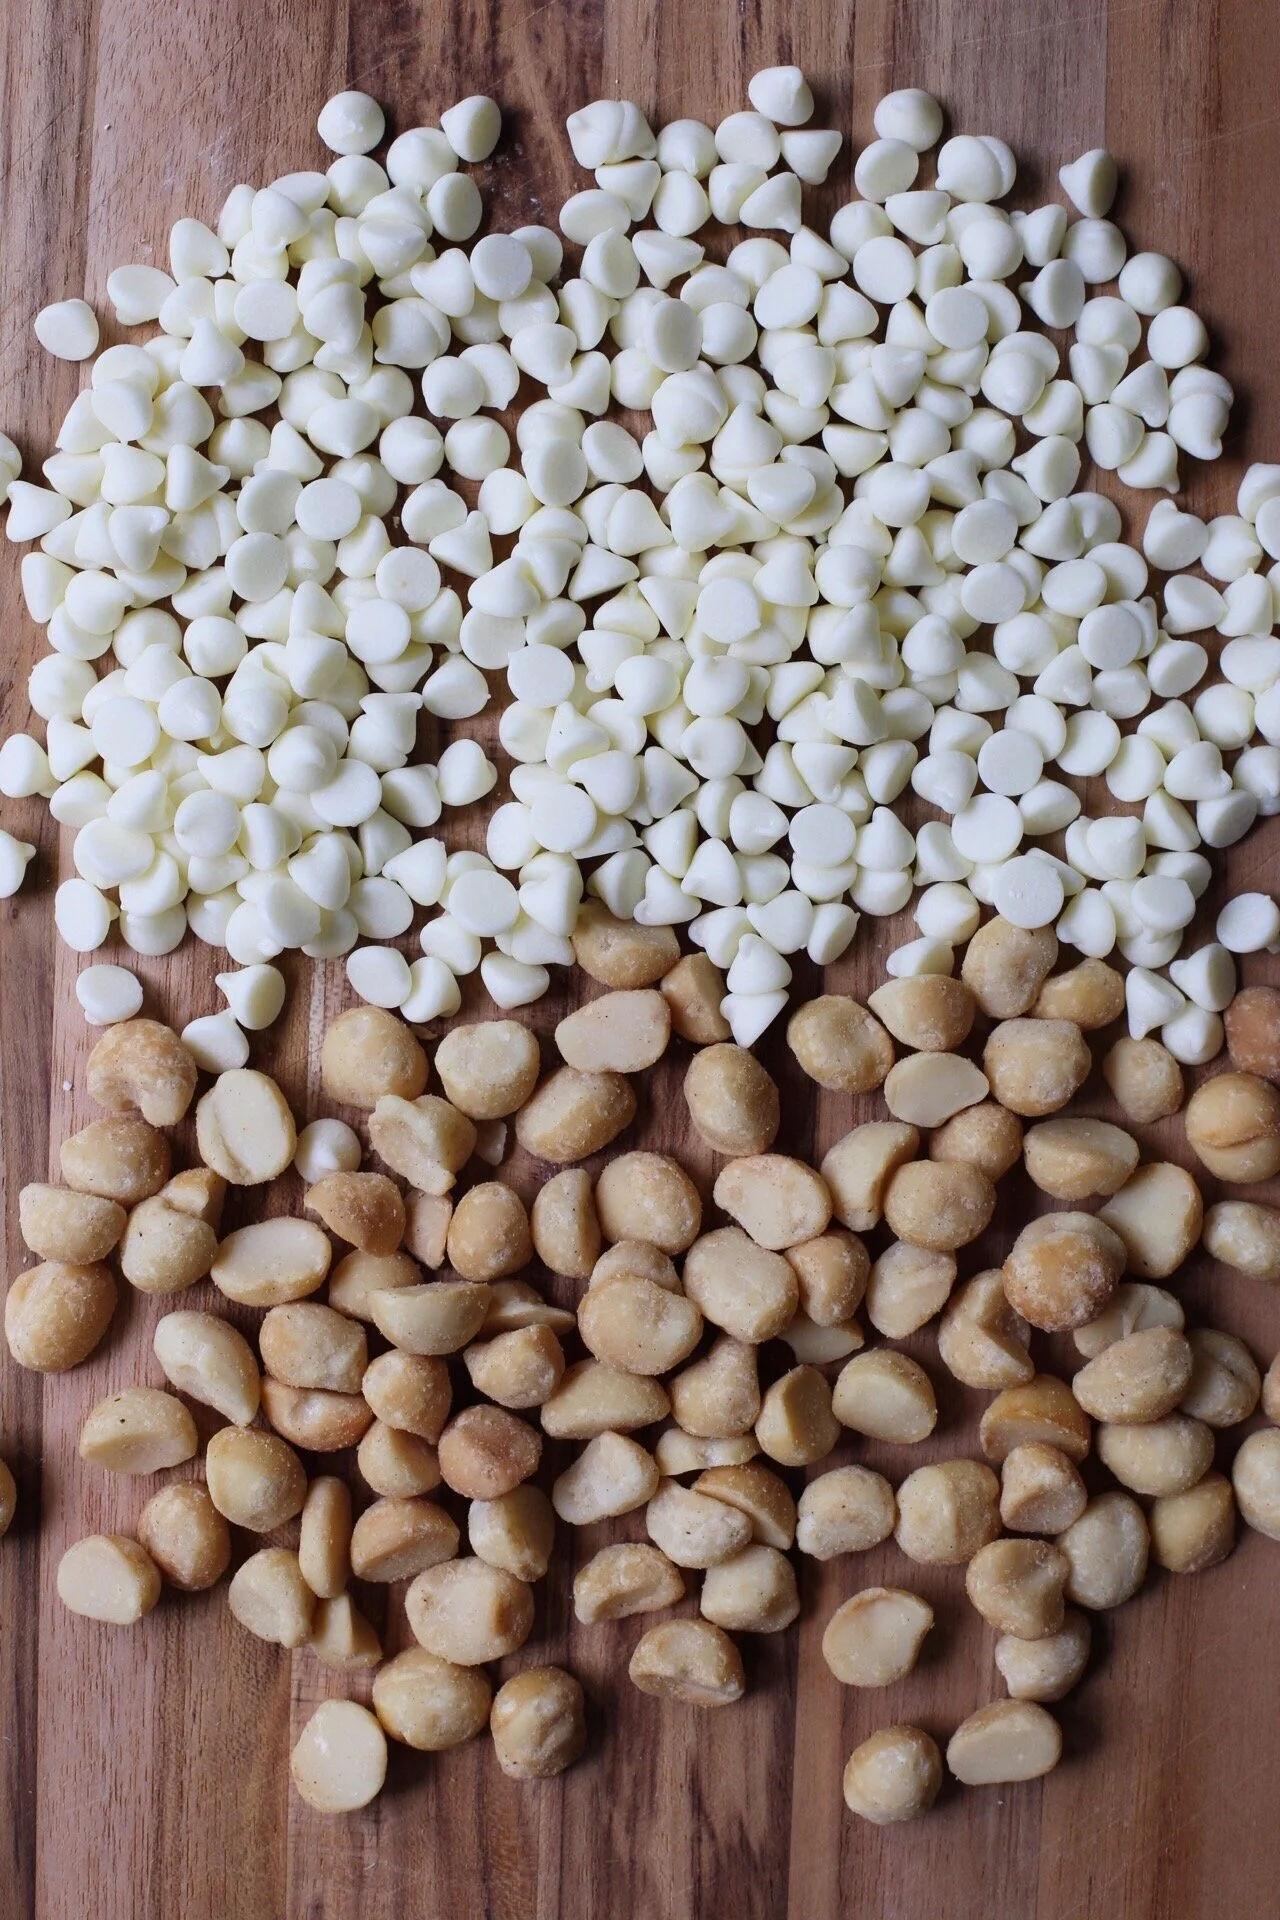
  • 3/4 cup white chocolate chips

  • 3/4 cup toasted macadamia nuts, chopped

  • Flaky sea salt to finish (optional)

Directions

  1. Whisk flour, baking soda, and salt in a medium bowl and set aside.

  2. Using a stand mixer with the paddle attachment or a hand mixer, cream the butter and sugars on medium speed until it is light and fluffy, about 3 minutes. Add the egg, egg yolk, and vanilla extract to the bowl and mix again on medium speed until incorporated, about 1 minute. Scrape down the sides of the bowl.

  3. With the stand mixer/hand mixer off, add the flour mixture all at once to the bowl and mix on low speed for 10 seconds, and then turn to medium and mix until incorporated. Don't over mix!

  4. Fold in the chocolate chips and nuts with a spatula.

  5. Cover with plastic wrap and let the dough sit in the fridge for at least 1 hour, or overnight if wanted.

  6. After chilling, turn on the oven to 325°F. Using a spoon or a cookie scoop (I use the medium size version) scoop out about a tablespoon and a half to two tablespoons of dough onto a baking sheet lined with parchment paper. Keep the dough cold in between batches.

  7. Bake in the oven for about 10 to 12 minutes, or until the edges of the cookies are golden brown. The centers of the cookies will still look soft and puffy. Sprinkle with flaky sea salt if desired. Let the cookies cool on the baking sheet for a few minutes before transferring to a wire rack. Enjoy!


TRADITIONAL GUACAMOLE

IMG_7820.jpg

If I had to describe my perfect date night to you it would start with dinner at one of my favorite Mexican restaurants, followed by either dancing or going to the movies (this all would depend on how much food I ate at dinner). I would also probably throw in Haribo gummy bears somewhere in that equation. 

So when the often dreaded question of "What should we have for dinner?" is asked, my answer almost always is naming off five different Mexican restaurants in the area. To me, nothing is more fun than having a round of margaritas and eating one too many chips, all before your plate of carnitas comes to the table.

IMG_7730.jpg

Despite all of this, my history with avocados and guacamole has been somewhat of a rollercoaster. When I was little, I was a very picky eater to the point that I'm pretty sure I existed only on chicken tenders and fries for dinner. Even when my family would go out to eat at restaurants, I would still order that exact meal. So when I first tried guacamole at about the age of 10, I was pretty hesitant of the green stuff but it soon grew on me and I eventually became obsessed with it. This obsession was short-lived when my family was all together during the holidays and we had a giant Mexican meal at home. Lil Shawna kind of went ham with the chips and guacamole, and one thing led to the other; before I knew it, I couldn't even look at an avocado without feeling sick.

This food aversion of mine with avocados/guacamole lasted until after I graduated college, so about 12 years! Guacamole came back into my life thanks to Trader Joe's and their free samples where I was able to try their "Guilt-Free" guacamole made with greek yogurt. I guess that version was less in your face with the guacamole flavor and before I knew it I was back to loving guacamole again and adding avocado to everything. Thank you Trader Joe's!

IMG_7792.jpg

This recipe for guacamole from Roberto Santibañez is, in my opinion, perfect. It is very straight forward with only 6 ingredients, but recommends using a molcajete (a mortar and pestle). I got mine for a great price at either TJ Maxx or Marshalls (they're pretty much interchangeable to me and I love them both), and I still always see some for sale every time I visit. The molcajete is key to making the "paste" of cilantro, chile, onion, and salt that is added to the avocados, but if you don't want to add yet another tool to your kitchen, you can definitely create the paste with a knife or fork.

Alex and I have made this countless times and even though people are usually hesitant to try our version because they're used to a different guacamole - one with garlic, red onions, and/or tomatoes - 100% of the time we end up being asked for the recipe: it really is that good. Try it and let me know what you think!

Traditional Guacamole

Recipe from Roberto Santibañez

Makes about 3 cups (we always make this portion but it can easily be halved)

Ingredients

IMG_7842.jpg
  • 4 tbsp. finely chopped white onion

  • 2 tbsp. minced serrano or jalapeño pepper, seeds included (more or less depending on what you can handle; Alex and I prefer serrano peppers)

  • 1/2 tsp. kosher salt (this may seem like a little, but I'd rather everyone start with less and then season to their liking at the end)

  • 1/2 cup chopped cilantro, divided

  • 2 large or 4 small ripe avocados, halved and pitted

  • A squeeze of lime

Directions

  1. In your molcajete, mash together the onion, serrano or jalapeño pepper, salt, and half of the cilantro until it is a paste. If you don't have a molcajete, mash the ingredients together as well as you can on a cutting board with a knife or fork.

  2. With the skin still on, score the avocados in a crosshatch pattern with a knife, being careful not to cut through the skin, and scoop out into a bowl. Add the paste to the bowl and toss together well, and then add the rest of the chopped cilantro and mix with a fork.

  3. Add a good a squeeze of lime. Taste the guacamole and season to your liking - you may need more salt or more pepper. Enjoy!


UPSIDE-DOWN BLOOD ORANGE CAKE

For those who don't know, citrus season is during the winter months, with most citrus fruits being in season from about December to April. With that said and considering what month it is (hey April), I wanted to do a citrus recipe that not only highlighted their flavor but also showed off their beauty. Enter this upside-down blood orange cake.

I'm the kind of person who looks forward to citrus season almost more than any other season (watermelon season might be a tie though). I fully embrace the season by making anything from my favorite sangria (I'll post the recipe for that in the near future) to grapefruit loaf cakes to blood orange doughnuts. I also get so much use out of my older-than-me juicer that I inherited from my mom, and drink as much fresh cara cara juice as I can.

Today we are utilizing blood oranges and with that I must advise not wearing a white t-shirt for the sake of not looking like you were just part of a crime scene. But besides their dyeing affects, blood oranges are incredibly beautiful fruits mostly for the reason that you can have an array of color ranging from a deep red to a lighter orange. 

I feel like this cake is one that you whip out when you want to show off: the topping of sliced oranges is an absolute showstopper and even if it doesn't come out perfectly (i.e. some of the topping may stick to the pan), the color alone will impress whomever you baked it for, including yourself. It's also exciting and slightly nerve-racking to see what the top will look like after you flip it. If you've never flipped a cake before, don't be worried! I've done it by myself plenty of times and it's a lot easier than you think - just move quickly and swiftly and you'll be oohing and aahing at your creation before you know it.

Upside-Down Blood Orange Cake

Yields (1) 10 inch cake
Adapted Slightly from Bon Appétit

Ingredients

  • Nonstick cooking spray

  • 1/4 cup raw sugar

  • 2-3 blood oranges thinly sliced with seeds removed (make sure to have at least two other blood oranges for the zest and juice that will be added to the cake later)

  • 2 1/2 cups all-purpose flour

  • 3/4 cup plus 2 tbsp. sugar

  • 1 tsp. baking soda

  • 1 tsp. baking powder

  • 3/4 tsp. kosher salt

  • 2 large eggs

  • 1 large egg yolk

  • 1 1/2 cups buttermilk

  • 3/4 cups (6oz.) unsalted butter, melted

  • 2 tsp. blood orange zest

  • 2 tbsp. blood orange juice

  • 3/4 tsp. vanilla extract

Directions

  1. Preheat oven to 350°F. Generously spray a 9 or 10 in. cake pan with the nonstick cooking spray (rather be safe than sorry when flipping the cake upside down!). In an even layer, sprinkle the raw sugar on the bottom of the cake pan and then place the orange slices on top. You can place the slices whichever way you want, whether in a random fashion or layered to cover the entire pan like I did.

  2. In a medium bowl, whisk together the flour, sugar, baking soda, baking powder and salt.

  3. In a large bowl, whisk the eggs and egg yolk, buttermilk, melted butter (make sure it's not too hot), zest, juice and vanilla extract. Add the dry ingredients to the wet ingredients and whisk until incorporated.

  4. Pour the batter over the orange slices evenly and bake it in the oven for 35-40 minutes. The top will be golden brown and a toothpick inserted in the middle should come out fairly clean.

  5. Allow the cake to cool for about 5 minutes. In preparation of inverting the cake, run a butter knife around the edges to loosen the cake. Using your desired plate or cake stand, place it upside down on top of the cake and as quickly as possible, flip the cake over. Lift the cake pan up and if the cake is still not coming out, tap the cake pan with the butter knife. Enjoy!