SALTED ALMOND BUTTER W/ CHIA AND FLAX SEEDS

IMG_6872.jpg

My household goes through jars of nut butter like it’s nobody’s business. Every single day, and I mean every single day, Alex and I both have either almond and/or peanut butter in some capacity. For me, I put almond butter in my post workout smoothie and I also put a good slathering of peanut butter on my toast for breakfast. As for Alex, he eats a scoop full of peanut butter with a drizzle of honey before he heads to the gym first thing in the morning.

Although the almond butter we buy is just a simple creamy, unsalted variety, our go-to peanut butter on the other hand is more amped up with a crunchy texture, slight salty taste, and added nutrition from chia and flax seeds. We buy this amazing peanut butter from our forever favorite grocery store, Trader Joe’s, of course. One thing that I always wondered is why Trader Joe’s never decided to make an almond butter version, so I set out to make my own. And I gotta say, I’m so happy that I did because Alex and I both prefer my homemade almond butter version to any store-bought nut butter we’ve tried (peanut or almond). Surprise surprise.

IMG_6757.jpg

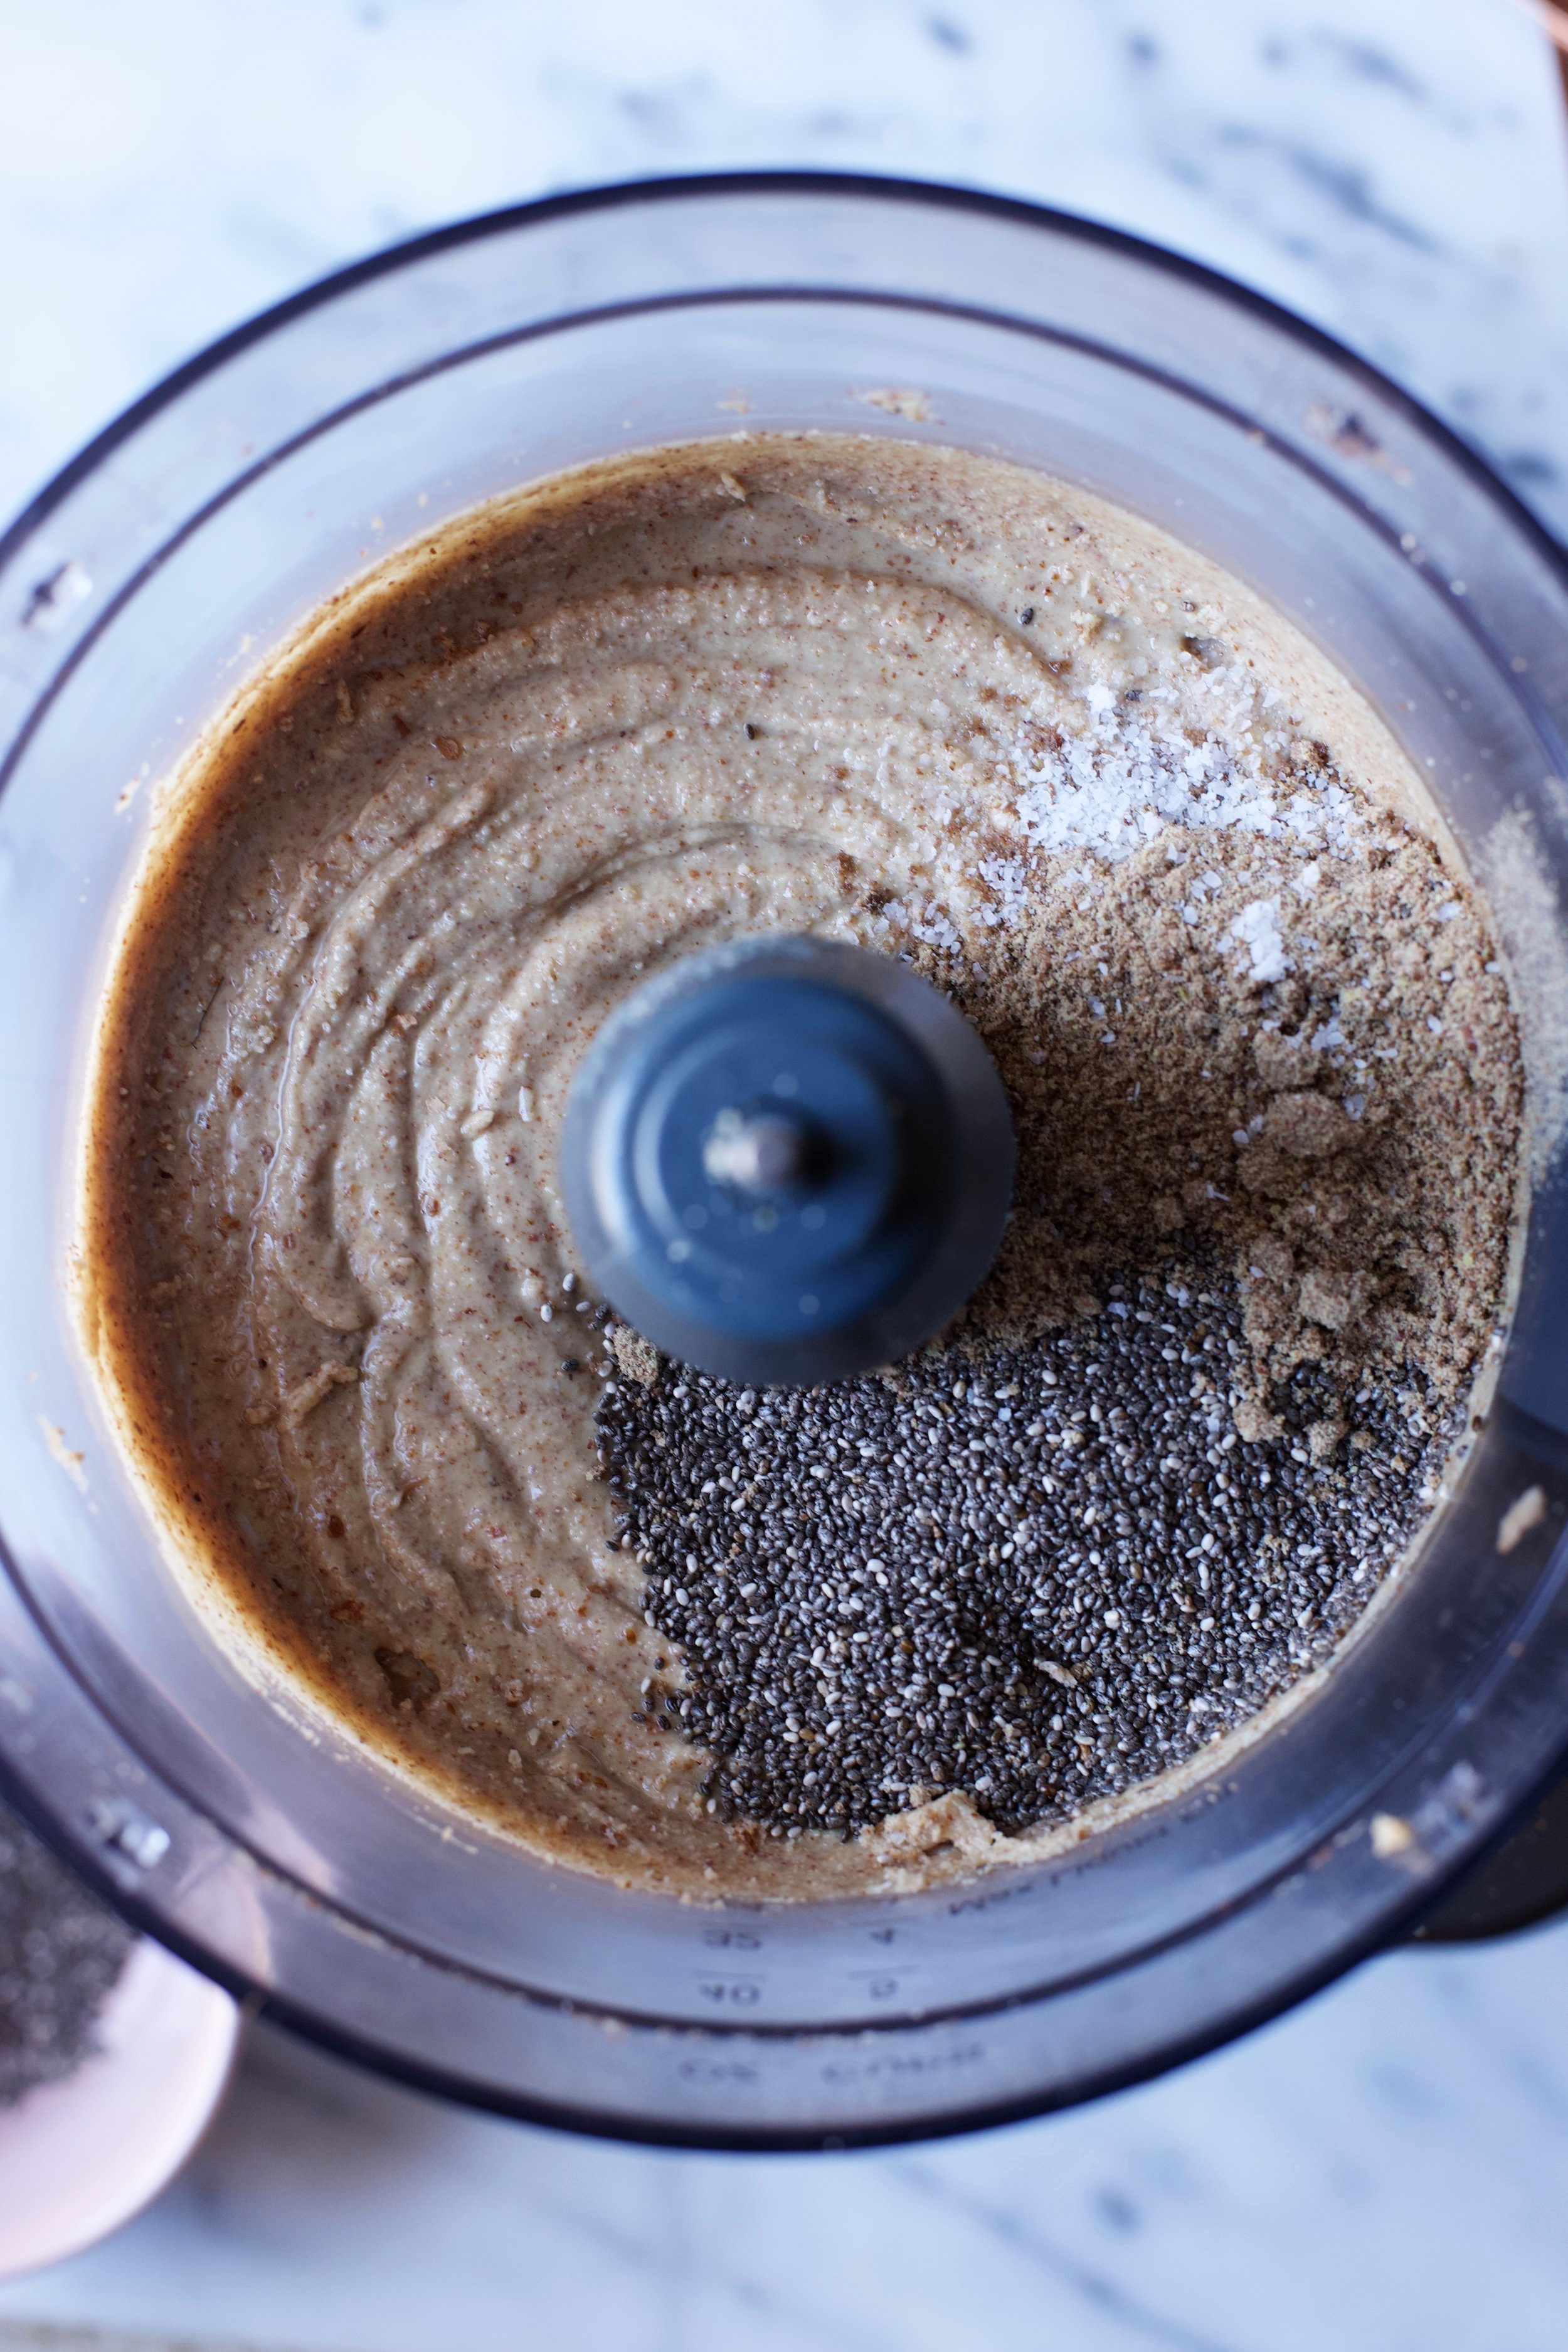
Making your own nut butter is fairly easy just as long as you have a high-powered blender, like a Vitamix, or a food processor. I own a Cuisinart food processor, so I’ll be giving directions on how to make the butter using a food processor, but the directions are identical if you plan to use a Vitamix instead. Once the almonds have completely transformed into a creamy mixture, that is when you will add in the salt and seeds. If you want to flavor it up a bit, go ahead and add whatever you’d like - cinnamon, vanilla extract, honey, maple syrup, etc..

IMG_6819.jpg

After some research, I found that making almond butter is easier/quicker if you buy raw almonds and toast them yourself - the heat will allow for the almonds to break up more easily. Also, if you want to have a crunchier almond butter, set aside about a 1/4 cup of almonds after toasting them and give them a chop. When the almond butter is complete, hand stir the almonds in and you’ll have a very nicely textured butter.

If you’ve never made a nut butter on your own, I highly recommend it! It’s a pretty fun process and undoubtedly gives you a much better flavor then what you’d get from the store.

IMG_6833.jpg

Salted Almond Butter w/ Chia and Flax Seeds

Ingredients

  • 16 oz. (about 3 cups) raw almonds

  • 1/8 tsp. kosher salt

  • 2 tbsp. chia seeds

  • 2 tbsp. ground/milled flax seeds

IMG_6830.jpg

Directions

  1. Preheat the oven to 350°F. Spread the almonds evenly on a rimmed baking sheet and toast them in the oven for about 10 minutes, giving them a stir halfway through.

  2. Allow the almonds to cool slightly before transferring them to the food processor, about 10-15 minutes. If making a crunchy almond butter, set aside 1/4 cup of almonds and give them a good chop.

  3. Place the almonds in the food processor fitted with the s-blade and blend on “high". The almonds will go through various stages of consistency - they will be powdery, then begin to form clumps, and then will eventually form one massive clump. Throughout this process, you will have to keep on eye on the food processor and break up the mixture with a spoon or the back of a spatula. If may seem like it’ll never become creamy, but trust me, it will! The whole process can take about 10-15 minutes depending on your machine, so you’ll just need to be patient.

  4. Once the mixture is creamy, add in the salt, chia, and flax seeds and pulse until incorporated - this is when you can add in any other ingredients of your choosing. Stir in the reserved 1/4 cup chopped almonds with a spatula (if you’re making a crunchier almond butter). Allow it to cool to room temperature.

  5. Transfer the almond butter to a mason jar and store in the fridge. Enjoy on toast, apple slices, in smoothies, or on its own.

OLIVE OIL BROWNIE COOKIES W/ NUTS

IMG_6428.jpg

I'll never forget the first time hearing someone say that they used olive oil in a dessert recipe. I was in high school, therefore completely unfamiliar with all things baking, when my sister told me that her then-boyfriend had made boxed brownies a few days earlier for his family. Sounds innocent enough, but since he was completely out of canola oil, he had no other choice but to use olive oil instead. I remember my sister and I laughing so hard and pretty much were mortified with the idea of mixing olive oil with chocolate. Of course, we never had the chance to taste them (and probably wouldn't have wanted to anyway) and decided to just write off my sister's boyfriend as a big dummy. 

Years later, I realized that it was I who was the big dummy and that I should have been experimenting with olive oil in desserts all along. When partially or completely using olive oil in place of butter or vegetable oil in recipes for cakes, cookies, etc. you are left with an amazing and delicious treat. The olive oil flavor doesn't overpower the other components in the recipe, and honestly just brings a whole different dynamic to the dish. It simply adds an incredible depth of flavor that other fats just can't deliver. 

IMG_6361.jpg

When scanning through old photos, I came to the realization that the recipe I am providing you with today is actually the first olive oil dessert that I ever baked. I remember being pretty hesitant when I was making these olive oil brownie cookies over 5 years ago, but in the end, I deemed these cookies to be the best of its kind. Let me be more clear: I've tried a handful of brownie cookie recipes since, mostly recipes using butter, and to this day, everything falls short compared to this batch. Over the years, I've probably made this recipe 10 or more times. 

Brownie cookies are the perfect marriage of two of my favorite treats: you get the decadence and fudgy-ness of a brownie all wrapped into a perfectly sized cookie with crisp set edges. They're totally addicting and nearly impossible to stop eating after trying one. Although I am not so fond of adding nuts to my brownies, all bets are off when it comes to my cookies, whether they're related to the brownie family or not. Pecans or walnuts usually reign supreme in the brownie world, but I wanted to do something a little out of the ordinary and decided that hazelnuts would be an amazing option. Luckily, I was right and as always when combining chocolate and hazelnuts together, there is definitely a bit of a Nutella flavor coming through. What could be better?

But, of course, feel free to use your favorite nuts in this recipe. My mom personally isn’t a fan of hazelnuts, so I’ve made these plenty of times with pecans and they are to die for.

IMG_6405.jpg

A couple of notes. Like I said above, I've made these cookies numerous times and I want to let it be known that you can use any kind of olive oil that you have in your pantry. I've used plain olive oil, standard extra virgin olive oil, expensive organic extra virgin olive oil... and I personally don't think which kind you use makes that big of a difference. Sure, extra virgin olive oil is a higher quality that contains pure, cold-pressed olives, as opposed to being a blend, but we aren't using the olive oil to dip bread into. It's part of a much larger picture combined with other huge flavors like chocolate, so if you don't want to go out and buy expensive olive oil for this, then don't! The olive oil flavor will still work its magic and the cookies will be fantastic regardless. 

And most importantly, the other note is that there is a step in the directions for this recipe that should not go unnoticed! At one point you have to mix baking soda with hot water to dissolve it before mixing it in with the cookie batter/dough. After some research, it appears that this ensures that the baking soda will be evenly distributed through out, which will prevent the cookies from spreading (these cookies are more susceptible to spreading due to the olive oil). I once forgot this step and I kid you not, I had to throw the cookies away because it turned into one huge cookie monster. Sounds like it could be delicious, but it was a very bad sight! Trust me on this when I say not to skip this step. Like always, read through the directions before doing anything, and you'll be just fine!

IMG_6546.jpg

Olive Oil Brownie Cookies w/ Nuts

Yields about 25 cookies

Recipe adapted from Butterlust

Ingredients

IMG_6699.jpg
  • 3/4 cup all-purpose flour

  • 3/4 cup unsweetened cocoa powder

  • 1 tsp. espresso powder (optional, but intensifies chocolate flavor)

  • 1/2 tsp. salt

  • 1/2 cup olive oil, any kind works

  • 1 cup sugar

  • 2 large eggs

  • 1 tsp. vanilla extract

  • 1 tsp. baking soda

  • 1 tbsp. hot water

  • 1 cup semi-sweet or bittersweet chocolate chips

  • 1 cup toasted hazelnuts, pecans or walnuts roughly chopped

  • Flaky sea salt, to finish (optional)

Directions

  1. In a medium bowl, whisk together the flour, cocoa powder, espresso powder (if using) and salt. Set aside.

  2. Using a stand mixer fitted with the paddle attachment, or in a large bowl, whisk the olive oil and sugar until completely incorporated. Add one egg at a time, mixing well until adding the next one and then mix in the vanilla extract.

  3. Slowly add the flour mixture and stir until just combined.

  4. In a small bowl, stir the baking soda and hot water together until the baking soda is dissolved. Add this to the large bowl and mix together.

  5. Using a spatula, fold in the chocolate chips and nuts. Cover with plastic wrap and refrigerate for at least 30 minutes. The longer it chills, the easier it'll be to scoop the dough. Compared to other doughs, this one is more like a brownie batter.

  6. Preheat the oven to 350°F. Line a baking tray with parchment paper, and using a spoon or a cookie scoop, scoop out 1-2 tablespoons of dough for each cookie.

  7. Bake the cookies for 8-10 minutes. The cookies are done when the edges are set - the center will still look soft. Do not overbake! Once taken out of the oven, sprinkle with flaky sea salt and allow the cookies to sit on the pan for about 5 minutes before transferring to a cooling rack.

ROASTED STRAWBERRY + VANILLA ICE CREAM

IMG_6279.jpg

With about a month left before summer is officially over, I am scrambling to make as many dishes utilizing what the season has to offer. Even though I'm much more of an autumn and winter fan, summer produce yields my favorite fruits to eat: watermelon, stone fruit, and berries. Although living in California allows me to eat some of these fruits year round, nothing compares to when these fruits are at their peak of ripeness.

The recipe I am giving you today was not what I had planned exactly. I was testing a roasted bourbon-peach sherbet and after a few trials, I ended up axing the recipe altogether. Alex gave his seal of approval, but from the process to the finished product, I came across a bunch of problems and in the end, I couldn't stand behind the recipe nor could I share it with you. Maybe I'll try it again next summer when I haven't reached my limit of purchasing peaches yet.

With that said, I want to be clear that today's ice cream recipe is no consolation prize, and in fact, I'm looking at the peach sherbet failure as a blessing in disguise. I realized that I hadn't shared my go-to vanilla ice cream recipe yet and instead of just giving you the recipe for that straight-up, I wanted to add something to it highlighting a summer ingredient. Enter: roasted strawberries.

Let me preface this by saying that growing up I never EVER cared for ice creams that didn't have some kind of chocolate element to them. Chocolate chip cookie dough, mint chocolate chip, cookies 'n cream... these were all my favorites. Flavors like pistachio, strawberry, cherry, or butter pecan, were all a no-go for me. Fortunately, I've outgrown my narrow-mindedness in the ice cream department, and can earnestly say that this roasted strawberry and vanilla ice cream is in my top 5 favorite flavors. Roasting the strawberries in honey and a bit of balsamic vinegar gives it such a unique flavor that isn't overpowering to the vanilla, and leaves you with a complete fresh taste. It's truly incredible.

I divided up the recipe so that if you 0nly want to make the vanilla ice cream, and trust me, you'll want to, the directions and ingredients are there for you. I've made this vanilla ice cream countless times and it's so creamy and refreshing that I will probably never bother trying to find another recipe. As for the roasted strawberries, there's one tip that I want to give: the larger you leave the roasted strawberries when cutting them before adding to the ice cream base, the bigger chance of them becoming icy when in placed in the freezer. As you can see in the pictures, I chose to leave the strawberries larger because I think it looks beautiful, and I personally wasn't phased by the texture of the berries. If you think that will bother you, simply puree the berries in a blender. 

Roasted Strawberry and Vanilla Ice Cream

Makes about 1 quart

Ingredients for Roasted Strawberries

  • 1 pound fresh strawberries, hulled and cut in half or quarters depending on size

  • 3 tbsp. honey

  • 1 tsp. balsamic vinegar

Ingredients for Vanilla Ice Cream (adapted from David Lebovitz)

  • 1 cup whole milk

  • 2 cups heavy cream, divided

  • 3/4 cup sugar

  • Pinch of salt

  • 6 large egg yolks

  • 2 tsp. vanilla extract

Additional Ingredient

  • 1 tsp. fresh lemon juice


Directions

Make the strawberries: 

  1. Preheat the oven to 350°F and line a baking sheet with parchment paper.

  2. In a medium size bowl, mix the strawberries, honey, and balsamic vinegar and transfer to the baking sheet, making sure to scrape out everything from the bowl.

  3. Bake in the oven for about 35-40 minutes, stirring the strawberries once halfway through. The berries will appear well-cooked, a bit browned, and the juices will be bubbling.

  4. Allow the berries to cool for about 15 minutes on the baking sheet. Using a knife or kitchen scissors, roughly cut up the berries so there will be bigger chunks in the ice cream. You can also use a muddler if you want a more less chunky mixture. Transfer to a bowl, making sure to get all the juices from the parchment paper and chill completely until ready for the ice cream.

Make the vanilla ice cream / strawberry vanilla ice cream

  1. In a large bowl, add 1 cup of the heavy cream and set a strainer over the top (use a bowl that will be able to fit over an ice bath for later).

  2. Warm the milk, 1 cup of heavy cream, sugar, and salt in a saucepan over medium-low heat. In a medium bowl, whisk the egg yolks together. Just as the milk mixture is beginning to simmer, gradually add some of it to the bowl of egg yolks, whisking constantly as to not scramble the eggs (this is called tempering). Once the egg yolk mixture temperature has raised, pour the mixture back into the saucepan. Stir constantly over medium-low heat until the mixture thickens and coats the back of your spatula or spoon.

  3. Pour the custard mixture over the strainer-lined bowl. Stir the custard in with the heavy cream that is already in the bowl and add in the vanilla extract. Let the ice cream base sit over an ice bath for about an hour before moving to the refrigerator. Chill for at least 4 hours, or overnight.

  4. When ready to churn, mix the roasted strawberry mixture with the custard ice cream base. Add the lemon juice. Churn the ice cream in your maker according to the manufacturer's instructions.

  5. Transfer the finished ice cream to an airtight container and freeze until solid. Enjoy!